Shopify collections are one of the major components to add to your store to bring more clarity to your customers. It doesn’t take long to arrange it, but the results help you improve your customer’s experience.
In this article, you will learn more about the benefits of Shopify collections, their types, and how to add collections to your Shopify store or manage them. Without further ado, let’s dig in deeper.
What is a collection on Shopify?
Shopify collections are product category pages. Collections allow you to group your online store's products by type and other characteristics. And organizing products in a Shopify store helps your customers find their desired products much faster.
Depending on how much control you want over Shopify product categories over time, you can choose a smart or manual collection.
However, keep in mind that Shopify collections aren’t the same as Shopify product catalogs. While the latter shows all the merchandise you have in your store, Shopify collections carry only related products you have grouped.
Boost your Shopify page speed and SEO performance
Try TinyIMG freeWhy do you need product collections?
It’s clear that using Shopify collections to group your products brings structure to your online store. But why is it needed, and what comes out of it?
First of all, product collections help you enhance your customers’ experience. Most of the time, customers aren’t up for wandering around online stores, as they seek to find their targeted products quickly. Adding Shopify collections to your store allows visitors to find what they need quickly without frustration.
Collections can also be one of the effective methods to drive more targeted SEO traffic. Our study on 100 Best Shopify stores showed that well-optimized product collection pages could receive more than 40% of the total organic traffic.
Smart vs manual Shopify collections
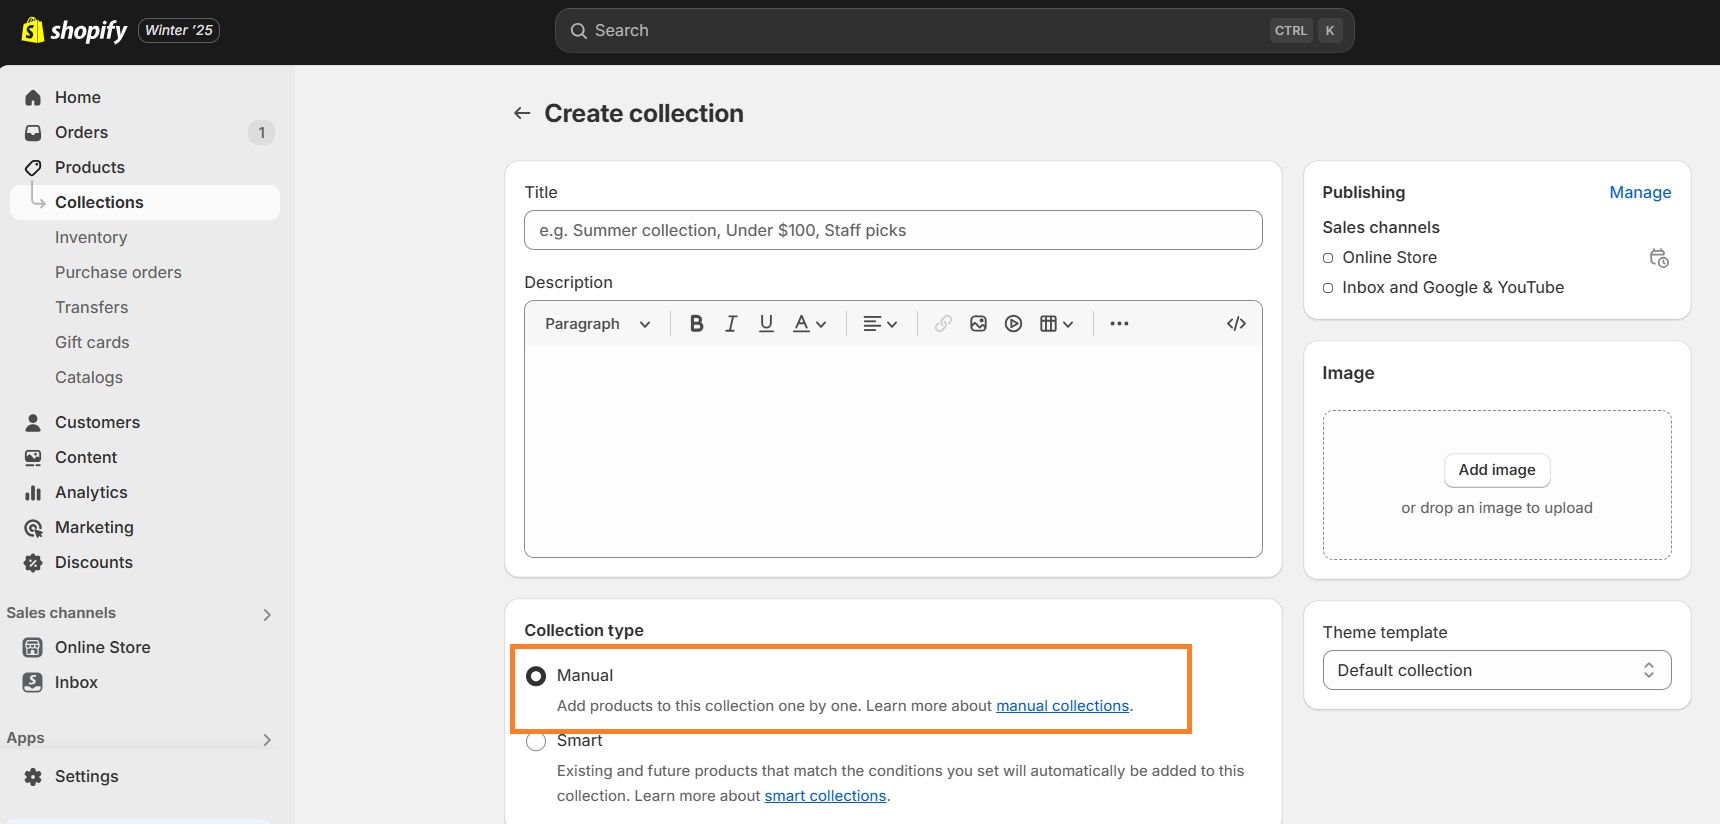
You can choose between two Shopify collection types: smart and manual. While manual collections give you more control over what you want to add in the long run, smart ones save you time. Let’s find out more about each type in the coming sections.
Smart collections
Smart Shopify collections are based on pre-selected conditions, and they systematically include analog products. They’re the way to go if you have large quantities of products that need to be organized.
This way, you can save loads of time, as you don’t need to choose each item individually. Plus, it ensures you don’t overlook newly uploaded merchandise that should go to the collection.
You can create up to 5000 different smart collections. You can set them to include products that meet all conditions or any of them so that exclusive merchandise can be added as well. Note that you can add up to 60 conditions to the collection.
The only downside is that you can’t remove selected products from the collection unless you change the conditions of the collection or the characteristics of a product.
Manual collections
Manual Shopify collections include only the products you select. It gives you more control over individual items. It’s also helpful if you don’t want to plan ahead of what products should belong to different collections.
You can set a specific publish date for the collection to be visible in your online store. The method is perfect for flash sales as well as for small businesses.
However, note that the collection type can’t be changed after the collection is created.
How to create collections on Shopify?
You can create both types of collections – smart and manual – in the Shopify Collections section. Let’s go through the detailed steps on how to add each of them:
Creating manual Shopify collections
Creating a manual Shopify collection takes just a few steps. Here’s how to do it and what to include:
1. Open your Shopify admin.
2. Go to Products > Collections and click Create collection in the top right corner.
3. Write down a keyword-optimized Title and Description for your collection.
4. In the Collection type section, select Manual.
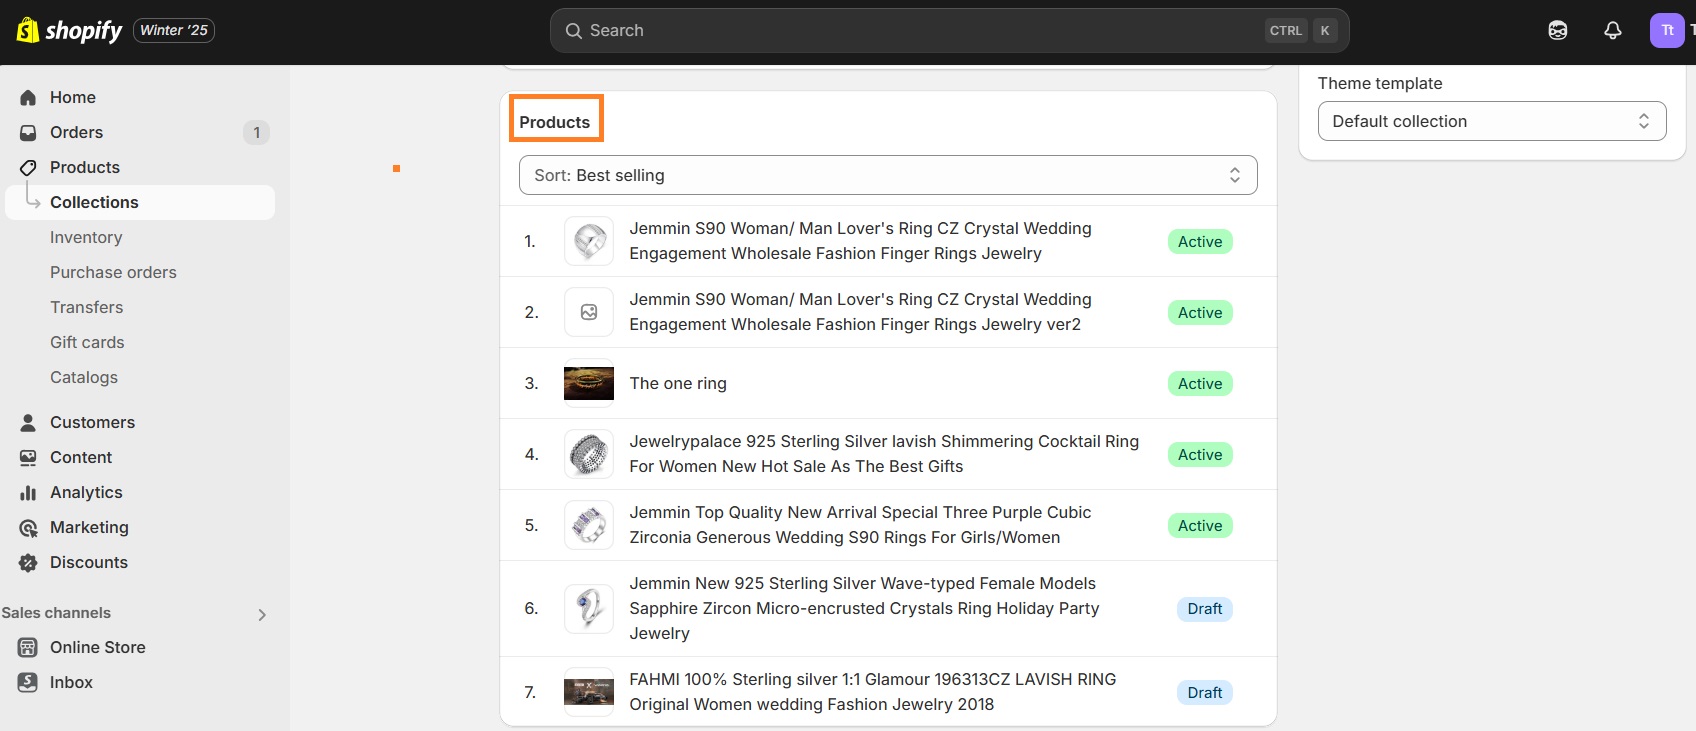
5. To add a product, scroll to the “Products” section and click “Browse.”
5. Add a tasteful image to your collection and pick the Theme template.
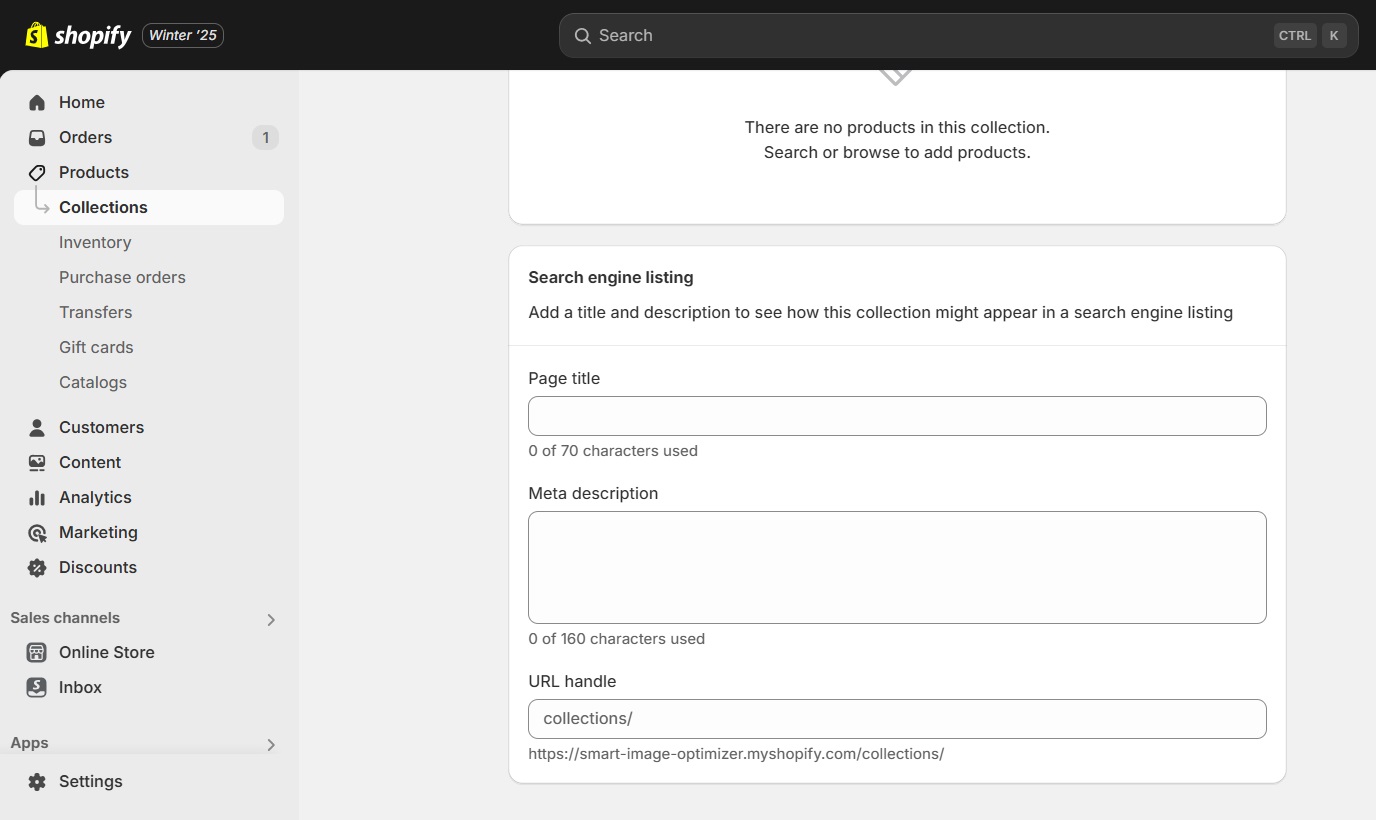
6. Scroll down to the Search engine listing section and tap Edit.
7. Add a meta description and meta title for your Shopify collection as well as the URL handle. You can learn more about best metadata practices in our meta titles and meta descriptions guide.
9. Click Save.
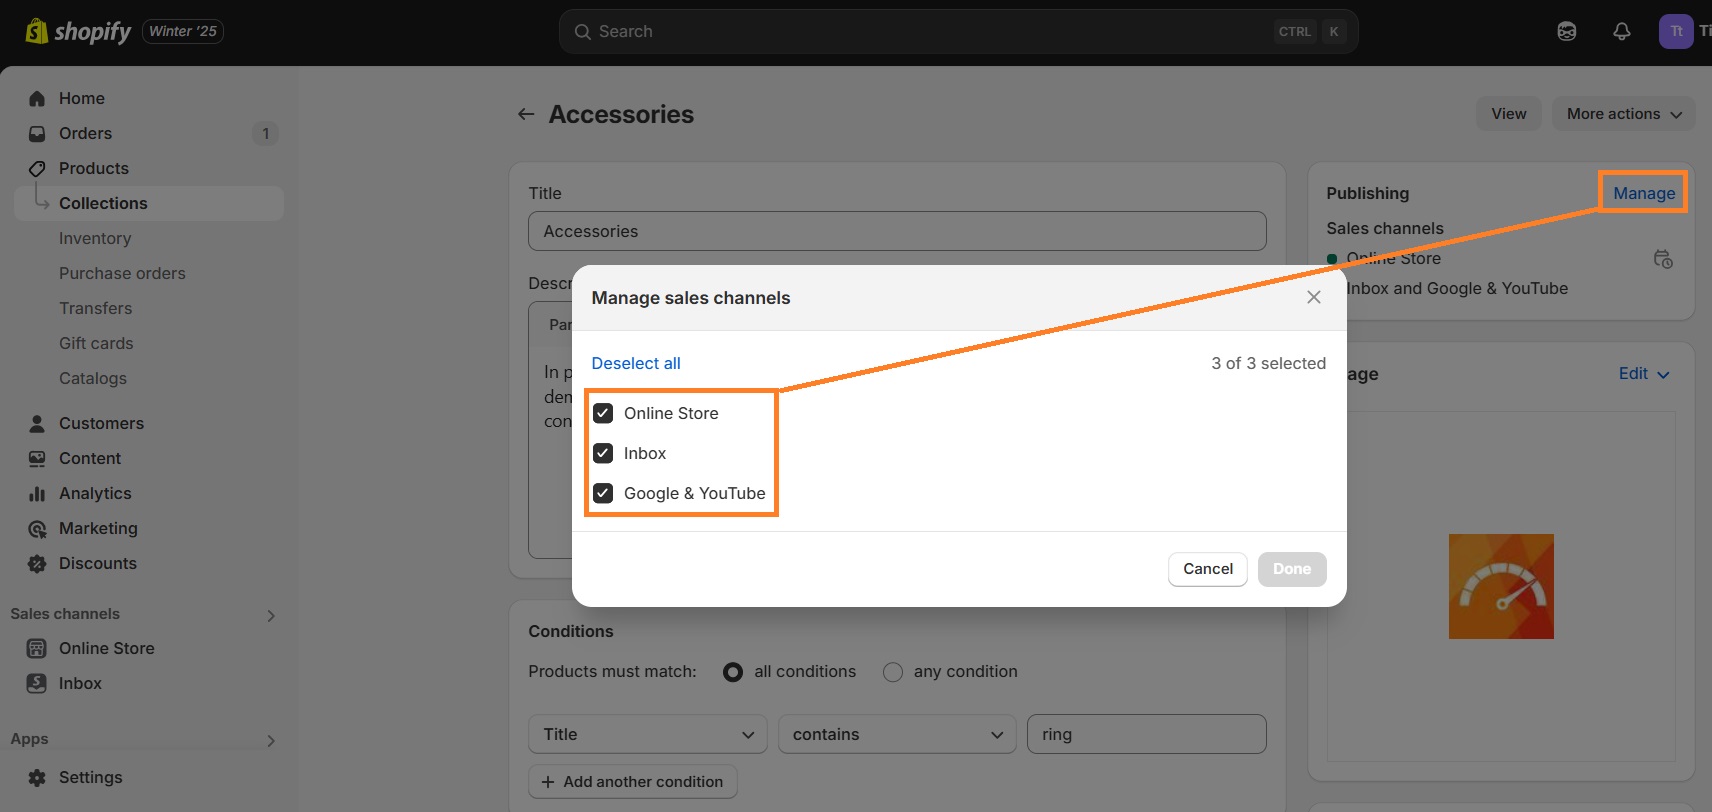
Under the Publishing section, you may also choose the sales channels or pick a specific time and date when you want the collection to become visible.
Suggested reading
Creating smart Shopify collections
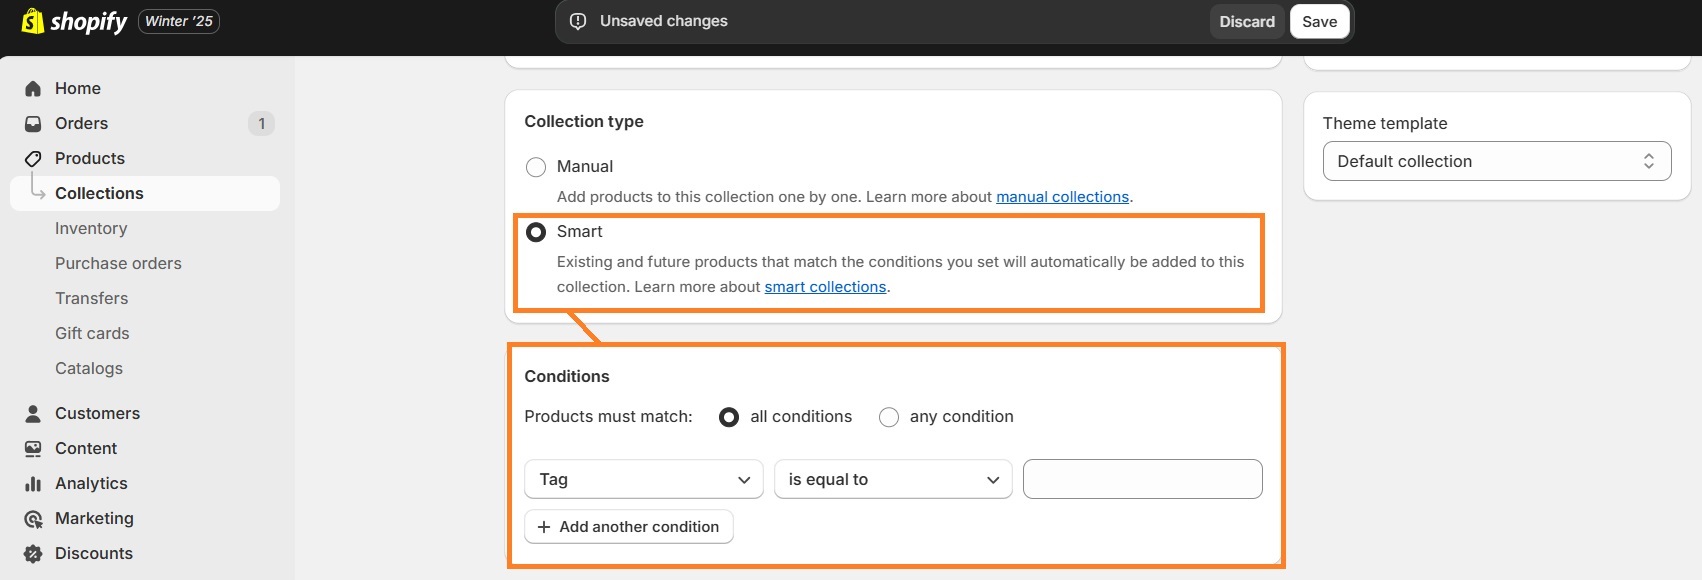
Creating a smart Shopify collection includes adding conditions (up to 60) that will define what products should be added to a collection and in what order.
Let’s take a look at how a smart Shopify collection is created:
1. Go to Shopify admin and head to Products > Collections > Create collection.
3. Create the title and description for your smart collection.
4. In the Collection type section, choose Smart.
5. Use the drop-down menus to add collection conditions.
6. Click Save.
You will see all the products that match the collection’s conditions in the Products section that is displayed. Continue with adding the collection image, meta title, meta description, URL, as well as other necessary details.
Note that each time you add a new product to your Shopify store matching a particular collection’s conditions, the product will be added to that specific collection automatically. Plus, keep in mind that smart collections can’t be changed into manual collections.
How to show collections in a Shopify store?
Once you’ve created the collections, you should make them visible online by adding them to the navigation, homepage, or collection page. Read on to find out how to do it.
Add collection links to navigation
Adding your collection link to your Shopify store menus ensures it’s easy for visitors to locate. Follow these steps to include it anywhere you like:
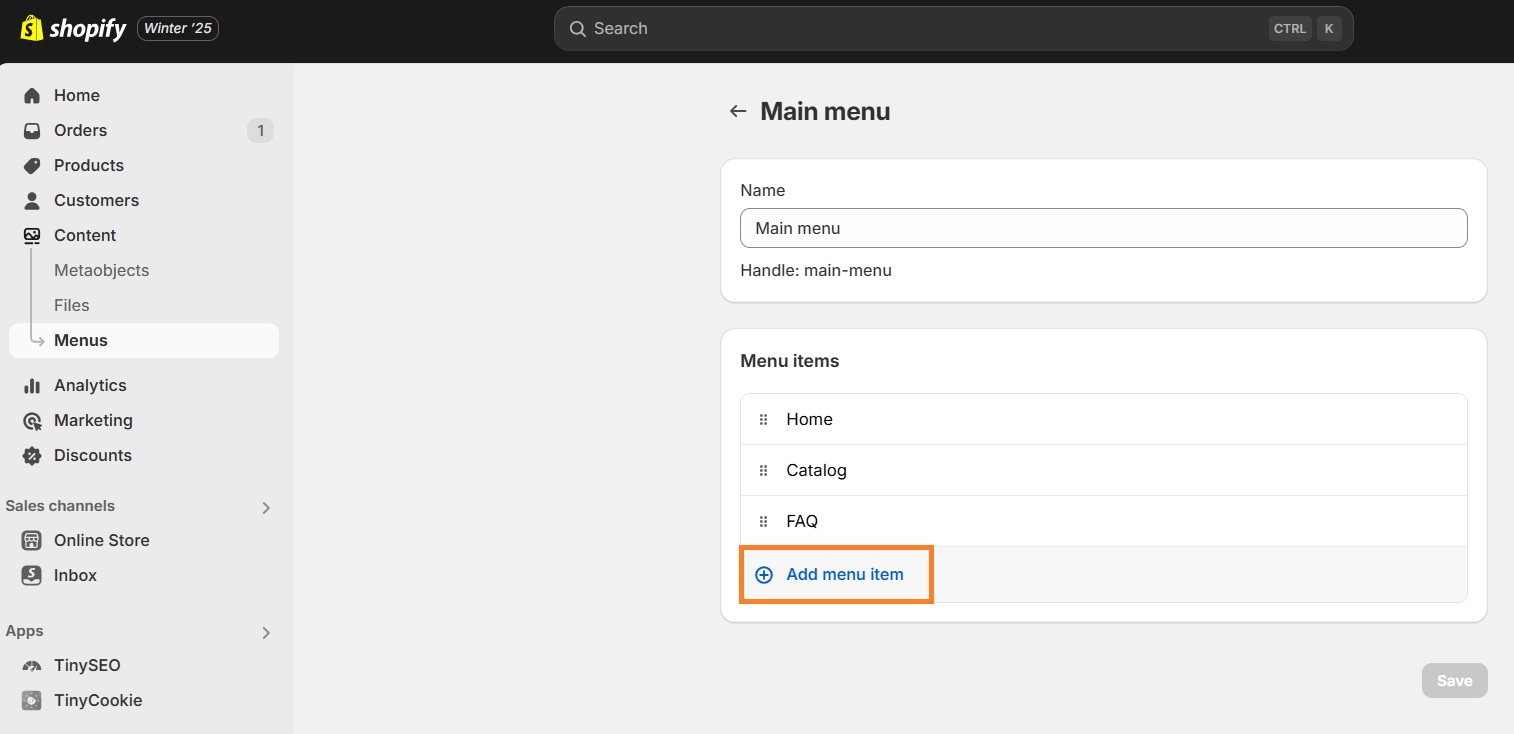
1. From your Shopify admin, go to Content > Menus.
2. Click on the menu that you want to add the collection link to.
3. Click “Add menu item.”
4. Create the Label, which will be visible to your customers, and insert the Link.
5. Tap Save.
Keep in mind that you can also create a drop-down menu in the Shopify store navigation linking to your collection.
Add collection to the store's home page
Adding a collection to your Shopify store’s home page is a great way to make your shop easier to navigate for the customer. Burning to find out how to do that? Find out right below:
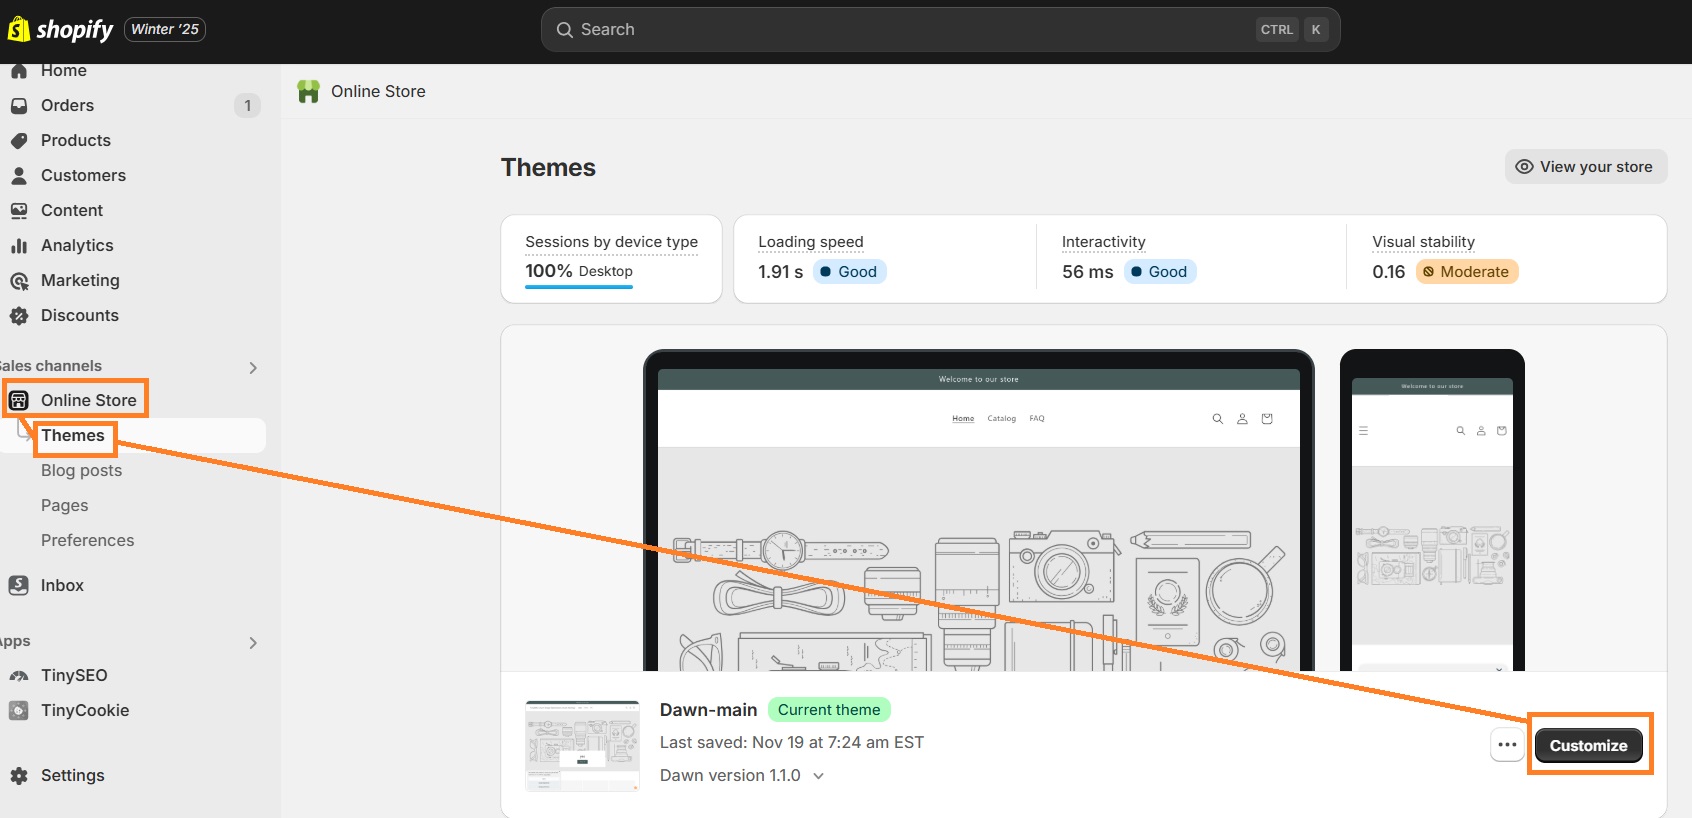
1. Head to Online store > Themes.
2. Click Customize by your theme.
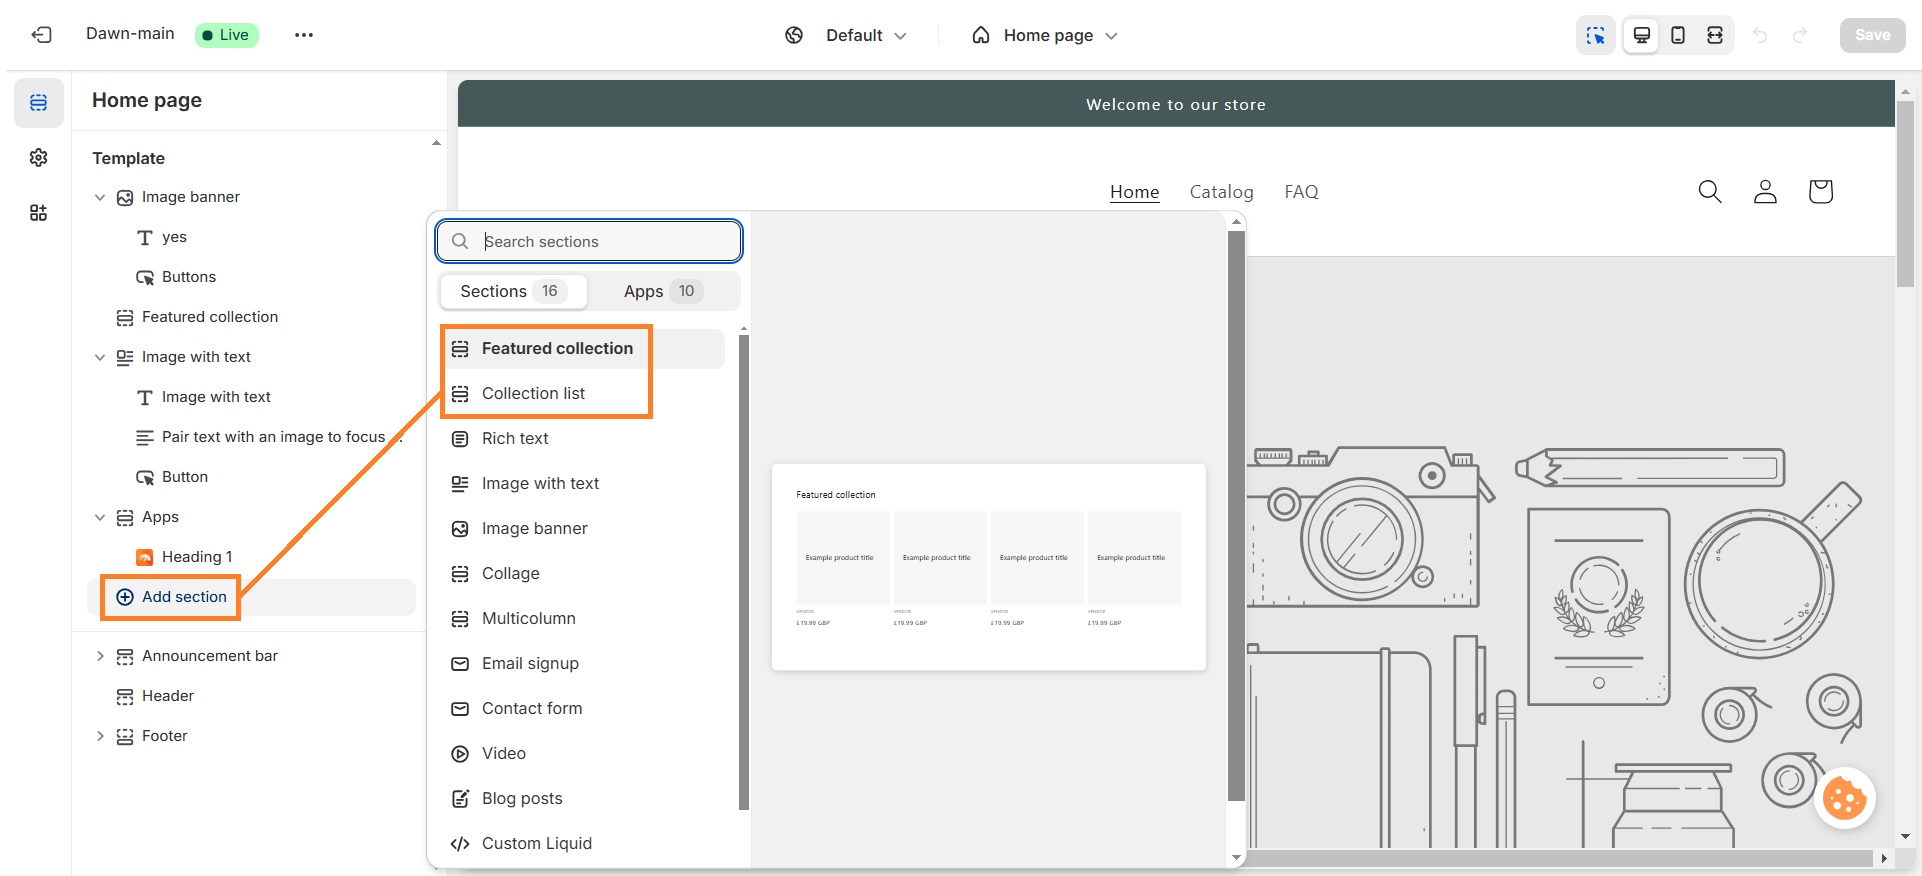
3. Click the Add section button on the left sidebar, and then choose whether you want to add a Featured collection or a Collection list.
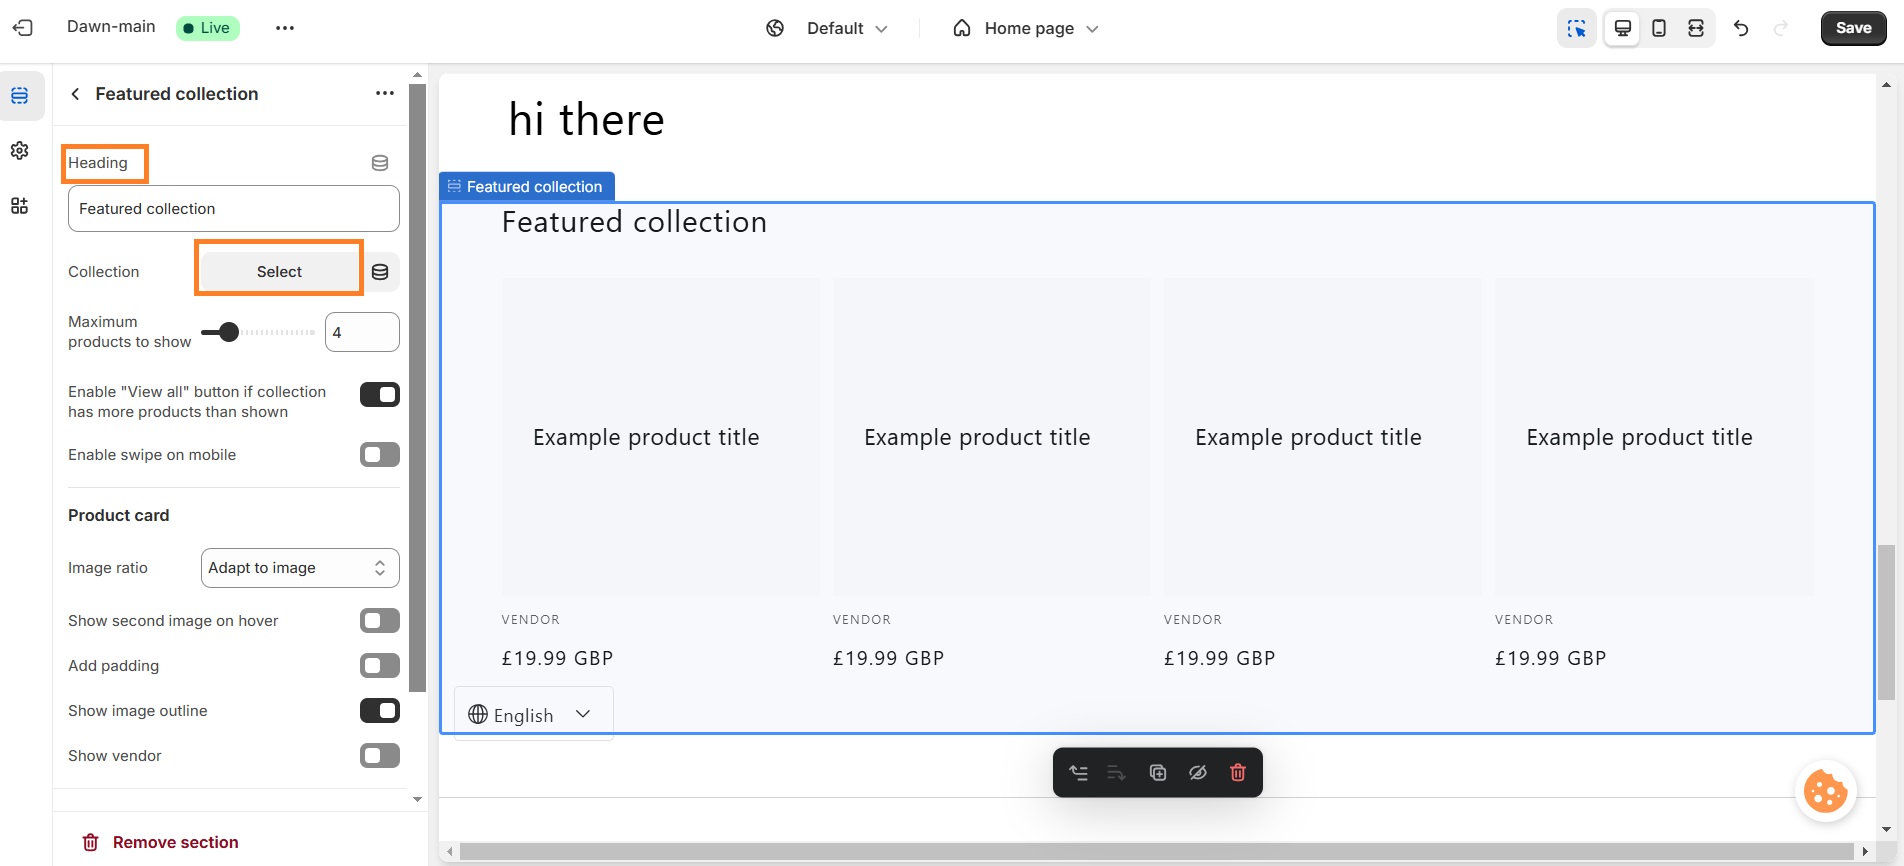
4. For the Featured collection, name your collection under the “Heading” section. Click Select to add a specific collection.
5. You can do the same for the Collection list, except you should click on the collection on the page and click Select.
6. Click Save.
Note that you can edit an existing section by tapping it on the left sidebar. If you want to move the collection section on your site, you can drag the section in the left side menu.
Add sub-collections to a collection page
Adding sub-collections to a collection page helps you manage your stocks better, as you don’t have loose ends of numerous products hanging around the store. And your customer will be satisfied by the ease of navigation in your Shopify store. Read our guide on how to add sub-collections on Shopify for detailed instructions.
Managing Shopify collections
Naturally, you’ll need to manage collections after creating them, whether to update products or change information, availability, or the publish date. Let’s review how to do all of it.
Edit collection information
To learn how to edit collection products, title and description, change images, or other information, follow the steps below:
1. Navigate to Shopify admin and head to Products > Collections.
2. Click on the collection you want to edit.
3. When the selected collection’s editor opens, choose what details you want to edit.
4. You can edit the SEO settings of a collection, such as the URL handle or metadata in the Search engine listing section.
5. To edit a particular product, scroll down to “Products” and click on it. Here, you can edit the title, description, variants, and other details.
6. To edit the SEO settings of a collection, such as meta title or meta description, head back to the collections main editor page, find the Search engine listing section, and tap Edit.
7. When you complete all the edits, tap Save.
Keep in mind that if you wish to change the URL of a collection, the first thing you should do is check the URL’s ranking so that you don’t harm conversion rates. And, if you’re still changing the URL, ensure you add Shopify redirects for your customers.
Change collection availability
Changing collection availability comes in handy when you have seasonal collections and you want to set the collection available for a particular time of the year. It’s also useful if some of the products don’t fit the qualification requirements for the specific sales channel. Or perhaps you want to sell a particular item on a chosen sales channel – then knowing how to change collection availability is crucial too.
Anyhow, here’s how you do it:
- From your Shopify admin, head to Products and then Collections.
- Click on the collection you want.
- Under the Publishing section, click Manage.
- Select sales channels where you want your collection to be available.
- Click Done and Save.
Keep in mind that changing the collection’s availability doesn’t apply to individual products within the collection.
Change collection publish date
Setting the Shopify store’s collection publishing date is possible, too. And it’s as easy as said. Here’s how:
- From your Shopify admin, navigate to Products and then Collections.
- Select a collection.
- In the Publishing section, find the calendar icon next to the Online store.
- Choose the date and time you want a collection to be published.
- Click Save.
Best Shopify collection practices
Before you make your collections visible in your store, there are some chores you can do to save heaps of time and potentially ensure higher revenue. Here’s what we suggest you do:
Optimize collections for SEO
Shopify collections are great for helping search engines understand your store’s structure better. But for that to happen, you need to optimize the collection’s information and your whole Shopify site for SEO.
Start by creating a logical site structure so that your website is easier to navigate. Then, optimize your title and description with relevant keywords. You should also ensure the URL handle of your collection is named accordingly.
If you have relevant blog posts, you can add internal links to them on your collection pages and vice versa. Alternatively, if you’re not running a blog, you can use a Shopify FAQ app to provide more information about your products on collection pages.
You can learn more about search engine optimization in our ultimate Shopify SEO guide.
Use powerful visuals
Images play an important role in boosting your revenue and the customer satisfaction level. You need to choose the correct image sizes to maintain a great Shopify store speed result and avoid hindering the user experience. According to Shopify image size recommendations, collection images should be 800 x 800 px on desktop or 240 x 240 px on mobile.
Empower customer reviews
Trust is one of the main aspects that encourage your customers to buy the product. Hence, adding reviews is another key to success. Of course, the comment section isn’t the only element you can add. You can also use Shopify apps for product labels and badges that add icons to your item for social proof.
Other practices for successful Shopify collections
As it’s known, there are no limits to improving. The same rule applies to Shopify collections. Here are some other tips and tricks for managing your Shopify collections:
- Make use of seasonal collections
- Add Shopify collection filters
- Use a logical collection list structure
- Add a Collection schema markup
- Use the featured collection element
Summary
Putting it all together, Shopify collections are one of the key aspects of your online store’s success. With them, not only does your shop become easy to navigate for a visitor, but you can also increase targeted SEO traffic and conversion rates.
However, for collections to be effective, ensure you polish all the details first. For instance, make your collections easy to find, add intriguing descriptions as well as visuals, and don’t forget customers’ reviews too!

Frequently asked questions
The Shopify collection includes multiple products grouped based on their similarities, and collections can also help your customers find their desired items easier. Whereas product types help the merchants categorize their products. Plus, an item can only fit one product type.
A Shopify featured collection includes your top product selection to demonstrate it on important sections, like the homepage. It can be used to highlight your best-selling, discounted, or new arrival products.
Shopify doesn’t have a functionality that allows you to duplicate your collection. However, you can create a new collection and add the same products or product conditions manually.


