While Shopify’s main focus is ecommerce stores, blogging can bring a lot of value to your website in the form of organic traffic. If optimized correctly, the blog can be another stream of revenue for your Shopify store.
It’s easier to build a brand when you engage with your customers – and a blog is a great way to do it. There are a couple of ways to add a blog to your Shopify store, and we’re here to guide you through the process.
Use the default News blog
Shopify’s blogs are called News by default. All Shopify stores have a news category dedicated to sharing updates about your products or writing supporting content in order to drive organic traffic, share on social media, and bring engagement.
This is where you can find and manage your blog:
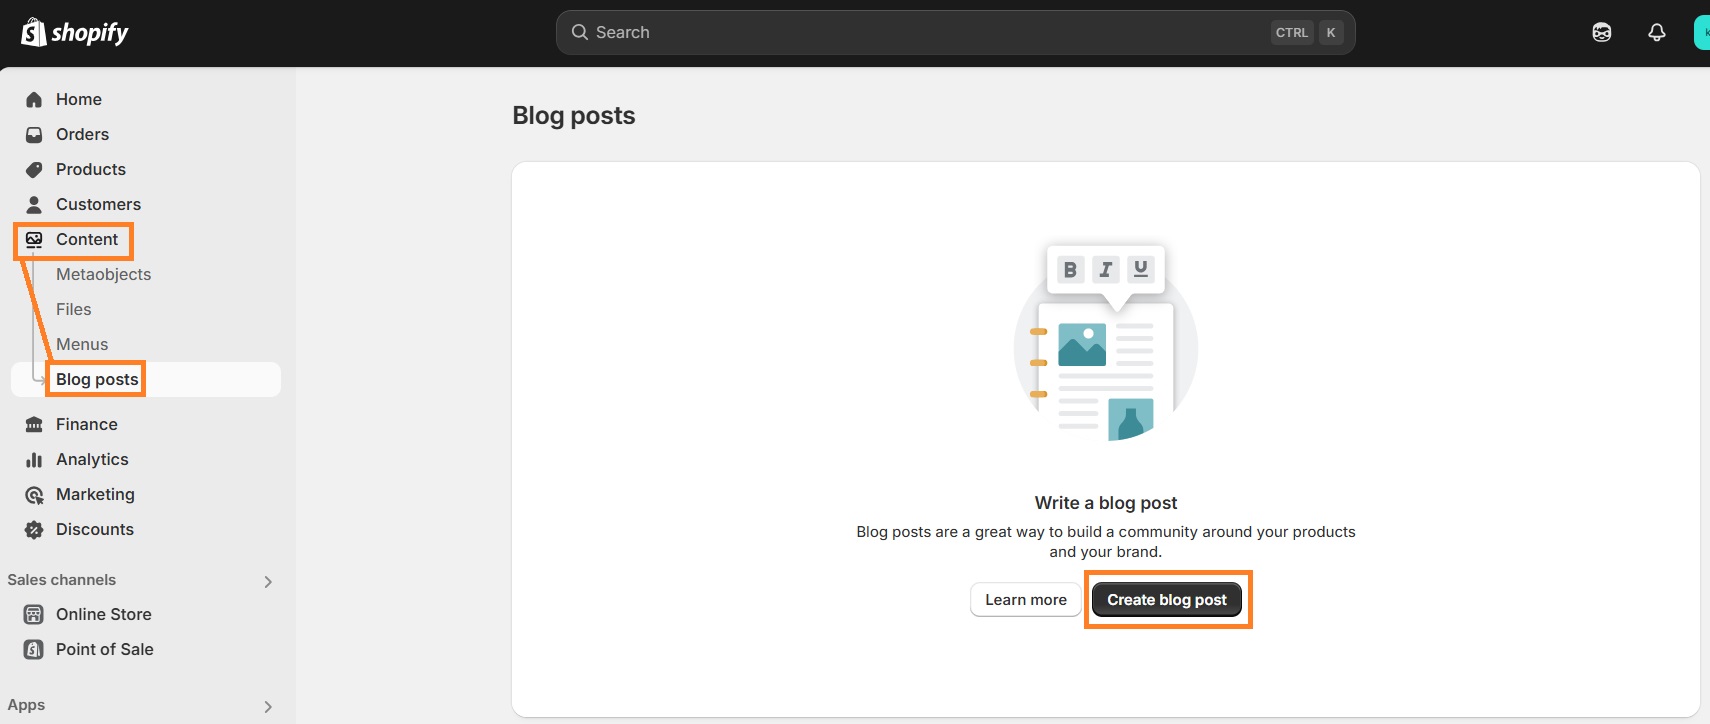
- Log in to your Shopify admin
- Click Content
- Click Blog posts
- In the top right, click on Manage blogs
Here’s your blog! You can rename it by simply clicking on it and changing the title.
If you’re just starting out and use one of Shopify’s free themes, you do need to make sure blogging is “enabled” on your store. To do this, navigate to Online Store, click Themes, then click Customize next to the Shopify theme you’re currently using. On the left, you’ll see your current store’s structure.
Click Add section to where you want your blog to appear. We suggest putting the blog below main store elements, for example, below the Featured collection. Scroll down to Blog posts and click on it. Finally, click Save in the upper right corner, and you’re all set!
How to create your first blog post
Here’s how to create a blog post:
1. In your Shopify admin panel, click Content
2. Press Blog posts
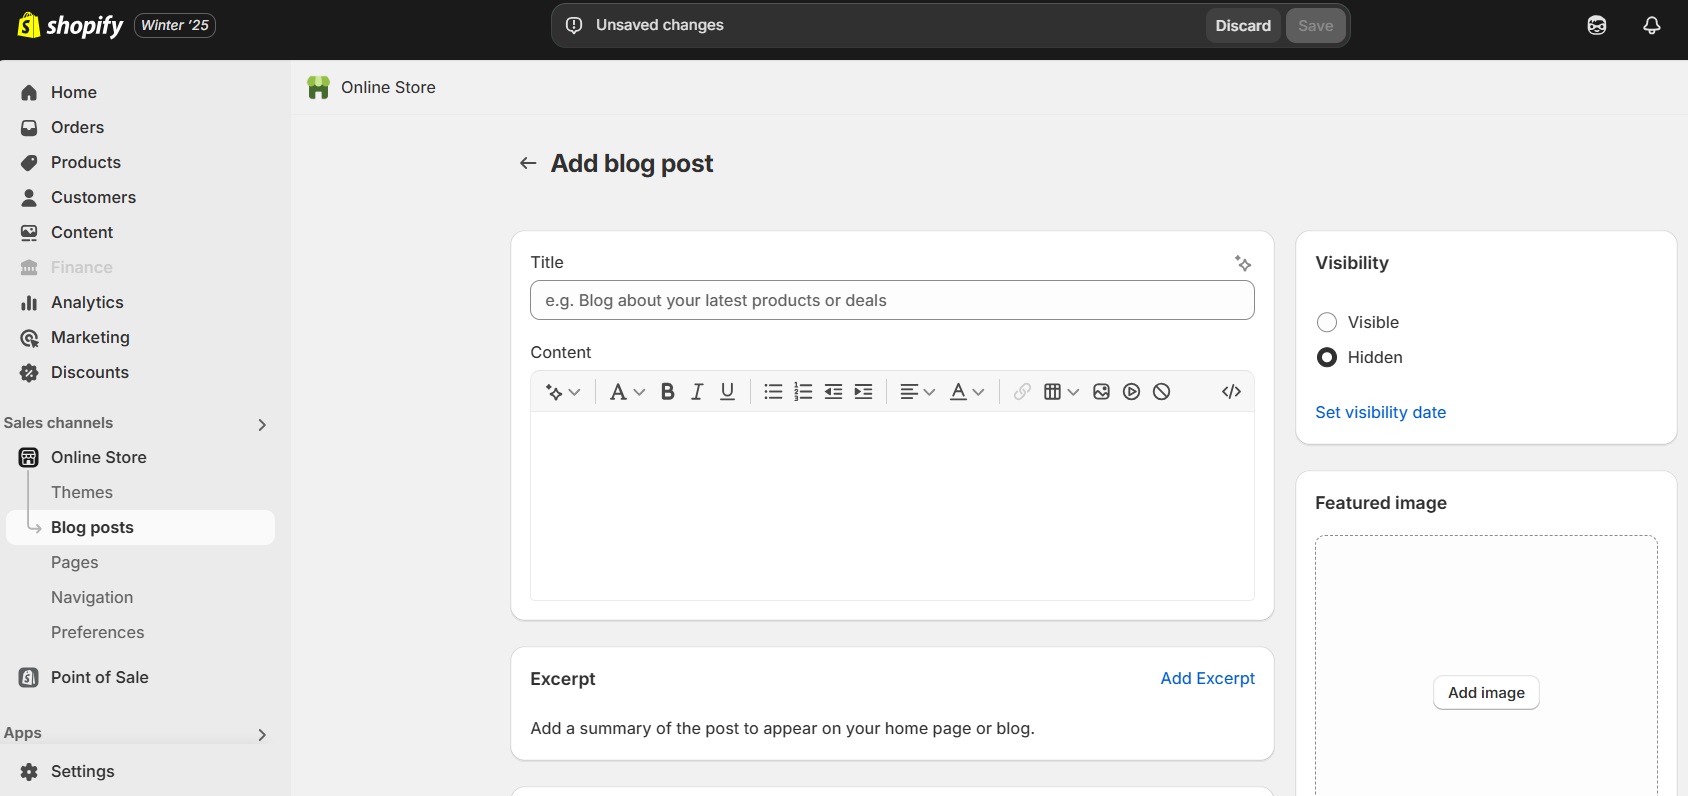
3. Click Create blog post
4. Write your blog post, choose visibility or add a visibility date, add an excerpt which will appear as a summary of your blog post in the home page and the blog, edit blog post SEO, add a featured image, add tags, choose an author and the blog you want this blog post to appear in.
5. Click Save
Now, your blog post will be visible on your blog.
Add a custom blog to your store
You can customize a default blog but if you want to add a new blog to your store (you can also have multiple blogs), it’s as easy as one, two, three.
Here’s how to create a custom blog:
- Log in to your Shopify Admin
- Click on Content
- Click Blog posts
- In the top right corner, click Manage blogs
- Again, in the top right corner, click Add blog
- Give your blog a name, choose whether you want to enable of disable comments, edit SEO information, and click Save
Now you have a second blog!
If your blog is not visible in your store’s navigation menu, follow these steps:
- Click on Content in your Shopify admin dashboard
- Click Menus
- In the section Menus, click on the active link named Main menu
- Click Add menu item
- Click on Search or paste a link
- In the drop down menu, click Blogs
- You’ll see two blogs: the default one called News, and the one you just created
- Click on whichever you want to appear in the main navigation menu
- In the bottom right corner, click Add
- Again, in the bottom right corner, click Save menu
Here you go. You can add both blogs to the navigation menu, as well as rearrange their order.
Can you categorize blog posts on Shopify?
Shopify doesn’t offer an easy way to navigate a blog but there are some workarounds. In this section, we’ll explore some ways of categorizing your blog posts on Shopify.
Creating multiple blogs
Creating multiple blogs is an easy way to categorize your blog posts – as we’ve touched on in the previous sections. This method of categorization could be used when you want to separate product news content from the supporting, informational content.
Drawbacks:
- Creating more than two blogs could look clunky on your website, especially if you want them to appear in the navigational menu. It could also be confusing for store visitors.
- You can’t add a blog post to multiple blogs without duplicate URLs which will hurt your SEO.
Using tags
Tagging is nothing new – it’s a classic way to categorize your blog posts. Simply add tags when you write a blog post. You can filter all your blog posts by tags by going to Content > Blog posts, and clicking Tagged with in the filtering menu.

Drawback: Tagging system is useful to you as a merchant but isn’t visible or useful to the store visitors.
Installing a Shopify app
There are Shopify apps dedicated to help your visitors navigate blogs easier. It’s a great choice for those who have blogs with a lot of entries and different categories. One example could be Blog Article Filter Search PRO app which combines blog post dropdown tag filter, blog search and featured articles.

Drawback: Most of the Shopify apps have monthly subscription payments.
How to grow sales with your Shopify blog
If done right and with consistency, blogging could help you not only grow organic traffic but also sales. Here are some tips on how to achieve it.
Create search-optimized blog posts
While creating content could be a great way to drive traffic and sales, writing without research will probably not garner the results you want.
In order to create search-optimized blog posts, you have to know what people are searching for in your niche. There are tons of SEO tools available that will help you with topic and keyword research. However, search engine optimization doesn’t end with optimized content, so we highly suggest optimizing your entire store – from lazy loading and speed, to redirects and meta tags.
TinyIMG app is a great all-in-one solution that will help you optimize your store (including blog) even if you don’t know anything about SEO.
Use images
Images are good for user experience and visual content engagement. Even a couple of images in your blog could act as a text separator, making it easier for readers to engage with content.
You can also optimize Shopify blog post images with alt texts for better accessibility and search engine rankings. Just like your blog post can be discovered through a search engine like Google, so do your images – through Google image search.
Add links to your products
You can use your blog as a supporting content for the products you’re selling. You can add links to your products straight from your blog posts, which could potentially increase sales.
Promote your blog
If you already have a social media presence, use it to promote your blog posts. Banking on SEO to drive traffic is a good choice, but diversifying traffic channels is a better strategy.
Suggested reading
- Check out some of the most successful Shopify blogs and what strategies they use
More Shopify blogging tips
We’ve already covered quite a lot regarding blogs on Shopify. Here are some additional blogging tips for you to consider that might answer some important questions:
- Blog templates. If you’re wondering if Shopify has blog templates, the answer is kind of. Blog templates come together with Shopify theme templates. Depending on developers and designers working on a certain Shopify theme, you can get a blog template with a varying amount of features and customization options.
- Blog analytics. Currently, there’s no native way to see blog analytics on Shopify but you can work around that by going to Analytics > Reports in your Shopify admin panel, click on Sessions by landing page, and filter the report to display blog articles. However, using Google Analytics is probably the most convenient way to track your blog’s performance.
- Blog URLs. When you create your Shopify store, your blog’s URL will automatically be yourstore.com/blogs/news. Sadly, as of right now, you only can change the last part of the URL, since it displays your blog’s name. We suggest not changing the name if your blog is already gaining traffic since it will hurt your SEO. However, if you really need to change it, you should know about best Shopify redirects practices.
Is blogging on Shopify worth it?
As you can see from the article, Shopify doesn’t give a lot of attention to blogs: from the lack of convenient categorization to rather clunky URL structure that you don’t have a lot of control over.
However, if your primary goal is to sell products – and we assume it is since you’re on Shopify – then the amount of features and customization that Shopify offers is quite enough. You can still successfully optimize your blog for search engines, gain exposure and new visitors.
Generally, blogging on Shopify is worth it, even with a few shortcomings.
Curious to read more? Check out these articles:
- More strategies to increase your Shopify store traffic
- How to create a strong About us page for your Shopify business
- Shopify SEO guide: detailed tips on Shopify store optimization


Frequently asked questions
Yes, you can have a blog on Shopify. In fact, you can have multiple blogs if you wish. When you create a Shopify store, a blog is created for you automatically.
Here’s how to add a blog to Shopify:
- Go to you Shopify Admin panel
- Select Content
- Click Blog posts
- In the top right corner, select Manage blogs
- Click Add blog
Fill in all the information, and click Save
Shopify doesn’t have a native way of categorizing your blog but you can work around it by having multiple blogs, using tags, or installing a Shopify app.
A blog is a place where all your news and supporting content is located. Meanwhile, pages are where your products, collections, or privacy policy are located.
Generally, all of Shopify is SEO friendly due to its clean code, structure, and features. Besides, there are a lot of Shopify apps available that can help you with better optimizing your blog.


