Setting up a Shopify store can seem challenging if you’ve never tried website building before. However, Shopify was made for beginners and by beginners. It has evolved into a comprehensive eCommerce website-building platform that has contributed to over $1.1 trillion in sales already.
Large brands like Gymshark or Crocs have already built their empires on Shopify. If you’re ready to learn how to set up a Shopify store of your own, this guide will help you prepare step by step.
1. Create your Shopify account
The first step when setting up your Shopify store is to create a Shopify account. You can get the free Shopify trial for 3 days plus 3 months for just $1/month – no credit card required. Here’s how to do it:
Go to the Shopify free trial page and sign up.
Once you answer a few questions about your business, pick a Shopify plan or skip to do it later. The Basic plan ($29/month) is the most popular option for those just starting out. It allows creating a full-fledged eCommerce store with unlimited products.

2. Create a custom domain
By default, Shopify assigns a URL to every newly set up Shopify store. It looks something like this:
yourstorename.myshopify.com
However, it doesn’t look professional, so it’s better to get a custom domain name. You can purchase a domain through the Shopify domain registrar or third-party registrars.
3. Get to know your Shopify Dashboard
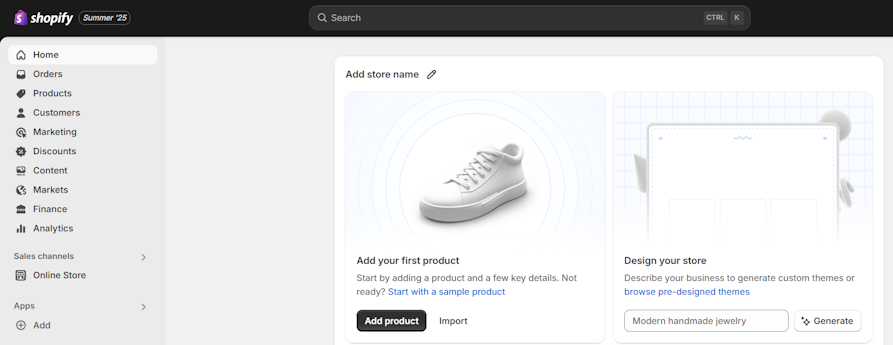
Before starting to set up your store, you have to understand how Shopify works. On the admin panel, you’ll find multiple sections that you’ll have to navigate all the time.
So, let’s review each section:
- Home – main store statistics (e.g. live visitors), setup guide tasks.
- Orders – a section with all of your store’s orders that allows managing order fulfillment and cancellations.
- Products – create and manage your products and inventory. You can add images, product descriptions, and more.
- Customers – a section with a list of registered customers in your store.
- Marketing – insights into marketing channel performance. You also get to view your past campaign performance and set up marketing automations.
- Discounts – create and manage different types of discounts with rules (like free shipping).
- Content – access your Shopify store files, create menus, and create or manage blog posts.
- Markets – manage different markets in your store, including international.
- Finance – access and manage integrated financial tools, such as Shopify Bill Pay for simplified bill payments.
- Analytics – get insightful reports on sales, returning customers, conversion rates, average order value, and much more.
- Online store – a section for managing your Shopify theme and customizing your website.
4. Choose your Shopify theme
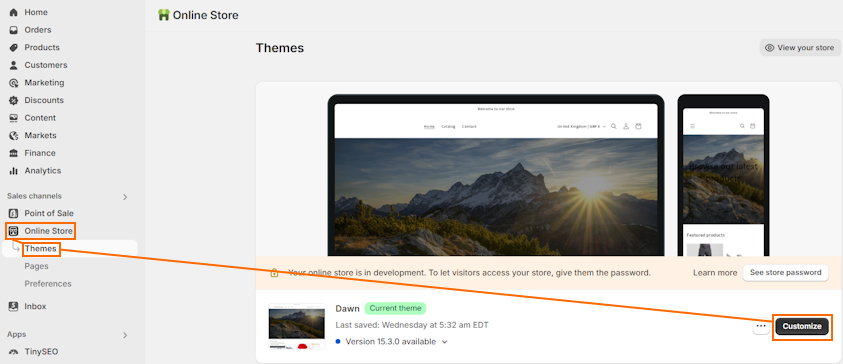
A good Shopify theme is one of the cornerstones when building a Shopify store. When you just start out, a free theme on your website called Dawn is installed by default.
However, you can browse the Shopify theme store to find over 240 paid and 20+ free options for different industries. Don’t just look at the design – consider the features you may need and check user reviews to know what to expect.
Once you find the theme you like, just click “Try theme.” You can edit even the premium options for free – you only pay if you publish.
To find and customize any of your installed themes, go to your Shopify Admin > Online Store > Themes and press “Customize.”
If you’ve installed multiple themes, you can click “Publish” on the one you want to use live.
5. Add products and collection pages
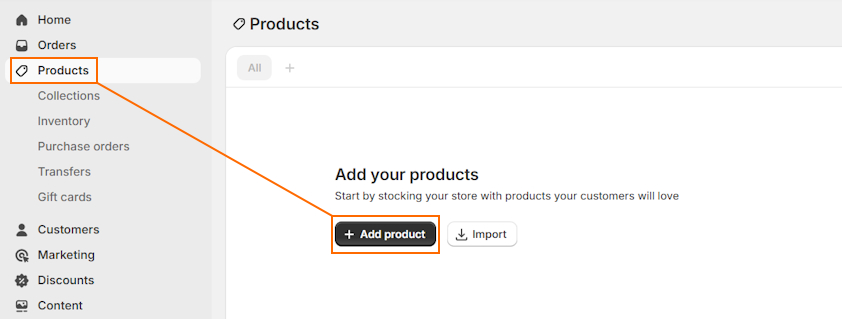
Organizing your products and collections early in the process will make it easier to customize your website. So, to add products to Shopify, follow this simple guide:
Head to Products and click Add product.
Insert the title, product descriptions, images, and additional details about your item. Click Save.
Then, you should also consider adding Shopify products to collections. You can easily create a collection by going to Products > Collections and clicking Add Collection.
All it takes is creating a title, description, and inserting the products you want.
6. Create your Shopify store's pages
The next step in our Shopify tutorial is your store’s basic pages. While your product and collection pages are the place for money-making, these basic pages are what build brand trust and ensure a clear purchasing process.
To add a new page, you can go to Online Store > Pages > Add page.
You can add a clear title, insert the content you want, including images and videos, and click Save. Don’t forget to set the visibility of the page and add it to your store’s navigation menu.
To give you a better understanding of what pages to create, here’s a list of the usual pages companies include:
- About us – describes your brand and its mission, helping build brand trust.
- Contact – contact information about your company, such as phone number, email, physical address, or a contact form.
- Privacy policy – a legal document explaining to your website visitors and customers how you handle their personal information.
- Terms and conditions – a legal document explaining the rules, policies, and disclaimers for using your website.
- Helpdesk – an FAQ or help section that answers some of the most common questions customers have to save customer support time.
- 404 page not found – custom page to have when visitors encounter a broken link on your website, encouraging them to keep shopping instead of leaving the site.
7. Create your website’s menu
To ensure easy navigation for your customers and search engines on your website, you need to create menus. You can do it by going to Content > Menus > Create menu or click the menus already created by default.
You’ll have to define two parameters: Label (the title of your page that will appear on the menu) and link (where that menu item will lead).
You can drag and drop your menu items to form dropdown menus within your top menu. It allows nesting multiple pages underneath one menu item, creating convenient navigation from the homepage.
You can view what your changes look like live in theme customization mode, your main menu will appear in the header of your homepage.
Suggested reading
- Check out some of the top Shopify menu apps to easily create store navigation
8. Set up payments
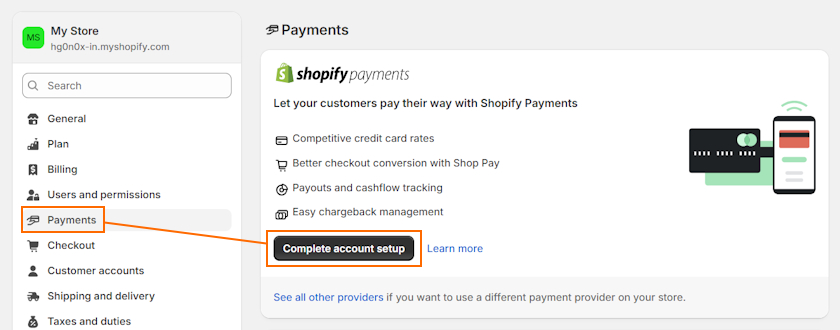
Shopify Payments is a native payment processing functionality available on Shopify. If you are eligible to use Shopify Payments, you can integrate it with one click and you won’t have to pay third-party transaction fees.
To enable Shopify Payments, go to Admin, Settings > Payments and click on Complete account setup.
Here, you’ll have to take these steps:
- Provide business information, including details about an authorized representative or your company
- Turn on two-step authentication
- Add your bank account
Once your payments are ready, you can set up a checkout page through Shopify Settings. Just head to the Checkout section, and customize the language, required information, customer contact method, and more.
9. Configure shipping settings
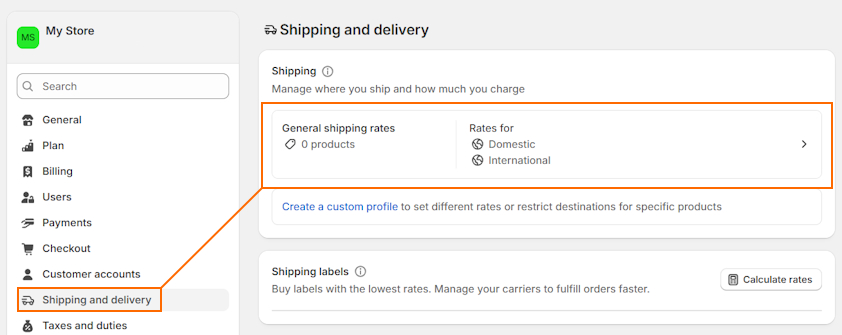
You can set up shipping on Shopify by going to Settings > Shipping and delivery. You can customize general shipping rates or create a custom profile for specific products.
Here’s what you can set:
- Shipping zone. When creating a shipping profile, start by selecting where you want to ship the products.
- Shipping rate. Open the profile you want, and click “Add rate” to enter a custom rate name, type, and price.
- Conditional pricing. While optional, you can set price or weight-based conditions for specific profile shipping rates.
- Local currency rates. If you’re using Shopify Payments, you can set up flat shipping rates using local currencies.
Once you’re done setting up shipping, click Save.
10. Set up tax rates
If you ship internationally, a correct duty and tax setup will prevent your customers from getting unexpected fees.
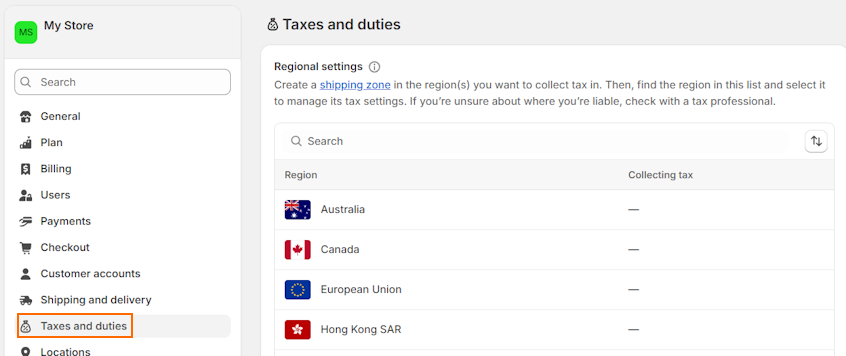
You can manage tax fees by creating shipping zones and setting tax rates under Settings > Taxes and duties.
These rates are highly individual based on the geographical location of the store. If this is your first-ever eCommerce business, we highly advise analyzing Shopify documentation on taxes carefully and contacting local tax authorities to avoid miscalculation and unnecessary liability.
11. Place a test order
When your store is ready to launch, there’s one more step to take before going live – placing a test order.
Here’s a detailed guide on how to test your orders on Shopify:
- Head to Shopify Settings > Payments.
- Deactivate your payment provider. For Shopify Payments, you need to click Manage > Manage payment methods, and click “Switch to a third-party provider.”
- Open Shopify Payments, select “(for testing) Bogus Gateway” and activate it. Click Save.
- Now, mimic what a customer would do – add products to the cart on your website, complete the checkout, review your order, and place it.
- Once you’re done testing, deactivate the testing gateway.
If you’re not sure what to use for testing, you can find Shopify’s guide on Shopify Payments test mode payment details.
12. Launch your Shopify store
Once you’re fully ready to publish your website, it’s time to take off the password. Here’s a quick guide on how to launch your store:
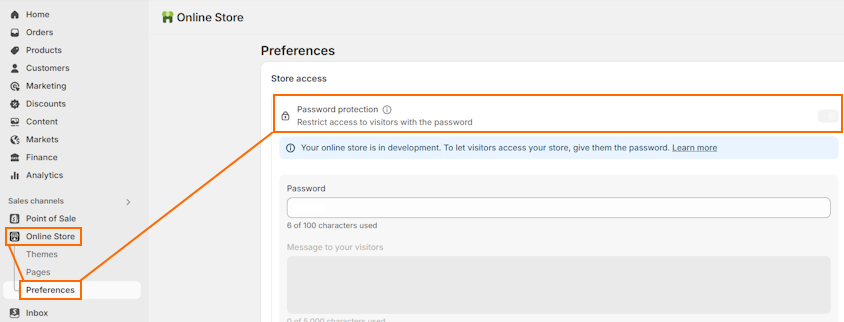
Go to Online Store > Preferences, uncheck the “Restrict access to visitors with the password” and click Save.
That’s it, your Shopify store is now live!
Shopify store setup checklist
Let’s review everything we learned about how to start a Shopify store. We’ll turn it into a Shopify store setup checklist to make sure you have all the basic steps in one place and don’t miss a detail.
That’s it, enjoy your newly set up Shopify store designed for success!
Shopify store setup – what comes next?
Setting up a Shopify store is only the beginning. Next, you’ll need to optimize your website and find marketing strategies to drive traffic. Here are a few things to do after setting up your Shopify store:
- SEO optimization. If you want to attract organic traffic, you should start following Shopify SEO checklists to grow your rankings higher. Most SEO tasks, like metadata and content optimization, can be automated with an SEO optimization app like TinyIMG.
- Marketing strategies. Start creating a marketing strategy plan and implementing strategies suitable for your business, like running paid Google ads, email marketing, or others.
- Social proof. Learn how to add reviews to Shopify to help build brand trust and foster familiarity.
- Speed optimization. Regularly test your store’s performance on tools like PageSpeed Insights. Take time to optimize Shopify speed – the faster your store is, the lower bounce rates and missed sales opportunities it’s likely to experience.

Frequently asked questions
To create a Shopify store, sign up for a Shopify free trial, create an account, and pick a plan. You can easily create products and collections, organize them into menus, and customize any theme you like. Once you add a custom domain and set up payments and shipping, your store will be ready to launch.
Yes, you can create a Shopify store that gets traffic all by yourself. While it may take a while to get the hang of how to build a website, it’s extremely beginner-oriented, so you can find plenty of tutorials and support to help you get started.
Building a Shopify store can cost you anywhere from a few dozen to several thousand dollars, depending on what you purchase. For example, the main costs of Shopify include a subscription plan, domain, transaction fees, themes, and apps.
However, you can opt for a free theme, limit third-party app usage, and use Shopify Payments for lower transaction fees.
As for the plans, here are the standard Shopify plans and what they’re best for:
- Basic ($29/month) – best for beginners and small stores
- Grow ($79/month) – best for small teams
- Advanced ($299/month) – best for medium-to-large businesses
- Shopify Plus ($2,300/month) – best for enterprises with custom needs


