A 1-second delay in website load time can decrease your conversion rates by up to 20% according to research by Think with Google. For Shopify websites, slow performance isn’t just a small drawback – it can lead to losing your customers to competitors who prioritize speed.
To stop losing sales and turn brief visitors into loyal customers, it’s important to act quickly and streamline your store’s performance. Continue reading to learn the best practices to elevate your site’s speed and take action now.
Skyrocket your website speed and optimize images with a single app
Save sales with TinyIMGWhy does speed matter for Shopify sales?
Speed is the backbone of any Shopify website because every second dictates whether users will transform into customers. Here are the main reasons why Shopify site speed is important for sales:
- Increases conversions. Based on the research made by Akamai, a slower page load time can lower conversion rates by around 20% with each passing second.
- Reduces cart abandonment. A case study by Radware found that 46% of consumers agree that checkout page performance determines whether they’ll return to the site again. That’s because slow load times during checkout causes worrying about the transaction, including double billing or a not-processed order.
- Improves SEO. With consumers looking to find answers as quick as possible, page load time becomes an important SEO ranking factor. Google Search Central values speed on both desktop and mobile devices, encouraging the slowest sites to improve load times in order to have a chance at ranking higher.
- Reduces bounce rates. The more bounce rates your website experiences, the more sales opportunities you lose. According to Think with Google, bounce rate likelihood increases by a whopping 32% when page load time rises from 1 to just 3 seconds.
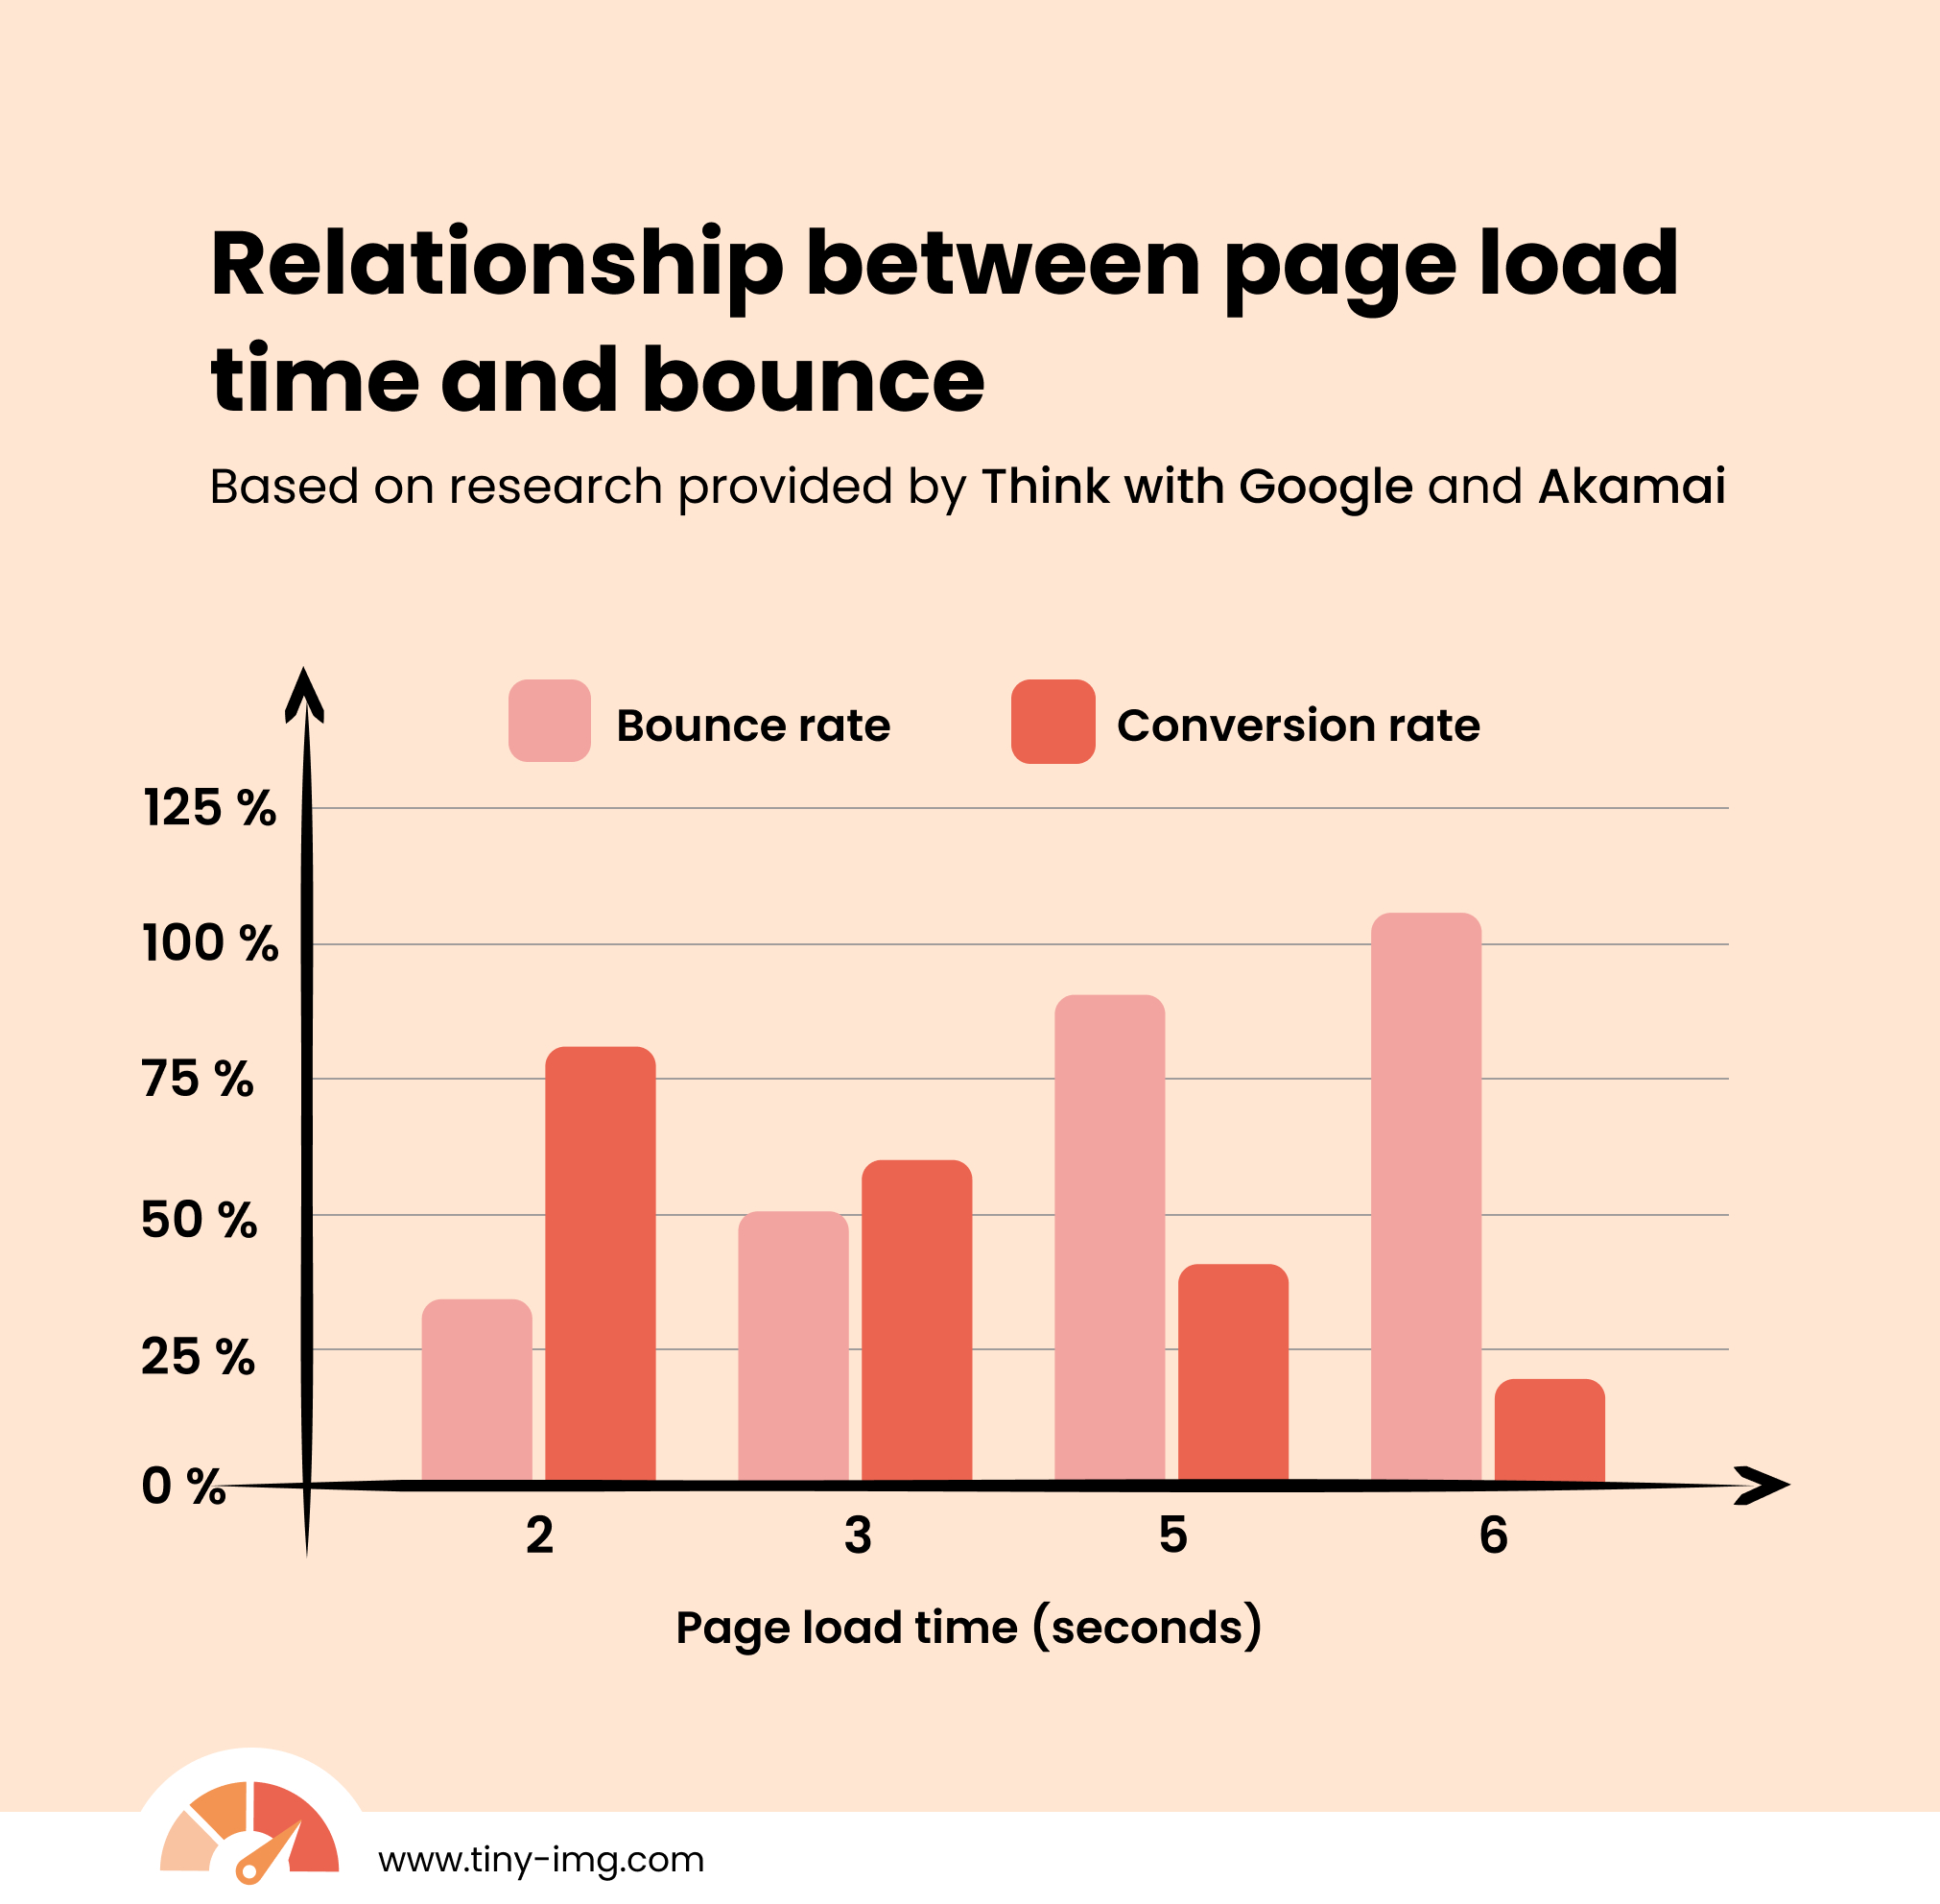
Here’s a chart to visualize the relationship between page load time and bounce rates or conversion rates based on the research provided by Think with Google and Akamai:
The chart showcases how changes in speed affect your sales, demonstrating that the ideal website load time for sites is anywhere between 0-2 seconds.
How to calculate your potential revenue loss
You can use a formula to calculate your potential revenue loss due to slow website loading time. Since research shows that a 1-second delay can cause up to 20% sales loss, we’re going to use this number as the percentage decrease due to delay.
Before we begin, run your page through PageSpeed Insights and mark down the current Speed Index.
Here’s a step-by-step guide on how to calculate potential revenue loss:
- Difference in speed index = current speed index – target speed index
- Expected conversion loss = difference in speed index × total conversions × 0.20
- Average order value = total revenue / total conversions
- Lost revenue = expected conversion loss × average order value
For example, let’s say your site has a 5-second speed index, you want to reduce it to 2 seconds, and you have 500 conversions, 10,000 visitors, and $50,000 revenue.
Your difference in speed index is 3 seconds, and your expected conversion loss is 3 * 500 *0.20 = 300. This would mean that you lost 300 * 50,000 / 500 = $30,000 by not optimizing your site for speed.
What’s slowing your Shopify website?
A slow Shopify website speed is often influenced by cumulative effects of particular elements. So, here are a few common reasons for poor site performance:
- Unoptimized media files. Uploading all your images as uncompressed PNG files means your customers’ browsers will have to load a lot of data when they visit the site. The same goes for videos that you host directly on Shopify.
- Excessive code. Leaving unnecessary whitespace, semicolons, or comments in a website’s code can add up to larger files and slow down your site.
- Unnecessary apps. Third-party Shopify apps can quickly accumulate, and that means extra CSS or JavaScript and more server requests, resulting in increased server load.
- Too many redirects. Redirects can lead to loops with endless requests or chains that increase HTTP requests. All of this puts pressure on the server, which delays the time it takes for the viewer to see the content.
Simple solutions to boost Shopify page speed
Let’s take a look at common issues and solutions on how to improve your Shopify page speed to decrease bounce rates and save your sales. Keep in mind that you should also apply all of these tips to your mobile pages.
1. Optimize your Shopify images
A low website performance score is often caused by large and unoptimized images. They can also result in content shifts or overlapping, which can be frustrating for visitors, causing them to leave your site and lose potential sales opportunities.
Here are some tips you can take to optimize your Shopify images:
- Choose the right size. To ensure images don’t affect page speed, you need to limit image sizes to a maximum of 5000 x 5000 pixels, or 20 MB. You can check our Shopify image size guide to see that you choose the right size for each case.
- Change the file format. JPEG images take less space than PNG images, so the latter format should only be used for transparent or sharp-edge images, like logos. However, the WebP format offers the best quality-to-size ratio, and you can easily convert it using our free WebP converter.
- Compress all images. According to the HTTP archive, images can take up around 27% of the total page size. Compressing images ensures less bandwidth is needed, so pages load faster. You can automatically compress all of your visuals using the TinyIMG image optimizer.
Compress all of your site's images with a click of a button
Try TinyIMG now2. Enable lazy loading
Lazy loading is a strategy that is used to refrain from loading content until the user needs it. It means that initially, only the essential elements are loaded, which decreases the amount of data needed for loading and reduces the page load time.
You can enable lazy loading by downloading the lazysizes.js file from Github, uploading it to your assets, and manually updating image tags to add the lazyload class.
However, the fastest way to turn on lazy loading site-wide is to get TinyIMG. All you have to do is:
1. Go to the Shopify App Store, install TinyIMG, and embed the app on your site as per instructions.
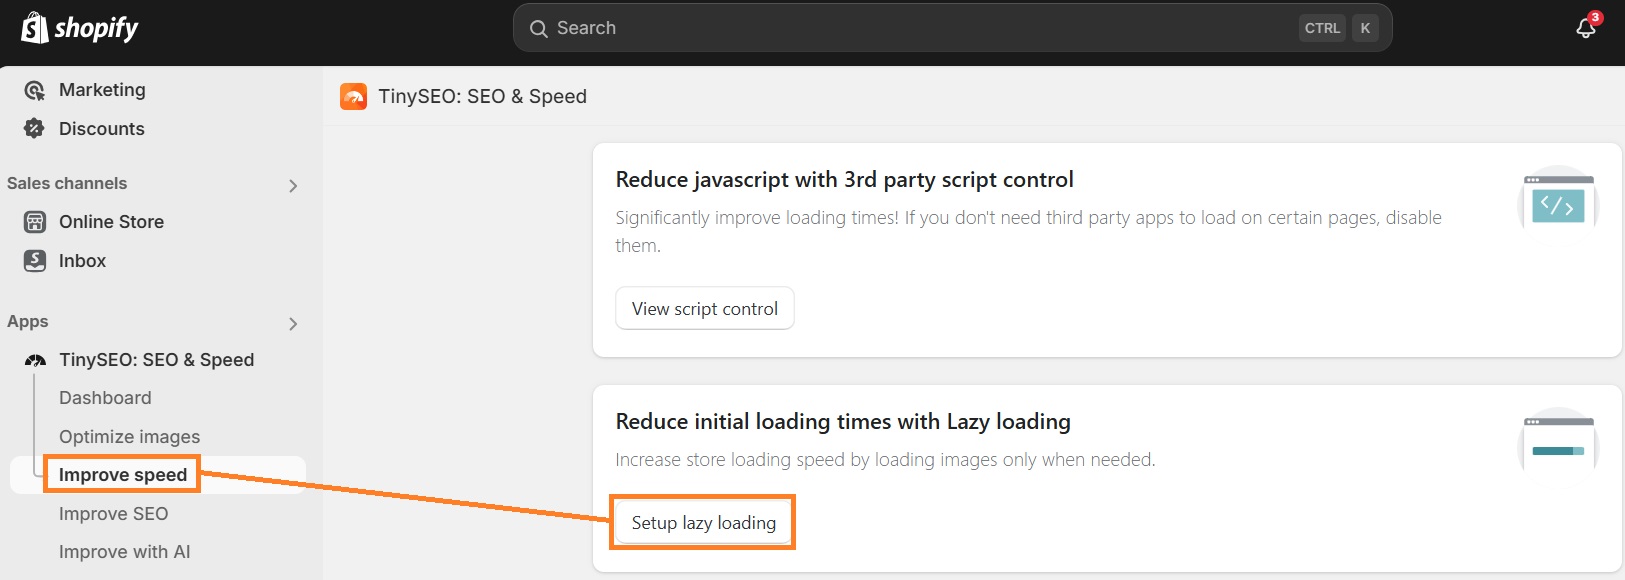
2. Head to the TinyIMG app, click Improve speed > Setup lazy loading.
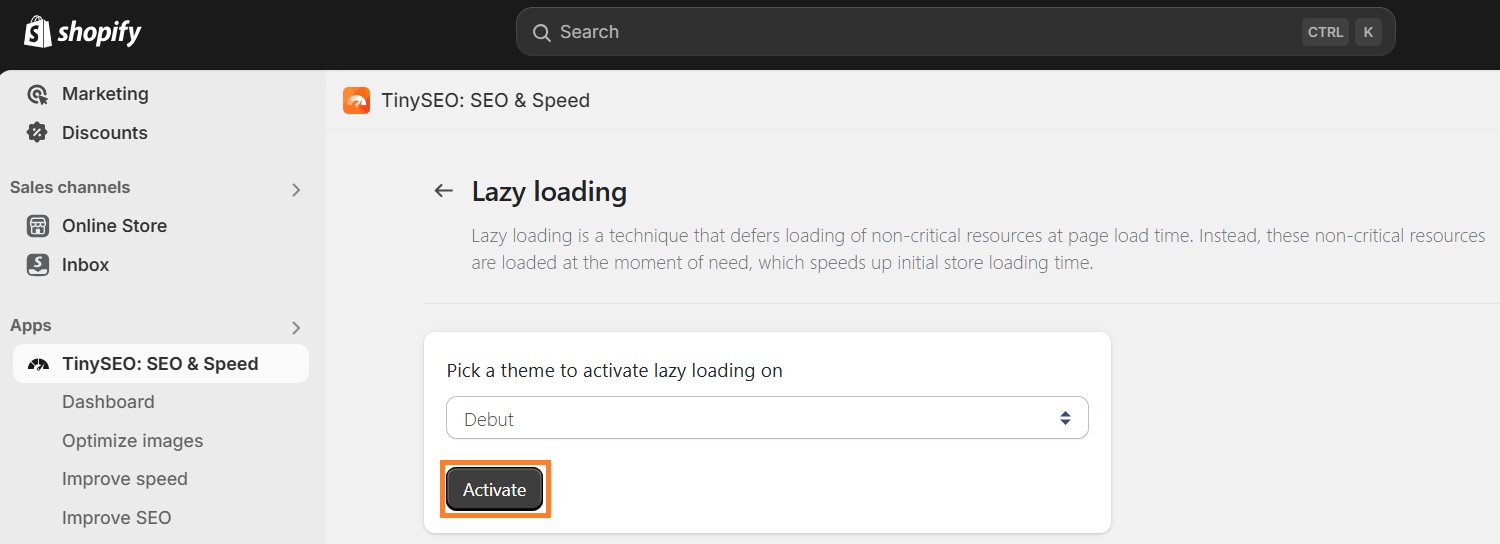
3. Just choose a theme that you want to enable the lazy loading feature on and click “Activate.”
That’s it – the lazy loading feature is now enabled.
3. Use a lightweight page builder
Websites that are overfilled with plugins and excessive page elements, including oversized banners or widgets, cause slower page speed. That’s because each element, especially if it’s large in size, participates in causing higher page weight and requires more HTTP requests.
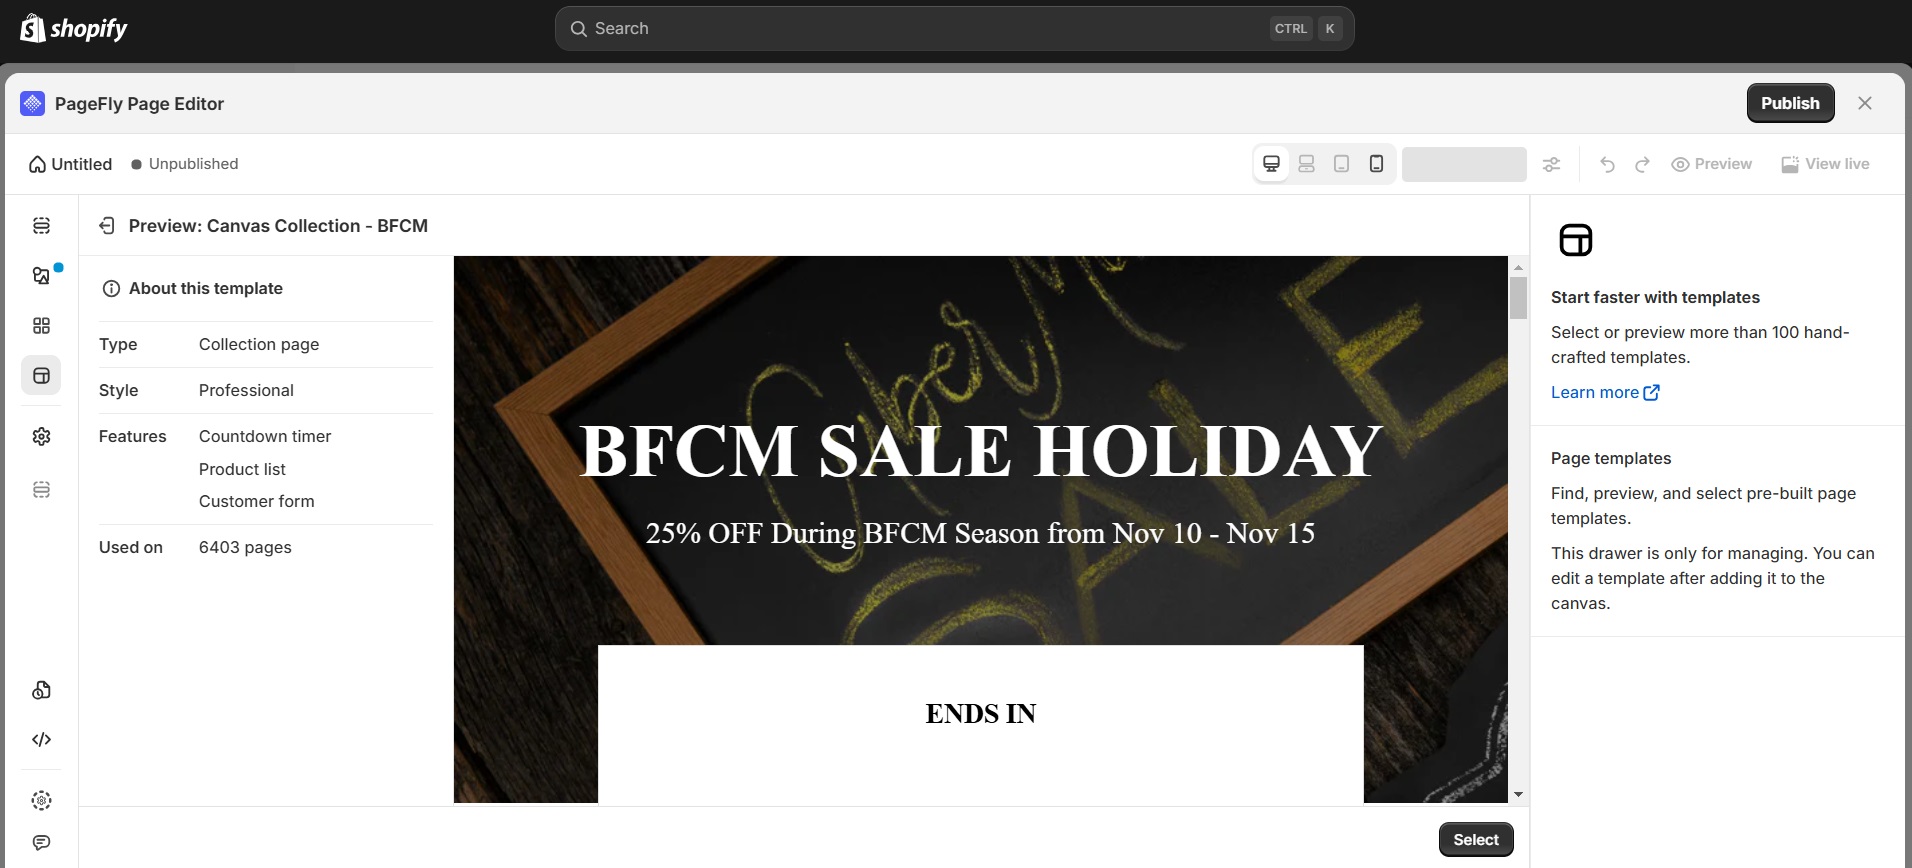
The easiest way to solve overloaded pages is to get a lightweight drag-and-drop page builder like PageFly. With this app, you can create custom pages and reduce the number of nested containers to improve page performance.
You can also use PageFly templates for any occasion, including Black Friday, to create effective sales funnels and maximize your conversions.
The app comes with conversion-oriented elements, from sales banners to countdown timers, color swatches, and more. This means you can leverage its comprehensive features to replace basic plugins, each with a single function, that overfill your pages and make it harder for them to load.
4. Remove unnecessary plugins
Third-party Shopify apps can be a useful addition to your website, but they consume resources that can quickly accumulate and result in slower page load time. The way to avoid this is to remove single-use unnecessary apps and get more comprehensive ones.
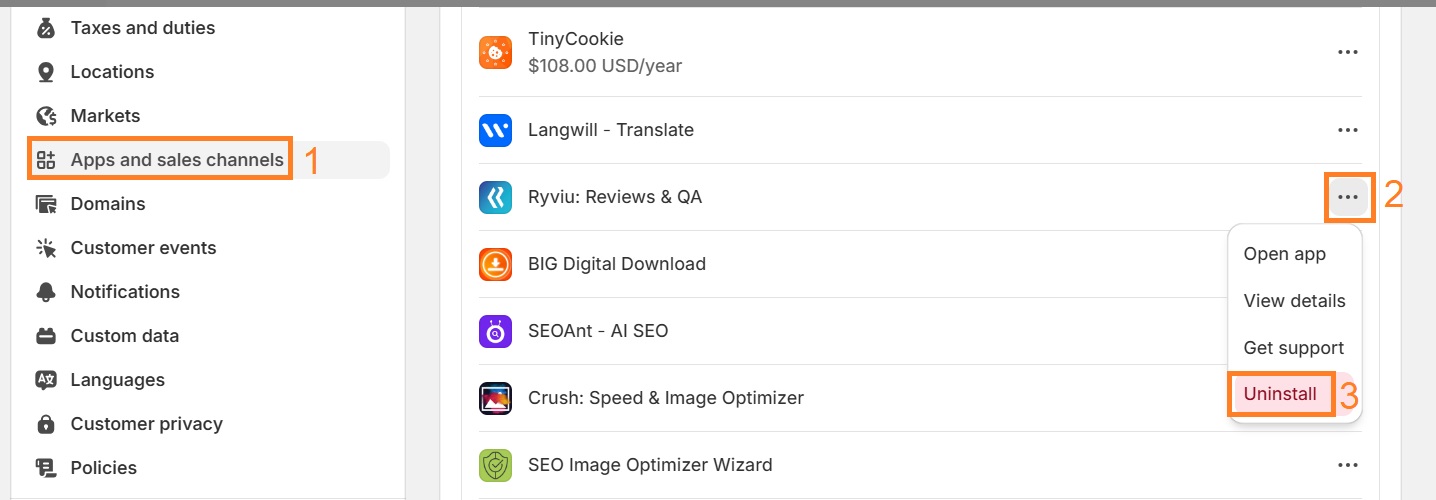
Here’s how you can review your app list and uninstall plugins on Shopify:
1. In your Shopify Admin, go to Settings.
2. Click the “Apps and sales channels” section in the left menu, locate the app you want to install, click the three-dot button, and press Uninstall.
To make sure that your pages don’t get overflowed with plugins, choose more comprehensive apps. For example, instead of opting for an app that offers a countdown timer, opt for an all-round conversion-focused feature solution.
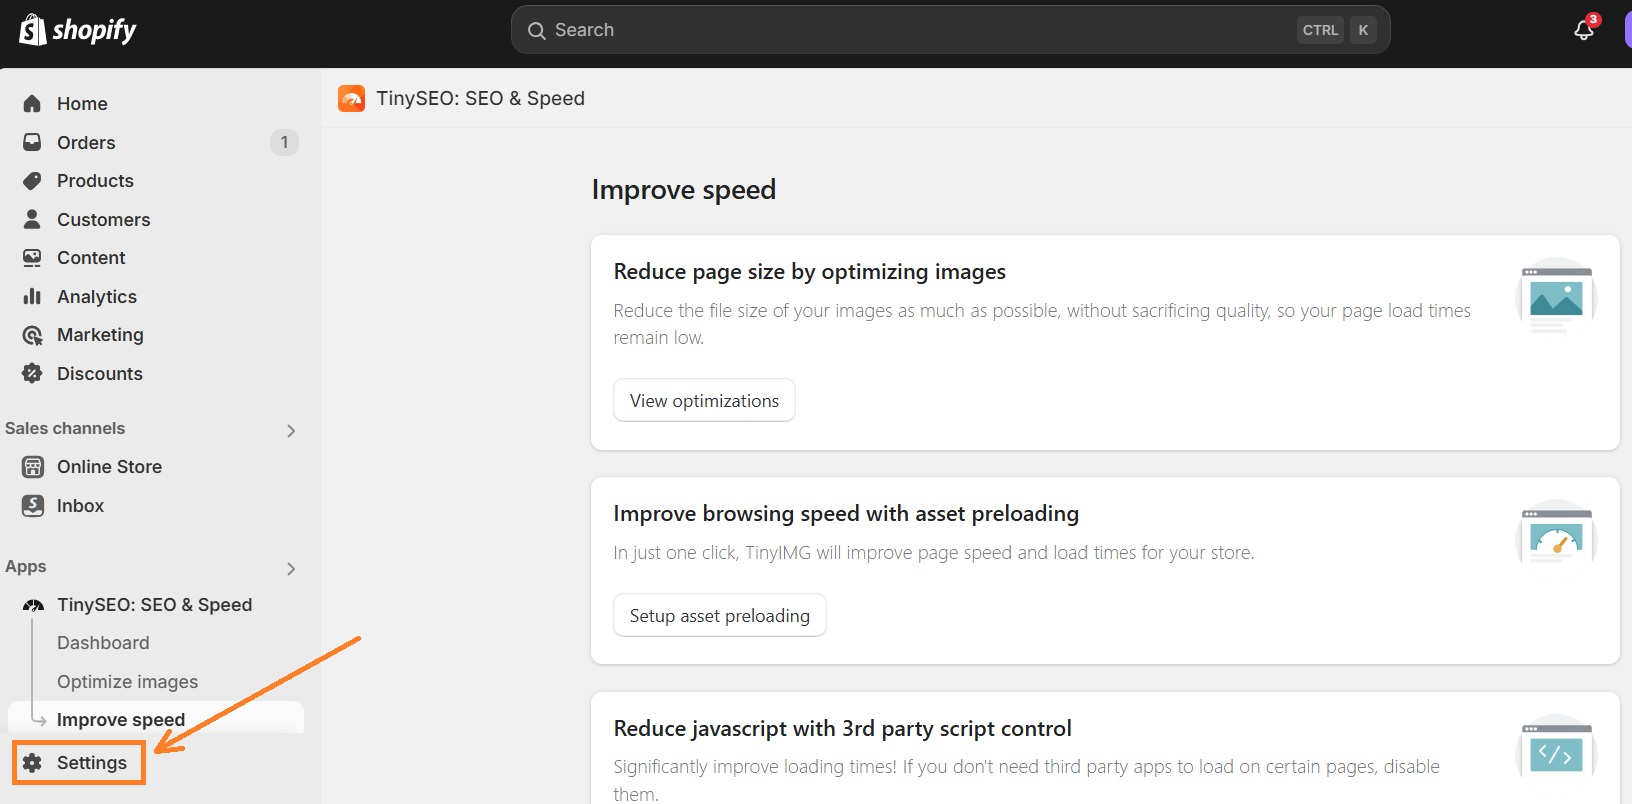
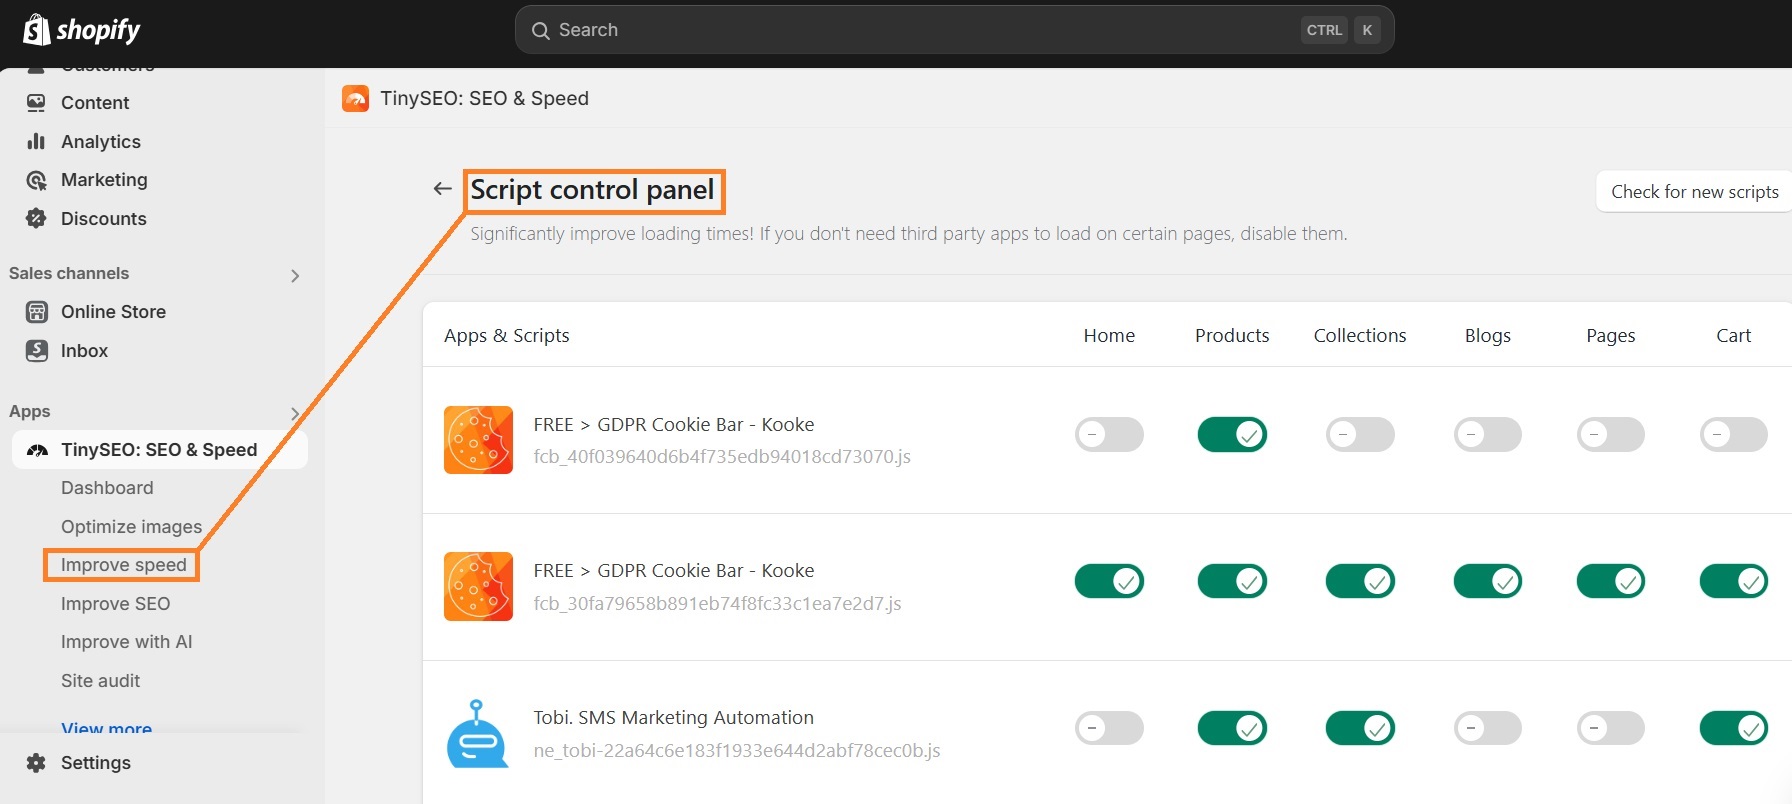
You can also check on what pages apps load using TinyIMG script control. All you have to do is open the app, go to the Improve speed section, and click View script control.
Here, you can disable scripts on parts of your website where you don’t need them to improve page load time in just a few clicks.
5. Minify code
Excessive website code results in large files that increase the load time of a web page. For this reason, it’s important to minify the site’s code. Minification means reducing your website’s code by eliminating unnecessary elements, such as developer comments.
You can find plenty of free tools online to minify your site’s code no matter if it’s for JavaScript, HTML, or CSS. Some of the free minifiers include Minifier.org or Toptal. All you have to do is paste your code and click “Minify.”
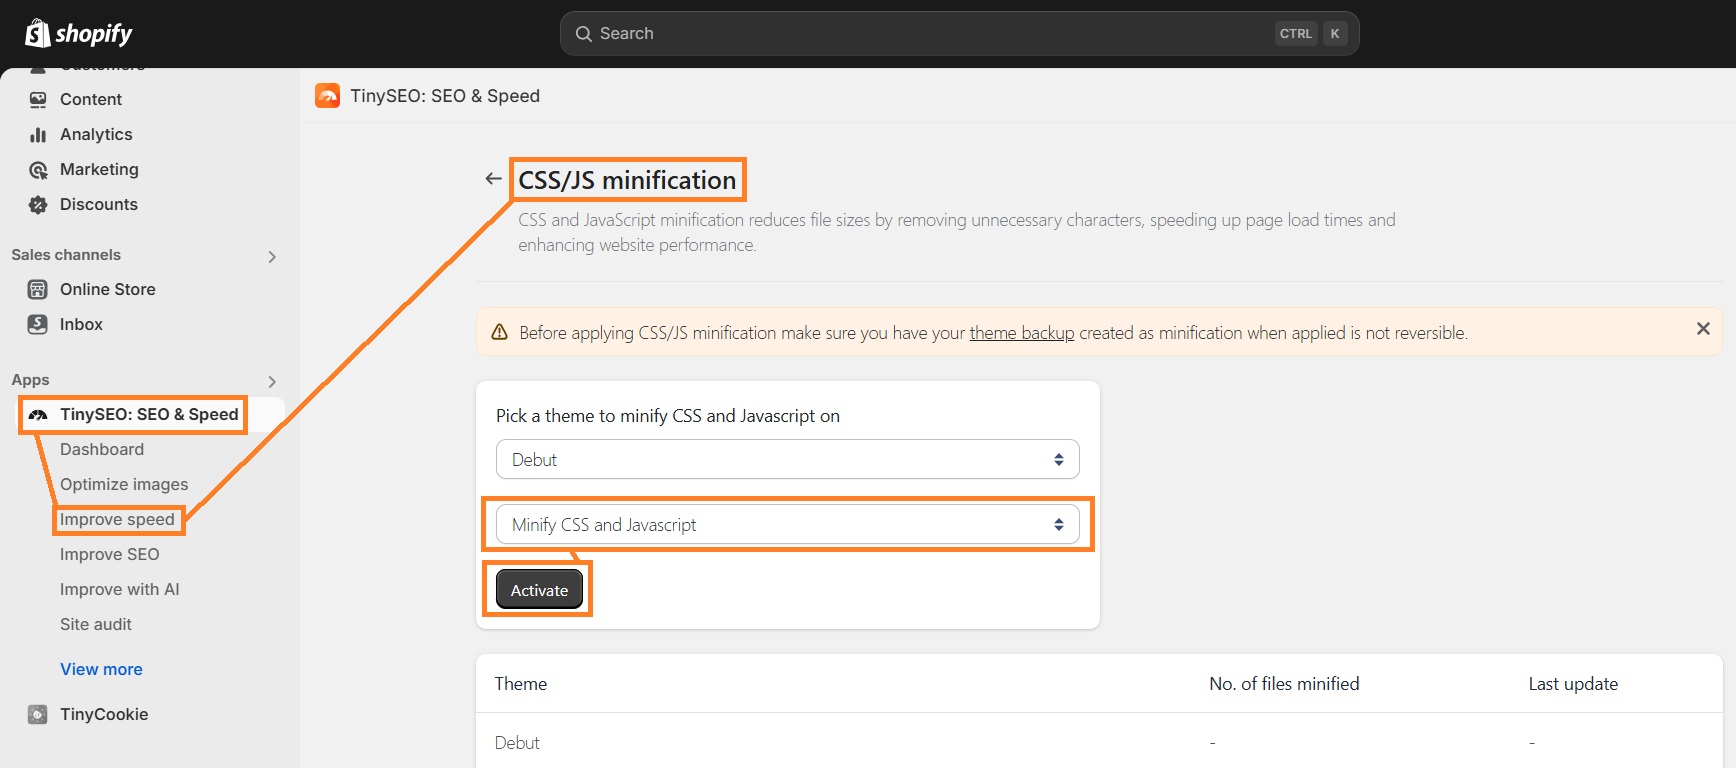
If you’re a TinyIMG user, you can also minify your site code straight on your Shopify Admin by going to TinyIMG > Improve speed > Minify CSS/JS resources.
You can choose whether you want to minify CSS, JavaScript, or both at the same time. All you need to do is click Activate.
6. Check for redirect chains
Redirect chains happen when a redirected URL relocates the user to another redirect. Multiple redirect hops can hinder your page load time, so you should instead create redirects that link straight to the final destination.
There are multiple tools that let you check for redirects on your website, such as Screamingfrog. Just install the program, enter your website’s URL, and go to Reports > Redirects > Redirect Chains.
Once you find the chains, go to your Shopify Admin > Online Store > Navigation > View URL redirects.
Here, locate the redirect chain components and delete the unnecessary ones. If you want to create a new redirect, click “Create URL redirect.”
7. Fix broken links
While a broken link doesn’t slow down your website by itself, multiple errors can result in unnecessary HTTP requests and slow down the server's response time. But 404 pages don’t just affect performance – they also adversely impact user experience, causing visitors to bounce and resulting in potentially lost sales.
The easiest way to fix broken links is to create redirects. Here are the fastest ways to identify and fix 404 pages:
1. Locate broken links. You can use Google Search Console or set up TinyIMG to receive regular broken link reports.
2. Go to your Shopify Admin, head to Online Store > Navigation, press View URL redirects, and create a URL redirect.
8. Embed videos instead of uploading them.
Whether you’re using videos on your product pages, blog posts, or anywhere else, uploading them directly to Shopify is a bad practice. Once your customers try to play the video, it will load from your web server, resulting in buffering and frustrating the clients.
Instead, you can use a third-party platform to host your videos and simply embed them on your site. Some of the most popular choices include YouTube and Vimeo.
Here’s a quick guide on how to embed a video on your page:
1. Upload your video to a platform you want to host externally from and copy the URL.
2. Go to Embed Responsively, insert the URL, click Embed, and copy the code.
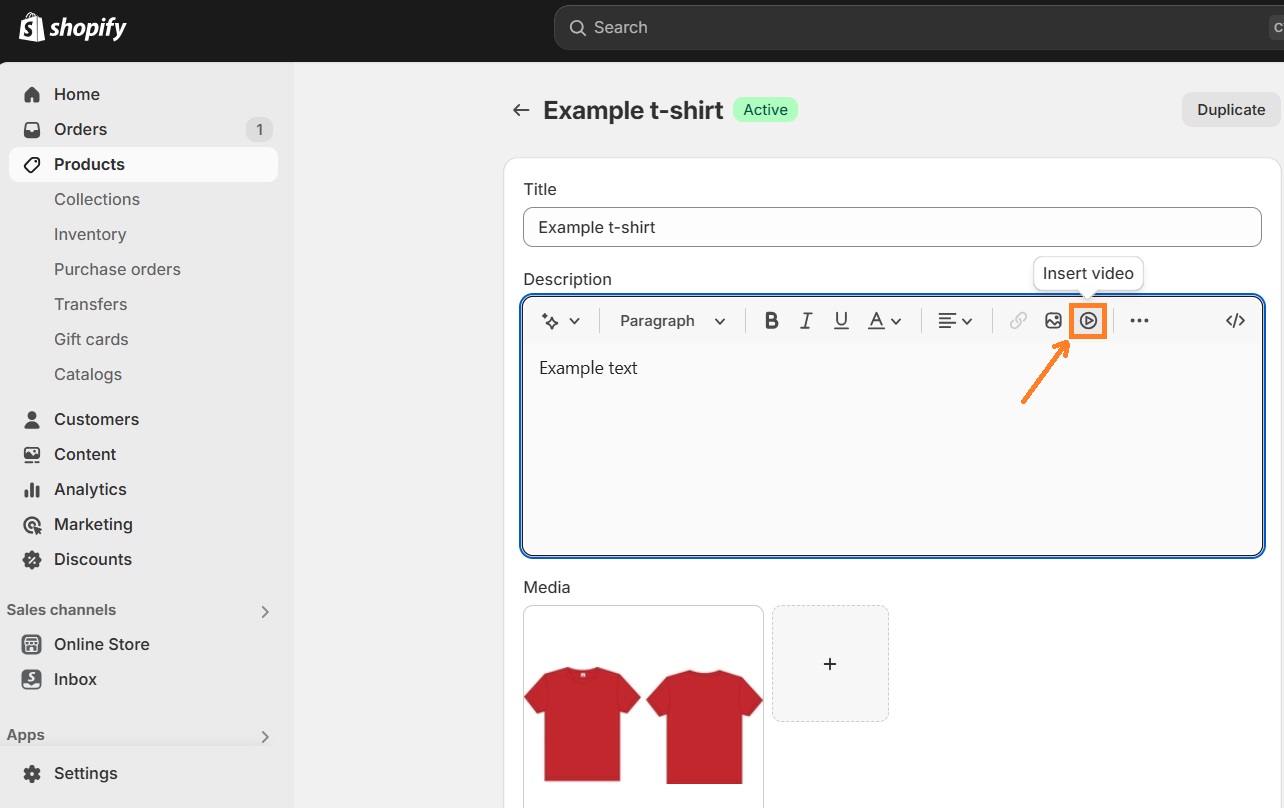
3. Open Shopify. To add a video to page content, head to Products. Click the product you want to add a video to.
4. If you want to insert a video in your product description, click the “Insert video” button under the Description section and paste the code.
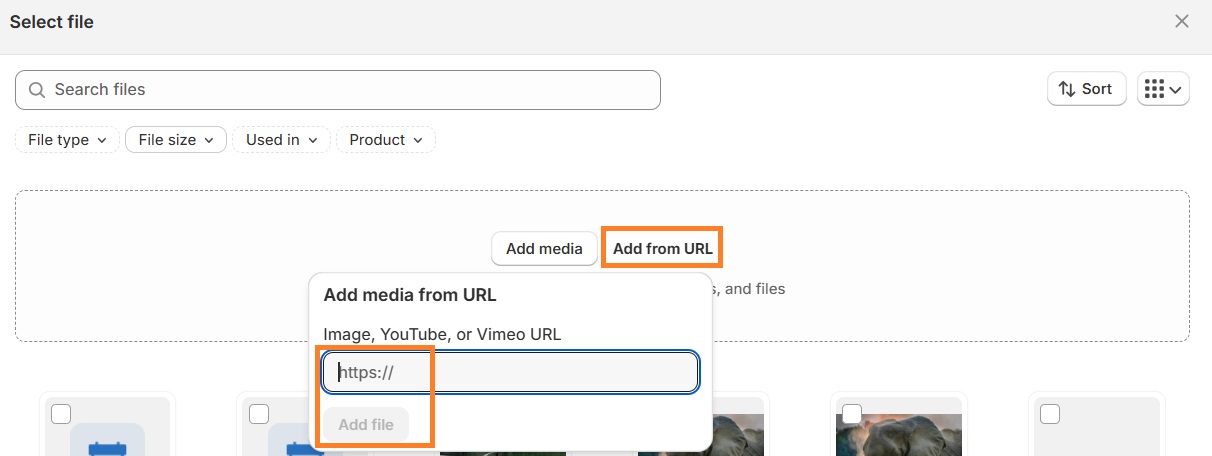
5. However, if you want to insert a video in the product gallery, click the “+” sign under the Media section. Now, press the “Add from URL” button and insert the URL of the video.
If you wish to embed a video to a specific page’s content or blog post, go to Online store, head to Pages or Blog posts, and click on the page or post you want. Press the “Insert video” button under the Content section and place your embed snippet there.
9. Move tracking codes to Google Tag Manager
If you’ve added multiple tracking codes on your website, they can accumulate and be another reason for a slow website. That’s why you should leverage the free Google Tag Manager and migrate tracking codes to manage all of them there.
Here’s how you can do it:
- Create a Google Tag Manager account and connect it to your website.
- Add the site tags to Google Tag Manager but don’t publish them yet.
- Simultaneously swap an old tag by deleting it and publishing the new one.
For more details, you can check the process in the Google for Developers tag migration guide.
Time to act: how speed can set you apart
With every passing second, you’re losing potential sales by not optimizing your site. A study by Akamai found that even a 0.1-second delay can decrease conversion rates by 7%. And it takes just a few optimization steps to safeguard your sales immediately.
Run your website through PageSpeed Insights and check the performance score. The most important steps to start from are compressing your images, which you can automate with TinyIMG, reducing the number of nested containers on your pages, and removing the apps you no longer use.

