If you’ve built a store on WooCommerce, you’re probably familiar with its headaches, like the overload of plugins and complex maintenance. It’s not always an ideal solution for merchants with a growing business who want to focus purely on selling.
That’s where Shopify comes in – a platform that eliminates complexity and balances ease of use with scalability. It lets you forget all about hosting and security, as everything is taken care of for you.
If you’ve decided to migrate from WooCommerce to Shopify, this guide is for you. I’ll cover step by step how to prepare, migrate your store, and troubleshoot issues.

Preparation before migrating WooCommerce to Shopify
To prepare for migration from WooCommerce to Shopify, you have to set up your Shopify account and back up your WooCommerce store data just in case. Let’s review how to do all of it in detail:
Step 1: Prepare your Shopify account
Before migrating your website, you need to get your Shopify account ready. You can read our full Shopify store setup guide to find step-by-step instructions for each step. Here’s everything you’ll have to do before migration:
- Sign up – you can use the free Shopify 3-day trial to try it out and pick a plan that suits your business needs.
- Choose a theme – you’ll have to choose and customize a new theme for your site, so browse the Shopify theme store for free or premium theme options.
- Set up shipping rates – go to Shopify Admin > Settings > Shipping and delivery and set up shipping zones and rates for your store.
- Add tax information – consult local tax authorities and set regional tax settings in Shopify Admin > Settings > Taxes and duties.
- Set up Shopify Payments – head to Shopify Admin > Settings > Payments and configure Shopify Payments or a third-party payment gateway. Note that with Shopify Payments, the transaction fees are lower.
- Place a test order – use “(for testing) Bogus Gateway” on Shopify Payments to place an order test and ensure everything works as intended.
- Transfer your domain – you can either transfer your domain by going to Shopify Admin > Settings > Domains > Connect existing, or you can get a new one. If transferring, note that the Shopify URL structure may differ, so make sure you set up redirects in advance.
Step 2: Back up your WooCommerce store data
It’s best to back up your WooCommerce store data just in case you encounter some errors. There are two ways to do this:
- Manually through phpMyAdmin: Go to your hosting control panel, locate phpMyAdmin, click your WooCommerce database, press Export > Custom > Go.
- Manually through FTP client: Open your FTP client, like FileZilla, and locate your WordPress folder (typically in /public_html). Download all important files.
- Automatically using a plugin: You can use a WooCommerce plugin to automatically backup all of your data. For example, WooCommerce recommends Jetpack Vaultpress Backup, which also comes with a free 14-day trial.
Best ways to migrate to Shopify
There are multiple ways you can migrate your WooCommerce store to Shopify, and the best one depends on your needs. Here are a few transferring options:
- Manual CSV data import: manually exporting your WooCommerce data, changing the data format, and importing it to Shopify. It takes time and effort, but it’s free. Additionally, you can’t import reviews or order history using this method.
- Shopify’s store migration app: the app automates CSV file data conversion and import to Shopify. However, it’s a fairly new app, so you’ll have to check carefully that everything is imported correctly.
- Copy-paste migration: This method of copying your WooCommerce store’s content and pasting it into your Shopify store is only good if you have very few products.
- Third-party migration apps: apps like Matrixify or LitExtension are premium migration methods, but they automate the process and ensure fewer errors.
- Migration specialist: You can hire an expert, like a Shopify Partner, to complete the full migration for you.
How to migrate WooCommerce to Shopify (manual)
Migrating from WooCommerce to Shopify manually takes more than just exporting and importing data. You also have to update the CSV file data format to match the platform you’re migrating to. It’s very easy to do if you follow the data formats.
Here’s a general guide of the migration process:
Step 1: Choose what to migrate to Shopify
The first step is choosing the data you want to move. Usually, merchants migrate the following data:
- Products
- Customers
- Orders (including already fulfilled ones)
- Reviews
The following steps will show you how to move each data category to Shopify one after the other.
Step 2: Export WooCommerce product data
To start moving your WooCommerce products to Shopify, you need to export product data. Here’s a quick guide on how to do it:
- Open your WooCommerce account. Click All Products > Products.
- Press Export.
- Choose the columns, products, and product categories you want to export.
- Click Generate CSV, add the WooProductDownload.csv file name, and save.
Step 3: Edit the WooCommerce product data format
To import your product data to Shopify, you’ll need to edit the WooCommerce file to match its data format to Shopify’s format. To make things easier, you can use the product CSV template provided by Shopify.
Here are the WooCommerce data types and what you should change them to:
| WooCommerce data type | Shopify data type |
| Name | Title |
| Description | Body (HTML) |
| Attribute 1 name | Option1 Name |
| Attribute 1 value(s) | Option1 Value |
| Attribute 2 name | Option2 Name |
| Attribute 2 value(s) | Option2 Value |
| SKU | Variant SKU |
| Weight (lbs) | Variant Grams |
| Stock | Variant Inventory Qty |
| Regular price | Variant Price |
| Images | Image Src |
Step 4: Import product data to Shopify
Once you change your WooCommerce product data format, you can initiate an import to Shopify. Here’s a simple guide on how to do it:
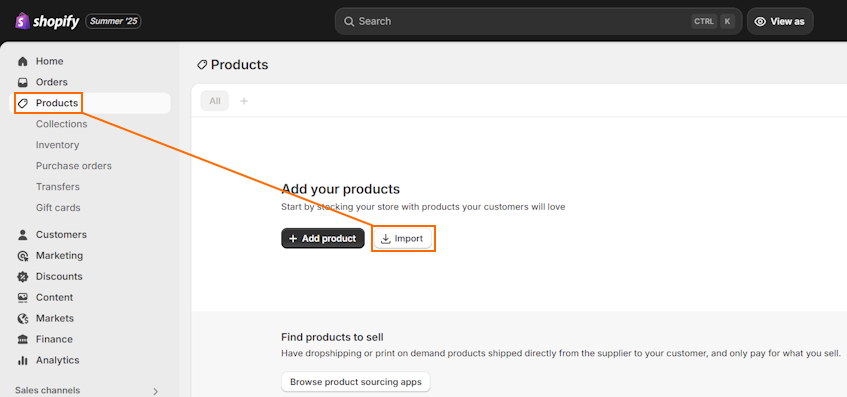
- Open Shopify Admin, head to Products, and click Import.
- Press “Add file” and select the WooProductDownload.csv file with updated data format.
- Make sure the “Publish new products to all sales channels” field is deselected. Click “Upload and preview.”
- Review your import details to ensure everything is correct and press “Import products.”
Once you complete the import process, you’ll receive an email from Shopify to confirm migration.
Step 5: Review your imported products
To ensure everything migrated without issues, review your products and their details. Here are the common issues to be aware of and how to solve them:
- Products were imported but not published. Go to the Products section in Shopify Admin, and open the product that isn’t published. Under the Publishing section, click Manage, and check the sales channels you want to include.
- Missing product details. If only some details are missing, you can fill them in manually. But if it’s a persistent issue, double-check that your product data is in the right format.
- Failed to import product variants. Head to the Products section in Shopify Admin and then open the product that’s missing variants. Insert the item options under the Variants section.
Step 6: Prepare an export file of customer data
You should also export your customer data when migrating from WooCommerce to preserve existing customer accounts and retain proof of legal compliance.
However, to export such data categories, you’ll need a plugin, like the Import Export Suite.
Here’s how you can export the file:
- Go to your WooCommerce account and open the export plugin.
- Click Export and select “User/Customer” from the provided menu.
- Press on “Step 2: Select an export method” and choose how you want to export the file.
- You can also export guest users by going to “Step 3: Advanced options/Batch export/Scheduling.”
- Insert a title for your file as “WooCustomerDownload,” pick the CSV format, and choose Delimiter. Press Export.
Step 7: Edit your WooCommerce customer data format
Like with the exported product data, you’ll need to first edit your CSV file before uploading it to Shopify. This means that the customer data format in your WooCommerce file should match the Shopify CSV file.
Here are the WooCommerce vs Shopify data types that should be exchanged:
| WooCommerce data type | Shopify data type |
| first_name | First Name |
| last_name | Last Name |
| user_email | |
| billing_company | Default Address Company |
| billing_address_1 | Default Address Address1 |
| billing_address_2 | Default Address Address2 |
| billing_city | Default Address City |
| billing_state | Default Address Province Code |
| billing_country | Default Address Country Code |
| billing_postcode | Default Address Zip |
| billing_phone | Phone |
Step 8: Import customer data to Shopify
Once you’ve edited your customer data file, it’s time to import it to Shopify. Let’s review the steps to do it:
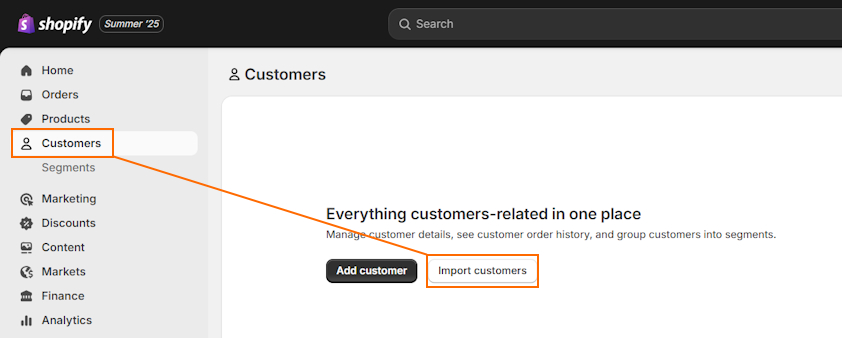
- Open Shopify Admin > Customers > Import customers.
- Click Add file and insert the CSV file with your customer data (like “WooCustomerDownload.csv)
- Click Import customers, review if the information is correct, and click Import customers again.
Step 9: Import customer reviews to Shopify
Importing customer reviews to Shopify can only be done with a third-party Shopify review app. You can see a simple guide on how to do it with Loox for free below, but the process will be similar to most apps.
- Install the review app, like Loox, and follow the setup instructions.
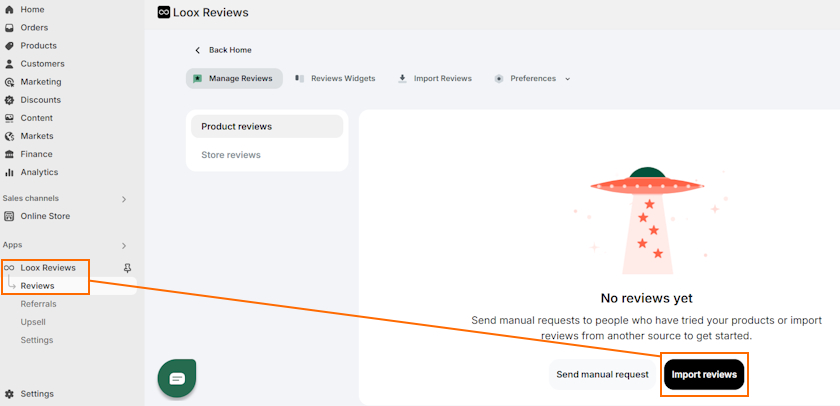
- Open the Reviews section and click Import reviews.
- Select Custom file and download the CSV template.
- Insert your review data and click “Continue to upload file” in the Loox app.
- Drag-and-drop your CSV file.
Step 10: Migrate order history data to Shopify
To migrate your order history, you’ll first have to export the data. For this, you’ll need to get a plugin for WooCommerce, like the Import Export Suite. Then, export it by following this guide:
- Open the Import Export Suite app and press Export.
- Choose “Orders” and press “Step 2: Select an export method” to select an export method.
- Go to “Step 3: Advanced options/Batch export/Scheduling” and check “Export guest users” if you wish.
- Add the file name as “WooOrdersDownload,” select the CSV format, and Delimiter. Press Export.
After exporting the CSV file, you’ll need to use a Shopify app, like LitExtension Store Migration or Matrixify, to import order history to Shopify.
How to migrate WooCommerce to Shopify (using an app)
Another way to migrate your whole WooCommerce store to Shopify is by using an app. Although they cost money, they help save loads of time and reduce errors.
If you have less than 100 products, I’d recommend LitExtension, as it’s free. However, if you have more than that, I’d suggest opting for Matrixify because its paid plans are cheaper.
With a migration app, you can quickly move not just products, customers, and orders, but also discounts, redirects, and collections.
For this guide, I’ll use Matrixify, but the process is similar to most migration apps.
Step 1: Create WooCommerce API credentials
Apps like Matrixify use the API to access your website data. So, you need to generate them on WooCommerce. Here’s how to do it:
- Open WordPress Admin and go to WooCommerce > Settings.
- Head to the Advanced tab and click “Add key” by REST API.
- Insert the key details, such as description (like “Product Migration”), select the user, and set permissions to “Read.”
- Click “Generate API key.”
Step 2: Construct URL with API credentials
After you create the API key, you’ll find the Consumer key and Consumer secret in the same Advanced tab of the WooCommerce section. Using this information, you have to construct an API URL. The migration app will use it to get your store data.
The URL with API credentials should look like this:
https://<Consumer key>:<Consumer secret>@<server>
Instead of the “server", you have to insert your store’s domain. So, the URL could be:
https://ck_00a0000a0a00000000000a0aaa0a00:[email protected]
If you want to only migrate specific data categories, you can add “?only=” at the end of the URL and insert the values you want. For example, “?only=products,orders” and similar.
Step 3: Start importing from the API URL
Once your URL with API credentials is ready, it’s time to download the import results from WooCommerce. Here’s how to do it:
- Copy the URL with API credentials that you created and head to the Matrixify app > Import.
- Here, insert the URL and click “Upload from URL.”
- Scroll down to Options > Import. When the import is finished, click “Download Import Results.”
- Unzip the file that was downloaded.
Step 4: Migrate WooCommerce to Shopify
The downloaded zip file contains an Excel file with your store data and a folder named “Images” where all product and collection visuals are kept.
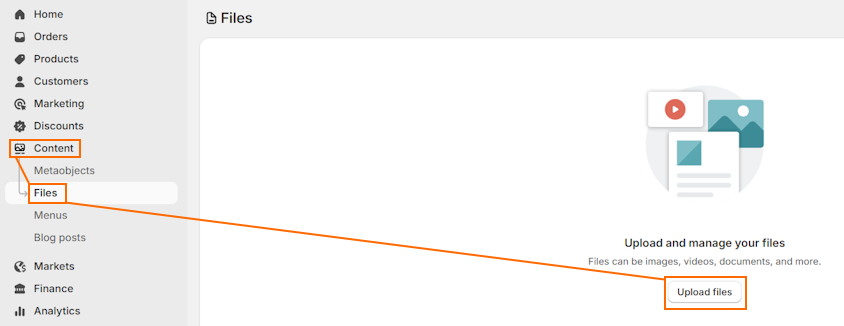
To upload unzipped images to Shopify, all you have to do is go to Shopify Admin > Content > Files, press “Upload files,” and select all images you want to import.
As for the Excel file, review it on your device first to check if all the information is correct. Then, go to the Matrixify app and upload it into the Import section. If you don’t see any issues, click the Import button.
Final thoughts
Migrating from WooCommerce to Shopify is a smart step for merchants looking to simplify website management. Shopify comes with managed hosting and security, so you can save time and focus on your business goals.
There are multiple ways you can migrate your store. If you want to do it for free, you can manually export CSV files, change the data format, and import them to Shopify. But if you want to save time and don’t mind spending some money, you can automate the process with a migration app like Matrixify.
Whichever method you choose, make sure to double-check your data. This will help make the process unnoticeable to your customers, so they can shop without disruption.

Frequently asked questions
Yes, you can transfer from WooCommerce to Shopify using plugins or manually. Manual migration involves exporting your WooCommerce data into CSV files, changing the data format, and uploading it to Shopify. Meanwhile, plugins like the Import Export Suite help migrate data categories that can’t be exported into CSV files, like customer data.
To migrate from WooCommerce to Shopify, transfer your store’s data categories to Shopify using plugins or by exporting CSV files.
According to my research, Shopify is better for eCommerce beginners. It offers an intuitive dashboard, a drag-and-drop editor, and includes hosting and security in all plans. Meanwhile, WooCommerce requires more technical knowledge, and hosting has to be bought separately. Additionally, WooCommerce doesn’t have as many support options as Shopify.

