Google Tag Manager (GTM) is a completely free way to create and manage all of your website tags in one place. It’s very beneficial to use because it doesn’t require knowing how to code, everything can be managed in one intuitive dashboard, and there’s also a debugging tool to help you out.
But starting out with GTM can be overwhelming if you have never encountered it before. That’s why in this article, we’ll teach you all about what Google Tag Manager is, how to set it up and create your first tag, and more.
Looking to improve website metrics? Optimize your SEO, improve page load time, fix broken links, and more with one app
Try TinyIMG todayWhat is Google Tag Manager?
Google Tag Manager is a free tool that helps you set up and manage the tags on your website without altering any code.
Marketing tags are pieces of code that send information about specific user actions, such as conversions, to a marketing tool.
There are various tools that use such tags, including Google Analytics, Hotjar, Twitter Ads, Facebook Custom Audiences, and more.
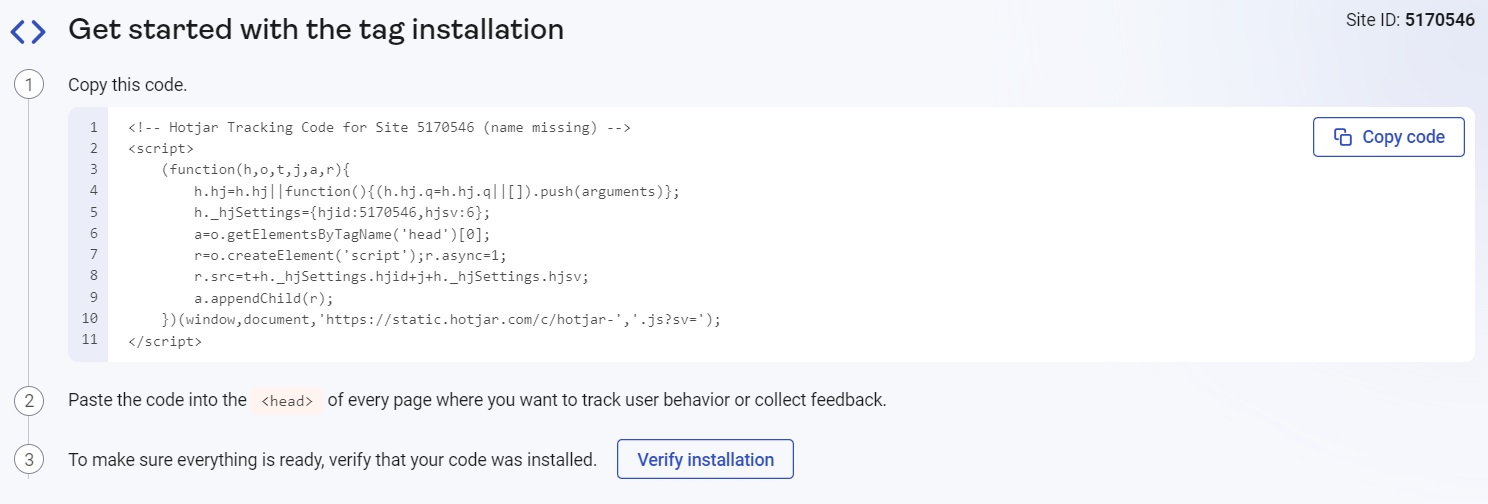
For example, when you try to set up such tools as Hotjar for user behavior analytics, you’re first asked to add a code to your website to verify installation.
This is necessary so that the tool can start tracking and showing you valuable data about your users. Without it, Hotjar cannot gain access to your website.
If you’re not familiar with coding, managing multiple tags can be risky. You may even end up breaking a particular tag or a part of your website.
That’s where Google Tag Manager comes into play. It makes tag setup and management easy. And since you don’t need to use code, it ensures you don’t accidentally harm your website.
Benefits of using Google Tag Manager
Using Google Tag Manager is beneficial for any website owner who wants to track user actions because it allows you to manage different platform tags that collect various data from your site. Here are all the main benefits that using Google Tag Manager gives you:
- Saves time. GTM lets you skip having to task your busy developers with adding tags to your website, so you can do it fast and on your own.
- Manage tags in one place. No matter how many tags you have, Google Tag Manager lets you control all of them in one place.
- Identifies bugs. With the Preview and Debug mode, you can easily find and fix errors before publishing the tag, ensuring you don’t break the website.
- Create custom templates. If you need to create some events repeatedly, like link clicks or conversions, Google Tag Manager lets you use custom templates. This means exporting the needed tags, triggers, and variables for later use.
How does Google Tag Manager work?
Using Google Tag Manager, you can control all your marketing tags on a web user interface. You first need to add snippets of code from GTM to your website so that they are accessible on all of your pages.
Then, you can start creating tags for the third-party analytics, marketing, or other platforms you use.
Tags execute in response to events, which can be link or button clicks, page scrolls, and so on. You have to set triggers for each tag which will wait for the specific events to know when to execute. For more customized tracking, you may also set variables to gather dynamic values.
Let’s take a look at each Google Tag Manager component in more detail.
Tags
A tag is a code snippet that is primarily used to send information from a website or an app to a third-party tool. This can help website owners understand user actions and behavior in order to improve website metrics.
For example, a tag can monitor user actions on your site, from specific page views to clicks, and more. Then, the collected data is sent to the tool from which you took the tag, such as Google Analytics, Google Ads, Hotjar, or any other platform.
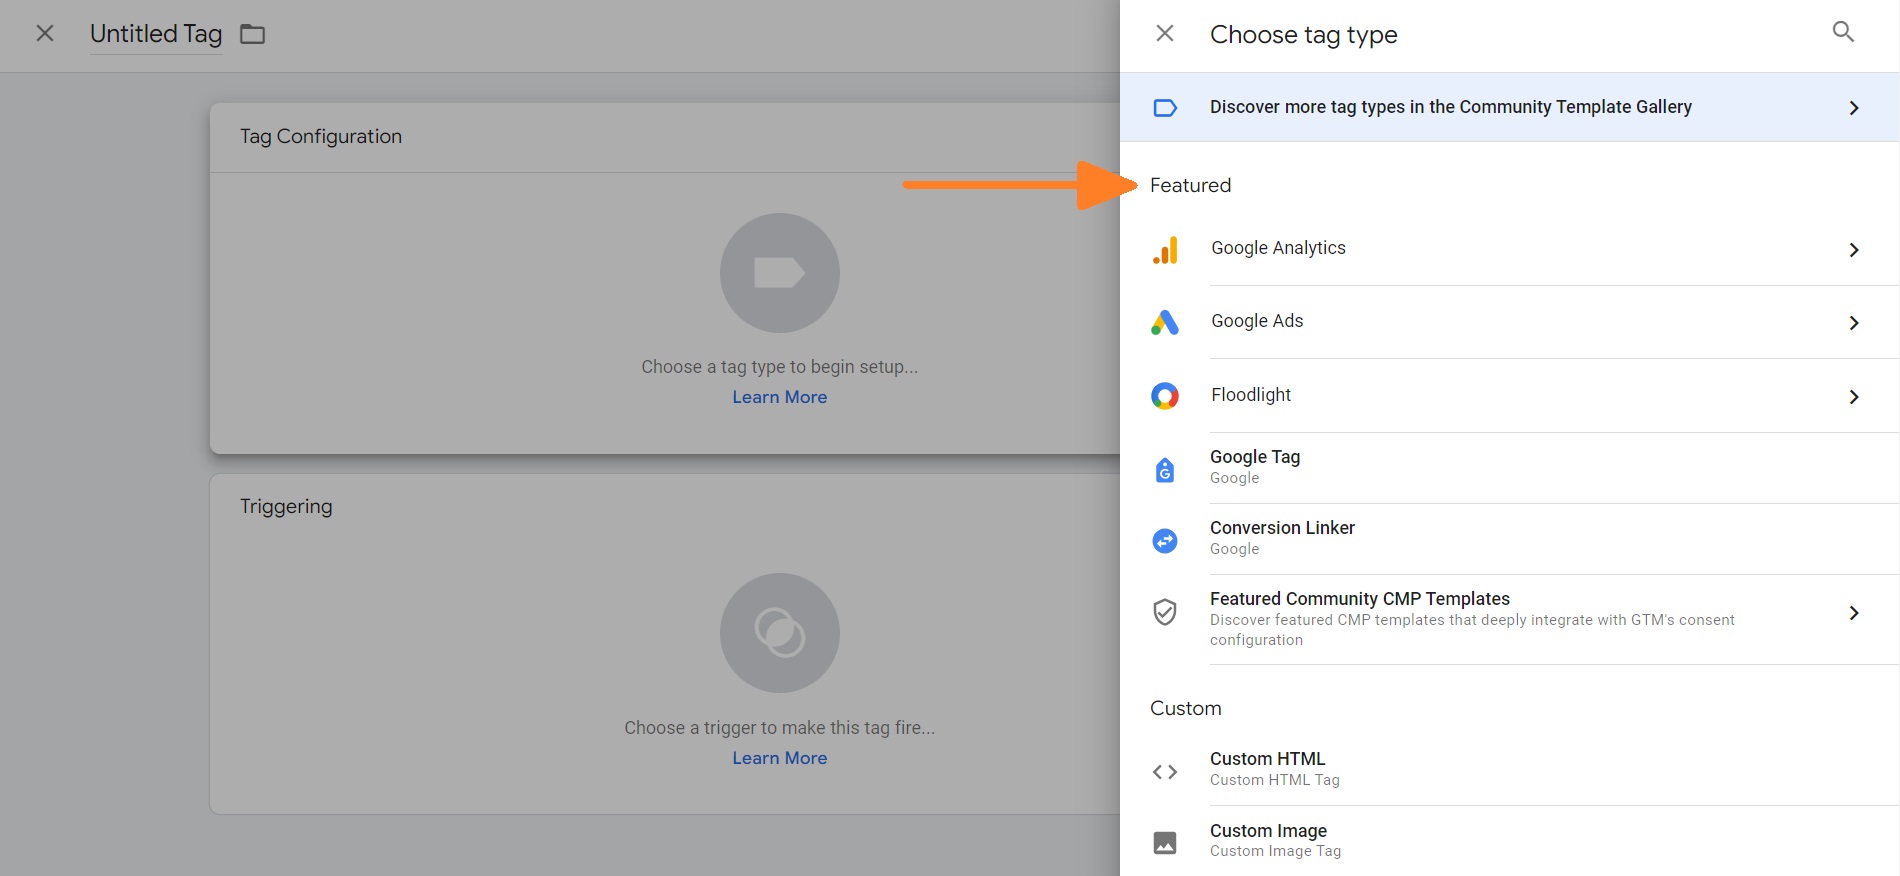
When creating a new tag on GTM, you’ll be given a lot of featured or commonly used tag templates from which to pick. Alternatively, you can create a custom tag.
Here are some of the most commonly used tag templates on Google Tag Manager:
- Google Analytics
- Google Ads
- Adometry
- Audience Center 360
- AWIN Conversion
- Crazy Egg
- DistroScale
- FoxMetrics
- Hotjar
- Google Trusted Stores
- LinkedIn Insight
- Pinterest Tag
- Quora Pixel
- Twitter Universal Website Tag
Triggers
Triggers are rules that determine when a website tag should execute. This means a tag should only fire in case of specific events. Such events may include page views, form submissions, link or button clicks, scroll depth, time on page, and more.
Triggers must be set for every new tag that you create or you won’t get the data you wish to collect.
For example, if a trigger is set to be a page view, the tag will execute as soon as the user visits the website.
You can set the firing trigger conditions when creating a new tag.
Google Tag Manager also lets you create page views, user engagement, click-related triggers, or even custom ones.
Variables
As defined by Google, a variable is additional information that can be called by a trigger, tag, or another variable to gather specific values.
In triggers, a variable is useful for better defining when a tag should fire. For example, this can be firing a trigger only upon form submission or when the clicked URL contains a specific value (e.g. examplesite.com).
Meanwhile, in tags, a variable is used to store dynamic values. For instance, it can be grabbing the submitted form ID or passing a product ID to a conversion tracking tag.
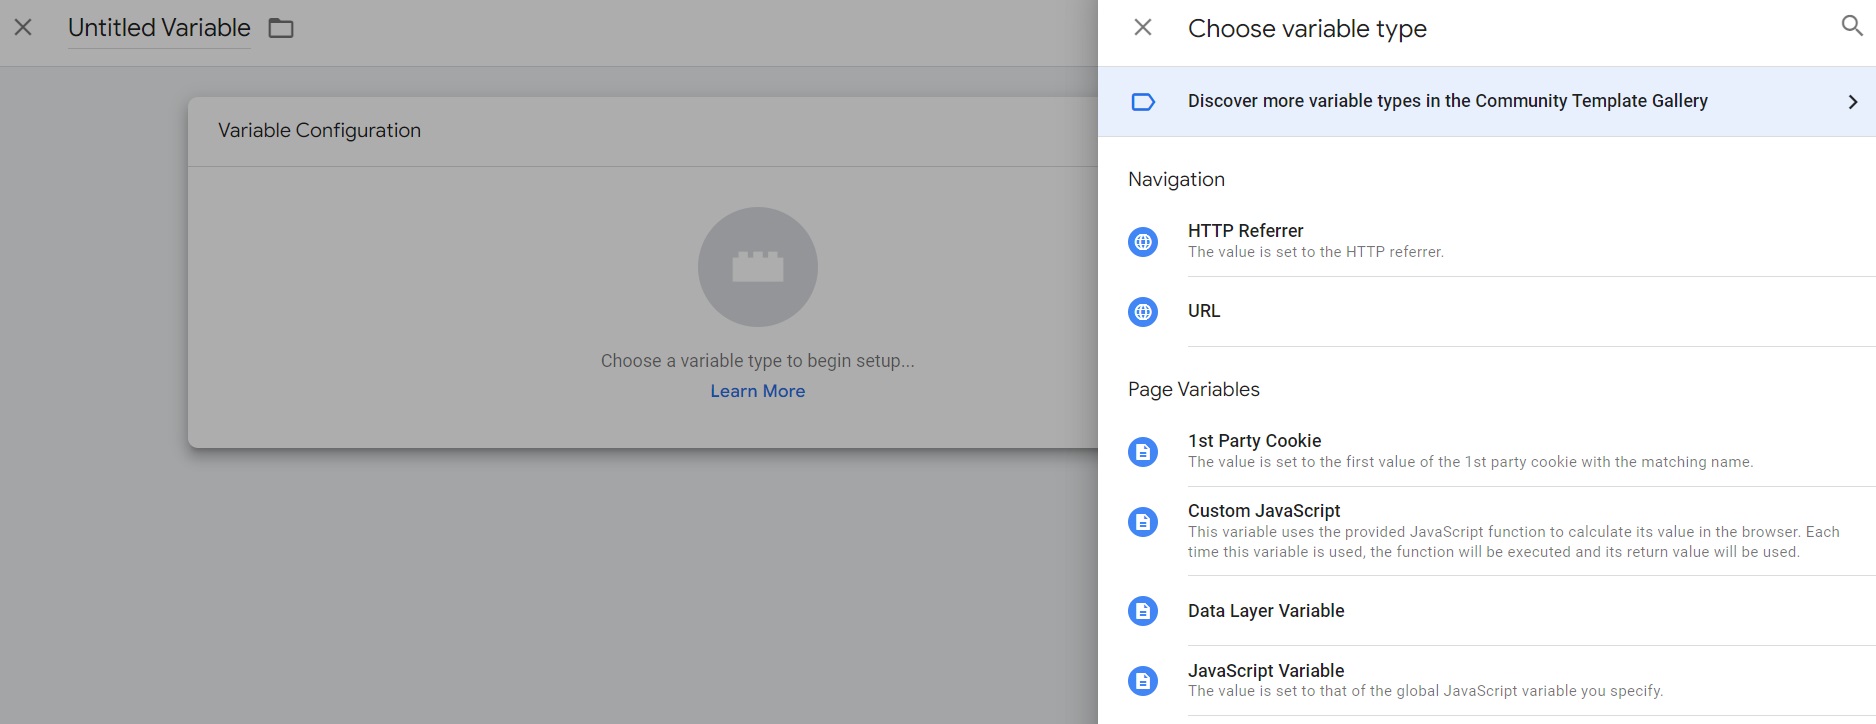
There are multiple types of premade variable templates on Google Tag Manager, including navigation, page, page element, utility, and container data variables. You can find them all by creating a new variable in the Variables section of GTM.
If you can’t find what you’re looking for, you may also browse through the Community Template Gallery.
Key use cases of Google Tag Manager
Google Tag Manager can be used with a variety of tools created for website analytics, marketing, and more. Some of the most popular platforms that website owners use and which require installing a tag on your website include:
- Google Analytics
- Google Ads
- Hotjar
- LinkedIn Insight
- Facebook Ads
- Salesforce
- HubSpot
Here are just some examples of what types of data you can track by implementing tags to your website with Google Tag Manager:
| Page views | Website page views, single-page website views, mobile page views, session duration, page load time |
| Clicks | Button clicks, link clicks, affiliate link clicks, file downloads, etc. |
| Forms | Form submissions, checkboxes, etc. |
| Conversions and sales | Affiliate sales, conversions, keyword and revenue relation |
Many of the things you track on various platforms thanks to Google Tag Manager can help you improve your website. It can give you insight into what you should focus on fixing which could potentially result in more traffic, lower bounce rates, or even higher sales.
How to set up Google Tag Manager
Setting up GTM requires having a Google Account. Here’s the full step-by-step guide on how to get started with the tag management system:
1. From your Google Account, head to the Google Tag Manager.
2. Click the Create Account button.
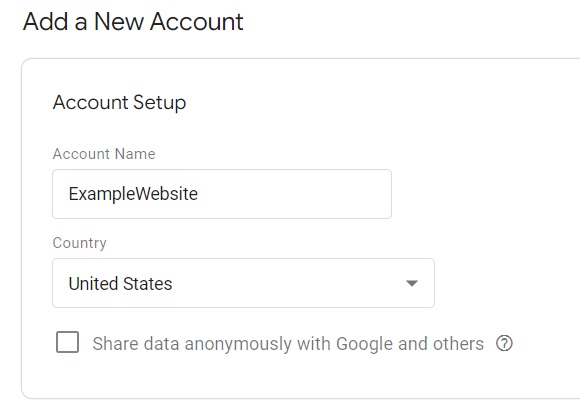
3. Enter the required account setup details, such as account name and country.
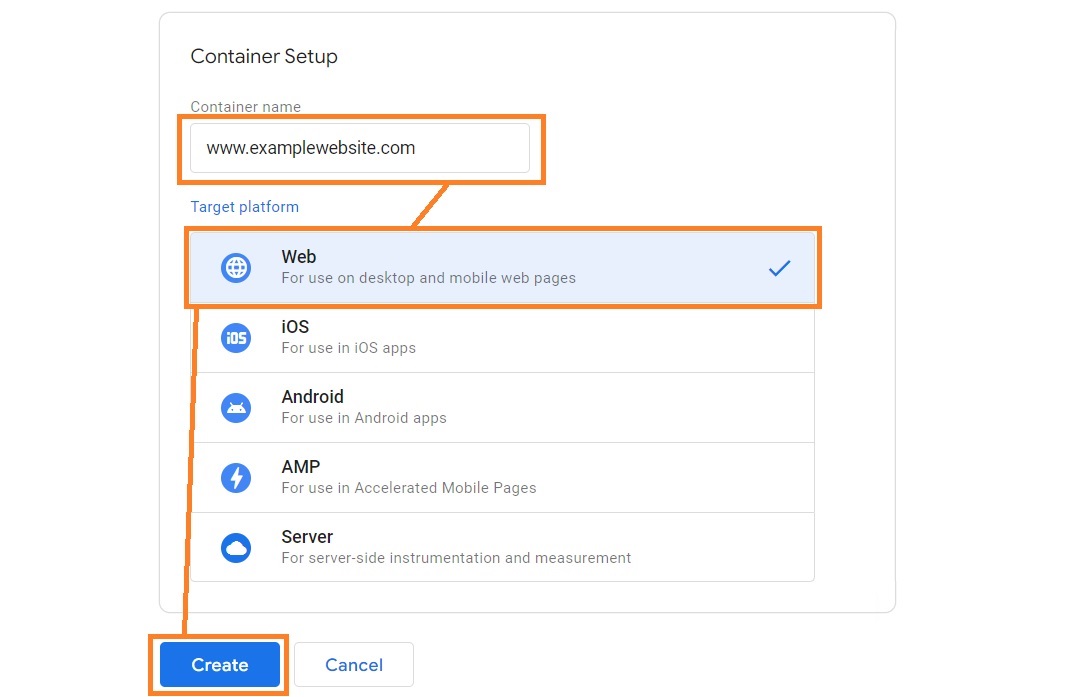
4. Under the Container Setup section, enter a container name (your website URL) and choose Web as your target platform. Click Create.
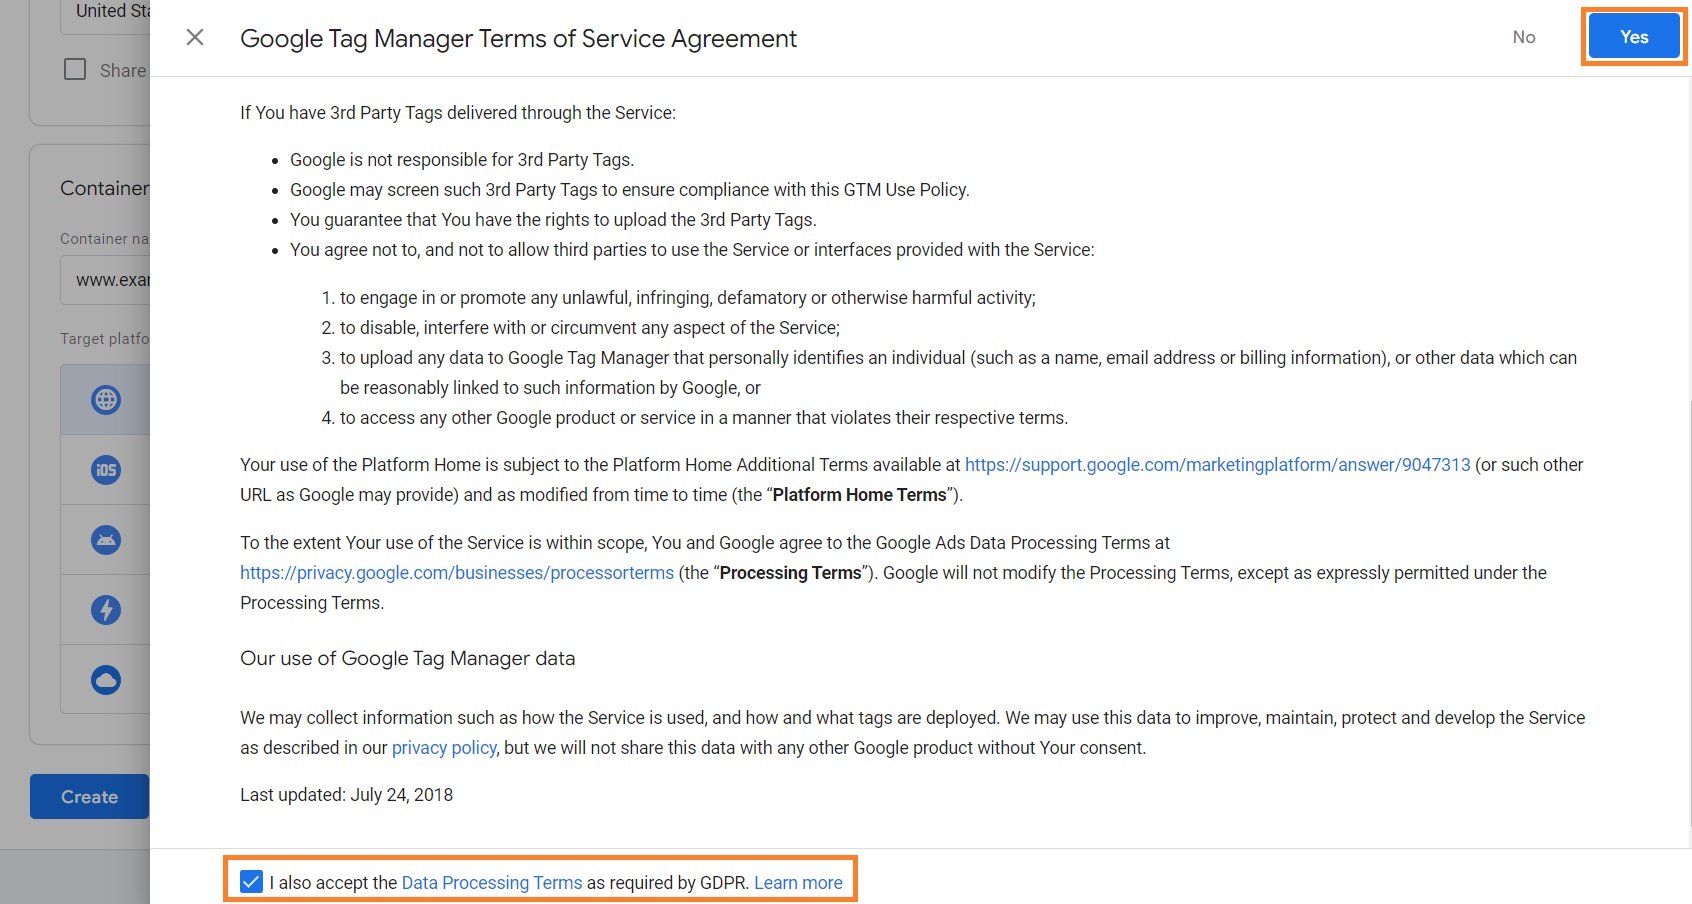
5. In the Terms of Service Agreement popup, checkmark the acceptance box at the bottom and click Yes at the upper-right corner of the window.
6. You’ll get a code snippet to paste into your website. Copy the first part of the code and place it immediately under the <head> section of your website code. You can see an example of it below:
7. Copy the second part of the code and add it after the <body> tag. Here’s an example:
8. Save the changes in your website code.
That’s it – you can start using Google Tag Manager. If you’re not familiar with code and don’t want to mess with it, ask a developer in your team to add the code for you.
How to add a tag on GTM
Adding a tag on Google Tag Manager isn’t difficult in most cases because there are plenty of featured tag templates for popular tools. Here’s a step-by-step guide on how to add and publish a tag:
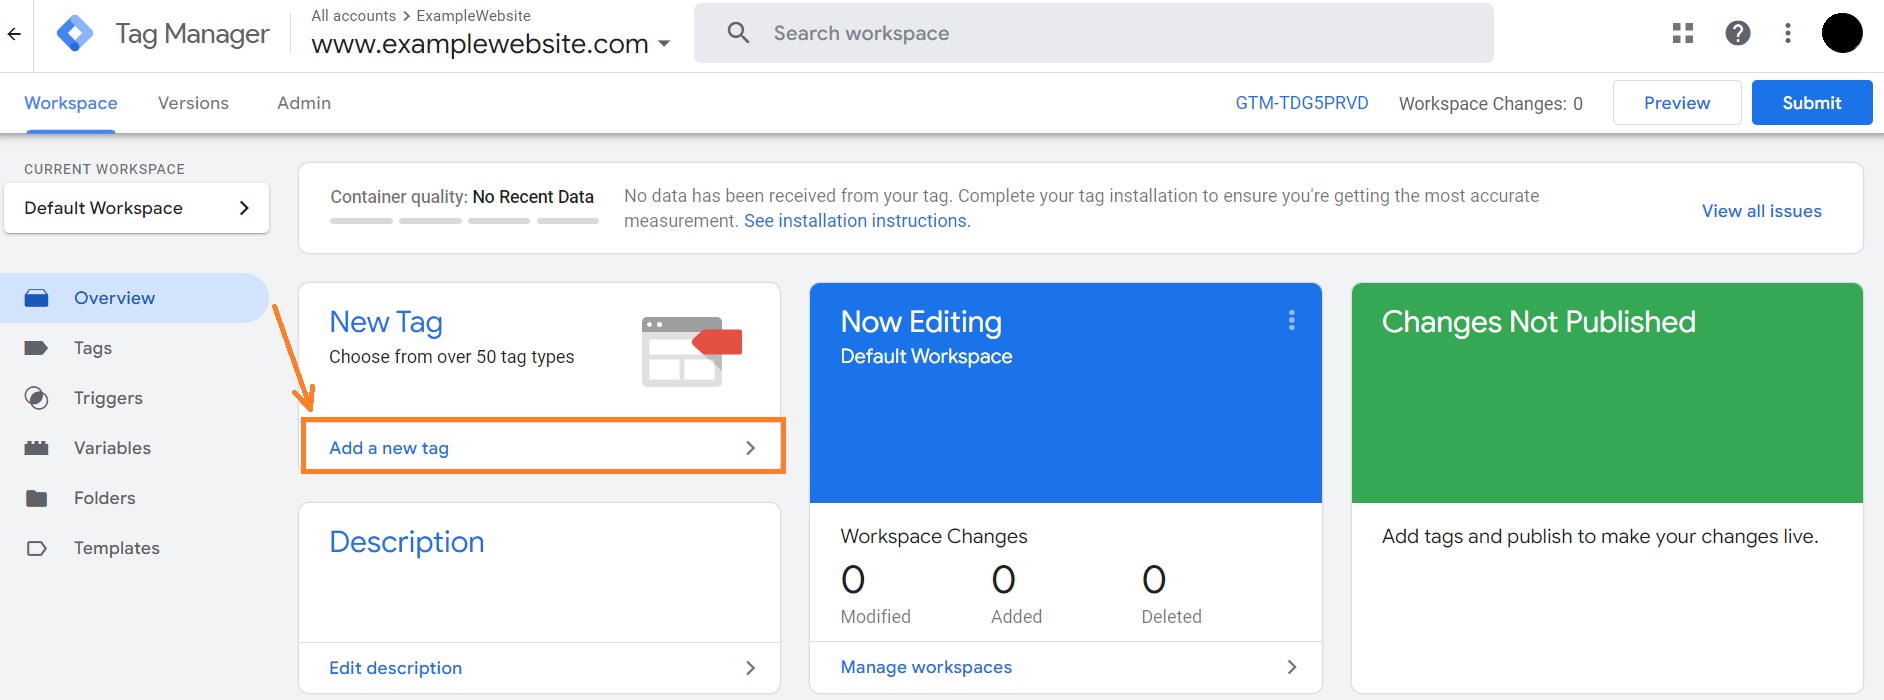
1. In your Google Tag Manager account, click Add a new tag.
2. Choose a name for your tag, preferably something related to the platform you’re creating a tag for.
3. Press on the Tag Configuration section.
4. Select the platform you want to create a tag for.
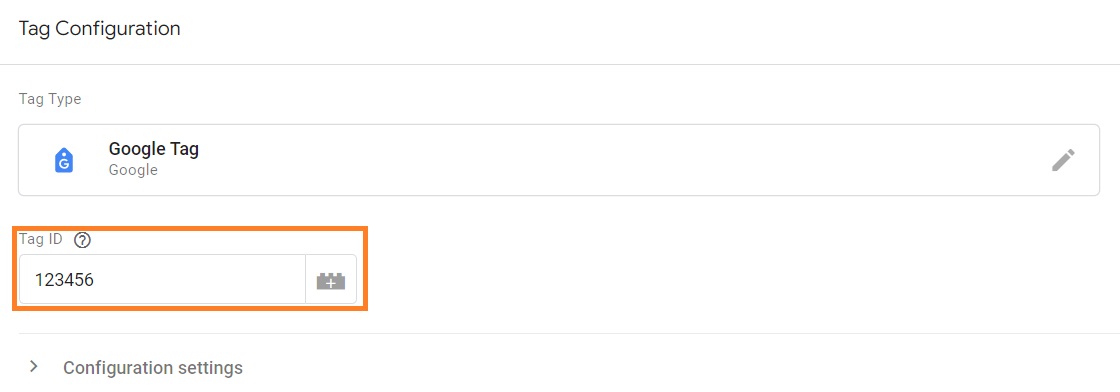
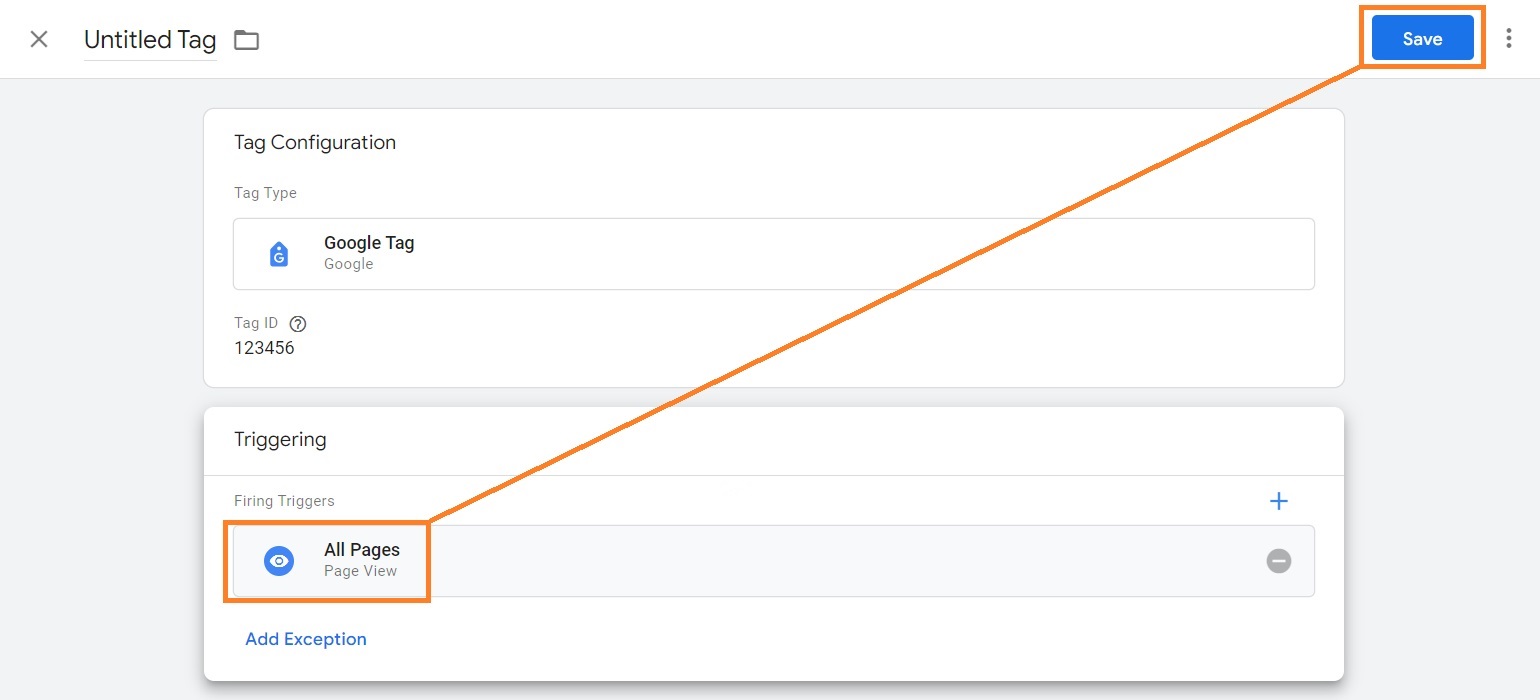
5. Click the Google Tag option.
6. Insert the account ID of the platform you chose. You may also set up configuration and event settings variables.
7. Scroll down to the Triggering section and click on it.
8. Click on All Pages. You may add exceptions if you wish.
9. Press the Save button.
10. In the main window, you’ll see the Preview button. Click it so that GTM can identify any potential bugs.
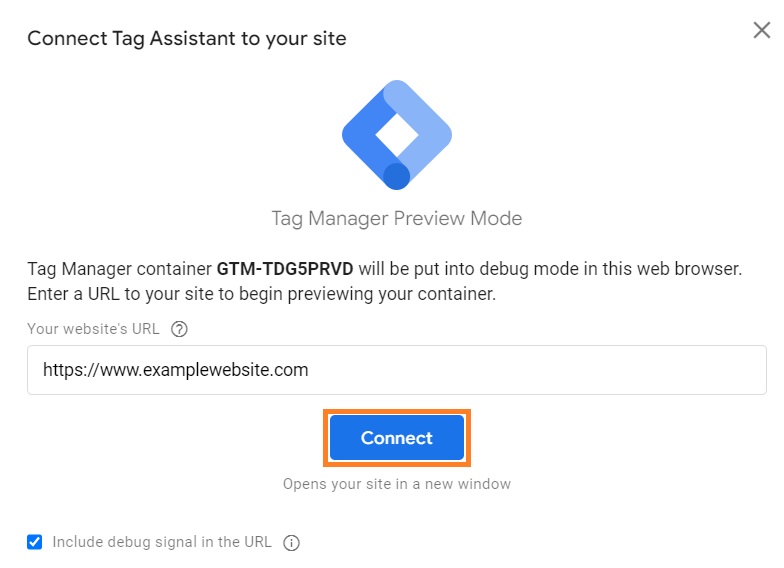
11. Insert your website URL into the new window and press Connect.
12. You should get a message that says “Tag Assistant Connected.” Meanwhile, the preview page should also say “Connected!” – click Continue.
13. Start debugging your tags – we highly recommend doing this before publishing your tags to ensure they work. Once you’re done, go back to the main Google Tag Manager window and click Submit.
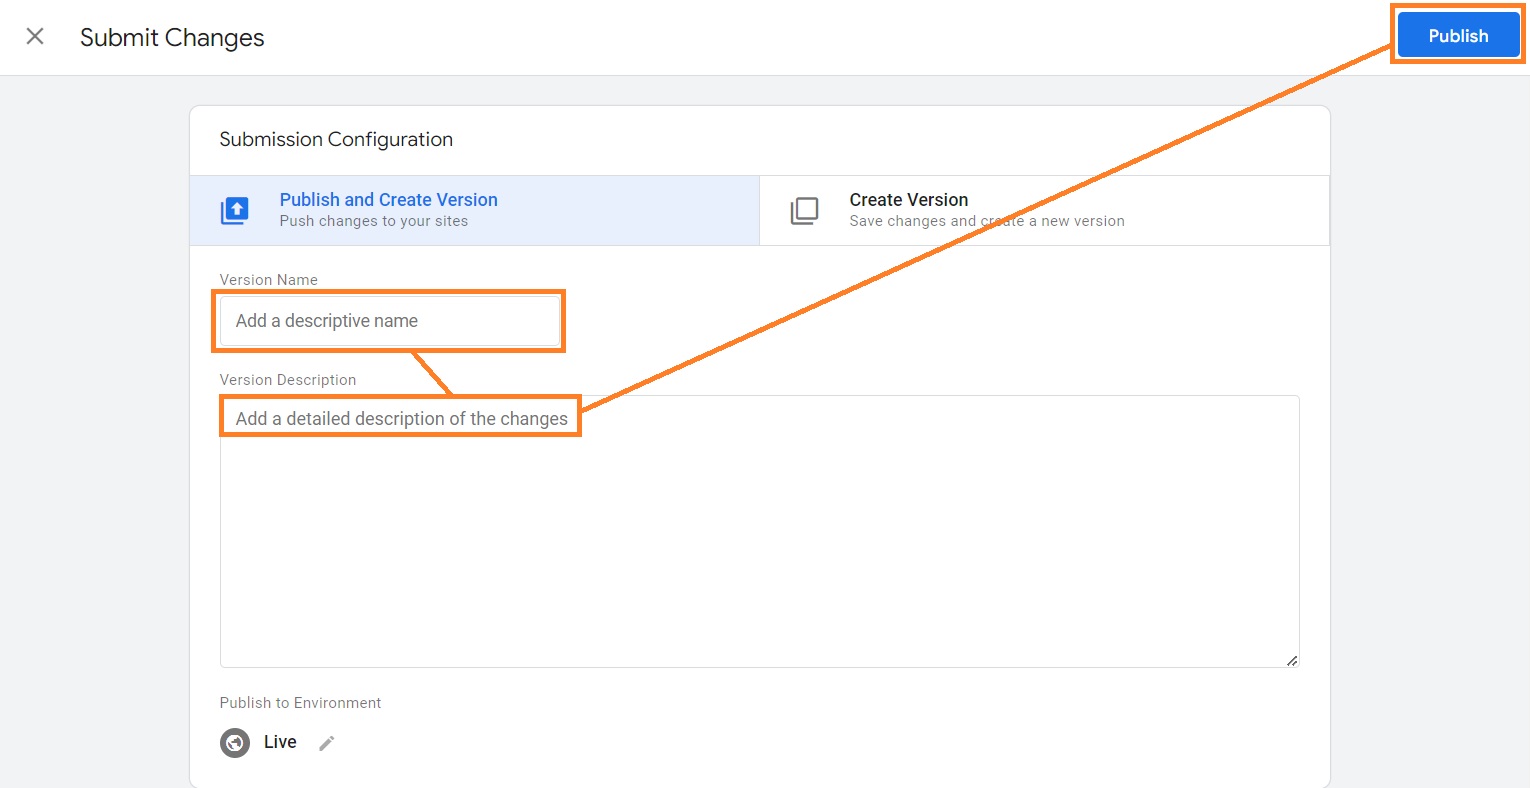
14. Add a name and description for your version and the changes, and click Publish.
Once you open the platform you created the tag for, it should start displaying data as soon as users start coming to your website.
Conclusion
Google Tag Manager is a must-have tool for anyone who tracks their website analytics, conversion, remarketing, and more. Setting it up is completely free and only requires having a Google Account.
The tag management tool helps website owners inexperienced with coding to set up tags and manage them in one place. Whether it’s Google Analytics, Google Ads, Hotjar, Pinterest Tag, Quora Pixel, or anything else – GTM can help you set up any tool quicker and with fewer resources.

Frequently asked questions
Google Tag Manager lets you add and manage your tags for various site analytics, conversion tracking, and other purposes in one place. It’s a great solution to use with tools like Google Analytics, Hotjar, Twitter Ads, and more.
Google Tag Manager is a free tool for installing and managing tags that track user actions. It requires no coding on your website, eliminating the risk of accidentally breaking your website. Some of the most known tags include Hotjar tag or Google tag which is used for Google Ads, Google Analytics, and more.
The Google Tag helps you send collected data to Google products, such as Google Analytics or Google Ads. This helps website owners analyze their ads and websites to gain insights about user actions and behavior.
What you should track with Google Tag Manager depends on your website needs. The most common tracking use cases include button clicks, outbound link clicks, menu link clicks, conversions, shopping cart abandonment, and more.

