Squarespace is an easy-to-use website builder, but it’s limited for eCommerce due to a lack of order fulfillment automation and not as many sales channels. So, many merchants are looking to make a switch to Shopify – a full-fledged eCommerce platform that’s catered to both beginners and large stores.
Shopify comes loaded with marketing features, from email to SEO and AI-powered tools. It also has an app store that’s loaded with thousands of third-party apps to elevate different parts of your store.
Continue reading to learn how to prepare your store and migrate from Squarespace to Shopify in multiple ways.

How to prepare to migrate from Squarespace to Shopify
Before you start migrating your store from Squarespace to Shopify, you have to prepare both platforms. For instance, this includes backing up your data to avoid data loss or errors and setting up a Shopify store.
Step 1: Set up a Shopify store
To ensure a faster and more seamless migration process, you have to prepare your Shopify store. You can use a free 3-day Shopify trial to test out the features and save money, considering you also get 3 additional months for just $1/month.
Here’s a step-by-step setup process for Shopify:
- Pick a Shopify plan. Choose a plan that offers the resources needed for your store.
- Choose a theme. Go to your Shopify Admin, head to Online store > Themes > Visit Theme Store. This will take you to the Shopify theme store – pick a free or premium design.
- Set up shipping. Go to Shopify Settings > Shipping and delivery and set up the rates for different regions.
- Configure tax rates. Head to Shopify Settings > Taxes and duties and set up taxes based on the store’s region.
- Set up payment gateways. Enable Shopify Payments in the admin panel Settings for lower transaction fees or set up third-party gateways.
- Run a test order. Select “(for testing) Bogus Gateway” as a provider on Shopify Payments and check if test orders work as intended.
- Transfer your domain. Either get a new domain or transfer yours to Shopify. Don’t forget to set up Shopify redirects to ensure your customers don’t encounter 404 pages.
Step 2: Back up your Squarespace store data
It’s best to back up your Squarespace store data before migrating to Shopify. This is necessary in case you lose data or make a lot of errors. All it takes is exporting all of your data types, including customers, products, reviews, and order history, as CSV files and storing them separately.
Squarespace to Shopify migration methods
There are multiple methods you can use to migrate from Squarespace to Shopify. The best way depends on your budget, time, and website size. Here are the most popular methods available:
- CSV file migration. While exporting data from Squarespace and importing it to Shopify takes time and is more prone to error, it’s a free migration method. You’ll have to update all of the data formats to match Shopify’s mapping.
- Copy-paste method. If your store is still small and you have just a few dozen products, customers, or orders, you can manually copy and paste the information from Squarespace to Shopify.
- Migration services. The fastest way to migrate your store is to use a migration service. For example, LitExtension tailors the price based on your store data size and takes care of migration for you. It costs money, but their experts ensure that migration is seamless and doesn’t leave errors behind.
- Migration expert. You can hire a professional to take care of migration for you. For example, you can explore the Shopify Partner program or hire an expert.
How to migrate Squarespace to Shopify (manually)
Migrating from Squarespace to Shopify manually requires exporting your store’s data, updating the data format to match Shopify’s, and importing it to your new store. Note that this process isn’t optimal for all data types, so you first need to know what you want to migrate:
- Products. You can import your product CSV file straight to Shopify.
- Customers. It’s easy to import your customer data straight to Shopify without any apps.
- Customer reviews. You’ll need a third-party Shopify app to upload your product reviews.
- Order history. The only option is using a migration app from the Shopify App Store.
Once you’re aware of what you want to migrate, you can follow the steps for each data type below.
Step 1: Export product data from Squarespace
The first step is to migrate your products. Squarespace makes it simple, as all you have to do is follow these steps:
- Open Squarespace and go to Products & Services > Products.
- To export all products, click Export all. Alternatively, you can select the products you want to export and click Export selected.
- Name the file, like “squarespace-product-data.csv”, and save it.
Step 2: Edit product data format to match Shopify
In order to successfully import product data to Shopify, you’ll have to edit your exported Squarespace product data format to match Shopify’s. To make it easier, you can use the official Shopify CSV product template.
Here are the different product data types of Squarespace vs Shopify:
| Squarespace data type | Shopify data type |
| Product URL | Handle |
| Title | Title |
| Default Vendor Name | Vendor |
| Categories | Type |
| Tags | Tags |
| Option Name 1 | Option1 Name |
| Option Value 1 | Option1 Value |
| Option Name 2 | Option2 Name |
| Option Value 2 | Option2 Value |
| Option Name 3 | Option3 Name |
| SKU | Variant SKU |
| Weight | Variant Grams |
| Price | Variant Price |
| Stock | Variant Inventory Qty |
Step 3: Import products into Shopify
When your CSV product file is ready, you can import it to Shopify. Here’s how to do it:
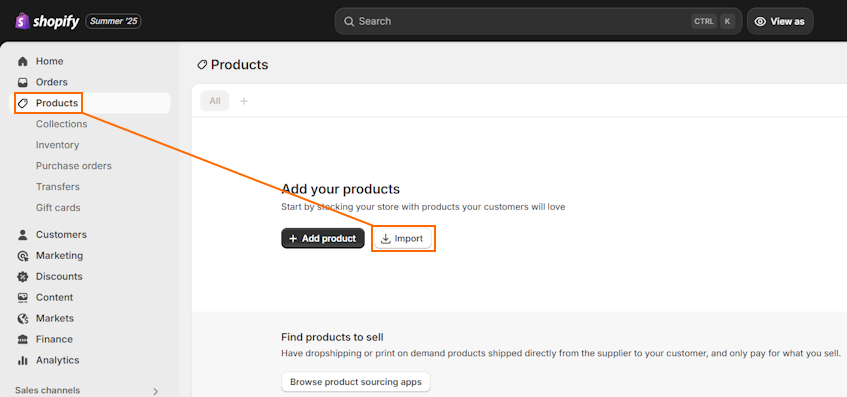
- Open your Shopify Account > Products > Import.
- Click “Add file” and select the CSV file with the edited data format.
- Deselect the “Publish new products to all sales channels” field and click “Upload and preview.” Once you review the details, click “Import products.”
When you upload the CSV file, Shopify will send you a confirmation email.
Step 4: Check for common errors
When you import the products, you should review whether all the details were imported properly. A few common issues to take note of are:
- Products imported but not published. Head to the Products section in your Shopify account and open the product that wasn’t published. Find the Publishing section, click Manage, and choose the sales channels to publish them in.
- Product details are missing. If some product information is missing, fill it in manually. But if it’s a consistent issue, you’ll have to review whether you updated the data format in your CSV file correctly.
- Product variants weren’t imported. Go to the Products section and find the product that’s missing variants. Click it and insert them manually through the Variants section.
Step 5: Export customer data from Squarespace
Although it’s optional, I’d recommend migrating your customers to Shopify as well. It ensures your customers retain their existing accounts, and in some cases, it’s necessary for legal compliance proof.
Squarespace makes customer exportation very simple. Here’s how to do it:
- Open your Squarespace account > Contacts.
- Click the three-dot sign (…) > Export all contacts.
- Press Confirm, name the CSV file something like “squarespace-customer-data.csv,” and save the file.
Step 6: Change the data format to match Shopify’s
Just like with products, you’ll need to update customer data to match Shopify’s. This one is a bit trickier, since it requires changing some values or adding columns that aren’t exported from Squarespace.
You can find the detailed instructions for each data type in the table below:
| Squarespace data type | Shopify data type | Action |
| First Name | First Name | No changes needed |
| Last Name | Last Name | No changes needed |
| No changes needed | ||
| Accepts Marketing | Accepts Email Marketing | Change the column name and use yes and no values in the column |
| Shipping Address 1 | Default Address Address1 | Change the column name |
| Shipping Address 2 | Default Address Address2 | Change the column name |
| Shipping City | Default Address City | Change the column name |
| Shipping Province/State | Default Address Province Code | Change the column name and ensure it contains the state or province ISO code of the customer’s address |
| Shipping Country | Default Address Country Code | This column won’t be exported, but you need to create it and add the country ISO code of each customer’s address |
| Shipping Zip | Default Address Zip | Change the column name |
| Shipping Phone Number | Default Address Phone | Change the column name |
Step 7: Import customers to Shopify
When you’ve double-checked the customer data file, you can import it to Shopify. Here are the detailed instructions on how to do it:
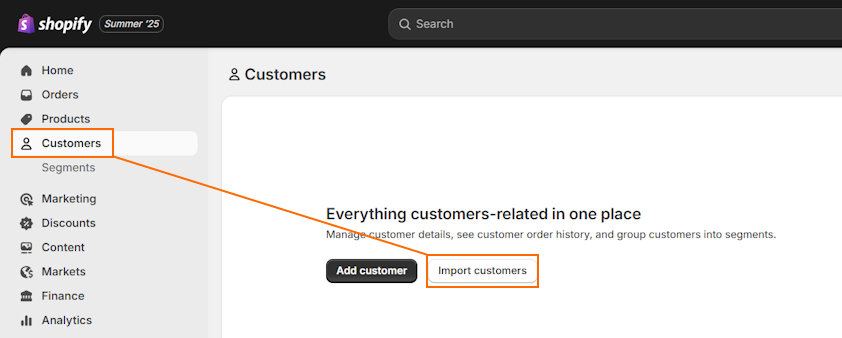
- Open your Shopify account and head to Customers > Import.
- Press “Add file” and insert the updated CSV file.
- Click “Import customers,” review if the information is correct, and press Import.
Step 8: Import your customer reviews to Shopify
Shopify doesn’t provide an automatic way to import customer reviews to your store. For this, you’ll need to use a third-party app like Loox. I’ll show you how to do it with Loox, but it’s similar to most apps.
- Open the Shopify review app page, like Loox, click Install, and follow the setup guide.
- Head to Reviews > Import reviews.
- In the presented options, click “Custom file.” You’ll find the CSV template; download it.
- Upload your customer review data to the CSV template, go back to the Loox app, and click “Continue to upload file.”
- Drag-and-drop your customer review data file.
Step 9: Migrate your order history to Shopify
You can also migrate your order history to Shopify. You’ll first need to export it from Squarespace by following these steps:
- Open your Squarespace account > Products & Services > Orders > Download CSV.
- Select Fulfilled orders, and choose the order date as “All time.”
- Click Download, name the file something like “squarespace-order-data.csv” and save it.
However, please note that you can’t simply import order history to Shopify. For this, you’ll need to use a third-party app from the Shopify App Store, like LitExtension Store Migration or Matrixify.
How to migrate Squarespace to Shopify (automatically)
Migrating from Squarespace to Shopify automatically can be done using a migration service like LitExtension. It reduces the chances of error and helps you save loads of time.
I’d recommend using LitExtension, since it takes just a few clicks to migrate the whole store, including products, orders, customers, and reviews. Plus, you don’t need any additional third-party apps.
Here’s the full process on how to migrate your Squarespace store to Shopify with an app:
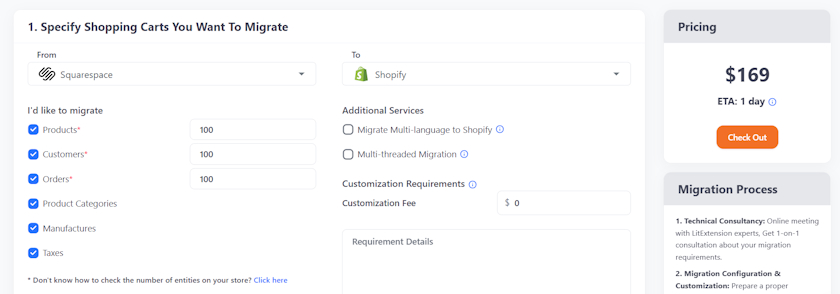
- Sign up and log in to your LitExtension account. Click “Create Migration.”
- Select Squarespace in the “Source Cart Type” section. You’ll be requested to purchase the migration package. Click “Get the package now.”
- Choose what you’d like to migrate and how many products, customers, and orders your store has. This will show you the total price. Go to Check Out and purchase the migration service.
- Once you purchase the service, you’ll get an online technical consultation with a personal assistant about your migration requirements.
- You’ll have to prepare an environment before the migration, including setting up your source and target carts (adding your Squarespace and Shopify details, like the store URL).
- You’ll be able to run a demo migration to preview the end result or run a full migration instantly.
The migration process is run on a server, so you don’t have to wait. You can close the site and continue browsing. LitExtension experts will guide you through the full process, helping to ensure that there are no errors left behind.
Final thoughts
Migrating from Squarespace to Shopify is beneficial for merchants who want to expand their business and sales channels. It comes with automated order fulfillment, loads of marketing features, and thousands of apps.
The easiest way to migrate your store from Squarespace to Shopify is to use a migration service like LitExtension. It doesn’t just save you time – it also reduces the chances of error and automated redirect creation. Yet, merchants on a budget can manually migrate the data by exporting it to CSV, changing the data format, and importing it to Shopify.
Whatever method you choose, ensure you double-check that all pages work as intended. This includes reviewing redirects, so customers don’t encounter broken pages.

Frequently asked questions
Yes, you can transfer Squarespace to Shopify by using a migration app like LitExtension or manually migrating CSV data files. Manual migration takes more time but is free. You can export your products, customers, and other data from Squarespace, edit the data format to match Shopify mapping, and import the files to Shopify.
Yes, you can integrate Squarespace with Shopify. You can add a Shopify Buy Button to your Squarespace pages. All you have to do is log in to Shopify, generate a Buy Button code for your product, and paste it into any Squarespace page you want.
It takes around 48 hours for a domain transfer from Squarespace to Shopify to complete. In rare cases, it may take up to 20 days due to delays. Please note that the domain connection should be complete before transfer.


