Shopify robots.txt file contains information about which pages should and shouldn’t be crawled by search engine bots. Before crawling your Shopify store, crawlers will check your robots.txt file to see what rules are imposed on them.
In 2021, Shopify started allowing website owners to edit their robots.txt file, giving you more control over your website. However, leaving errors in robots.txt can be detrimental to your store’s traffic and SEO, so it’s important to know how and when you should edit the robots.txt file.
That’s where we come in. In this article, we’ll dive deep into the ins and outs of editing, customizing, and resetting robots.txt.
What is robots.txt?
Robots.txt is a file placed in a website’s server that contains rules about accessing your website for search engine bots/crawlers. When you edit the robots.txt file, you’re telling search engine bots which parts of the website they can explore and show to people in SERPs (Search Engine Results Pages) and which should not be accessed through simple search.
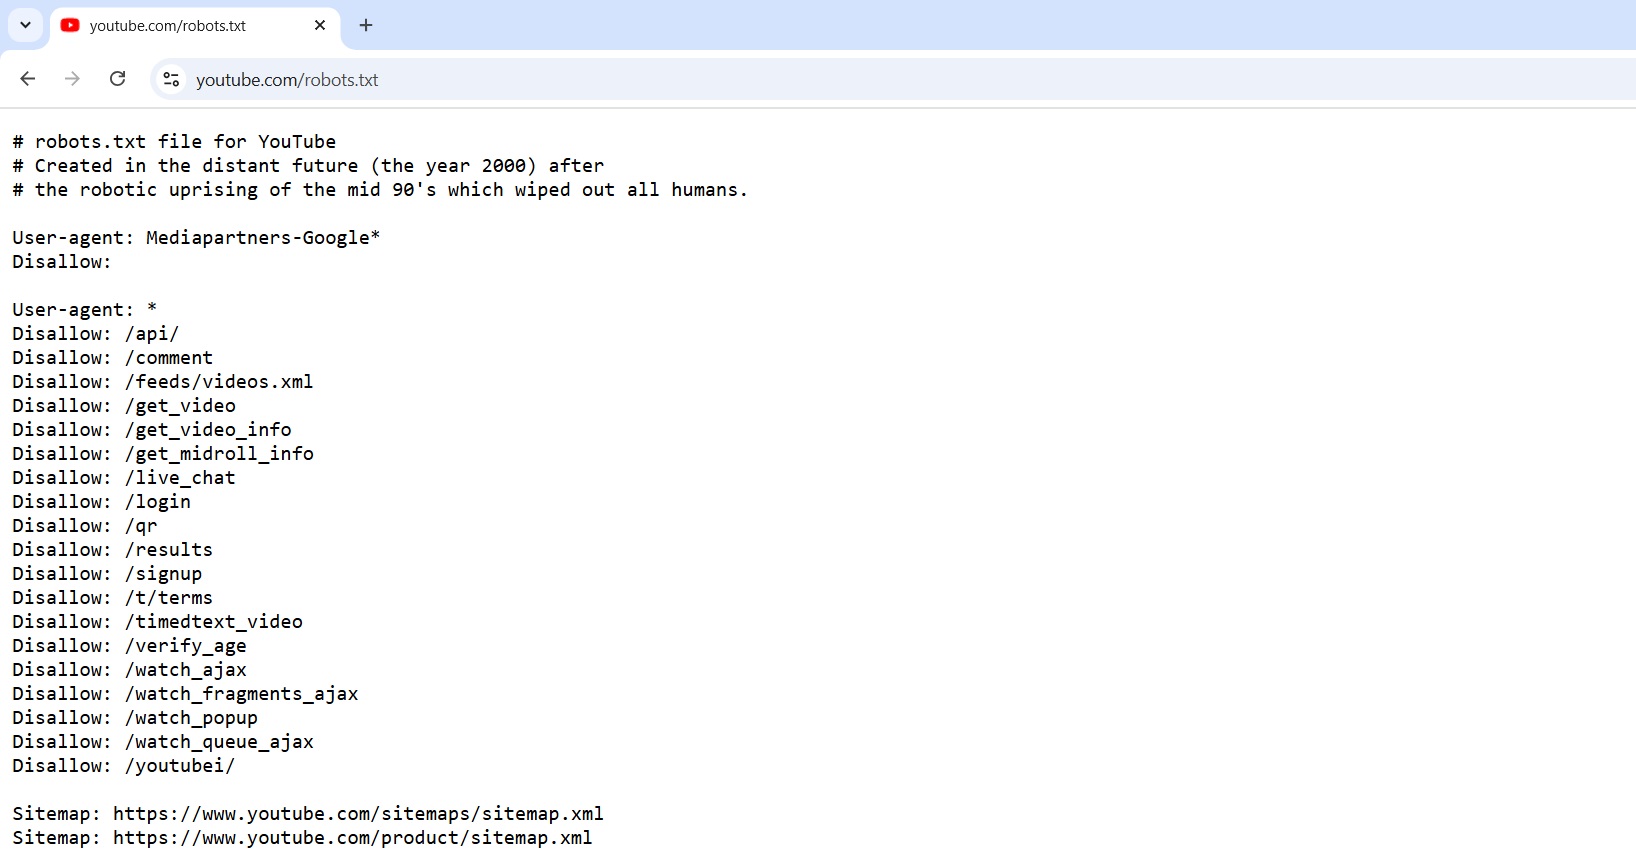
You can see any website’s robots.txt file by adding /robots.txt to the site’s URL. Here’s an example of YouTube’s publicly accessible robots.txt file:
As you can see, the URL of the file is youtube.com/robots.txt. The file allows Google AdSense bots to access the full site but it also blocks bots from accessing login pages, backend points, and other pages.
Is the default Shopify robots.txt good enough?
All Shopify stores come with the default robots.txt file. Generally, the default file is enough for most Shopify stores as they already contain a good amount of rules. However, if you want even more control over your website, it’s a good idea to customize your robots.txt.
Since most ecommerce websites are bigger than any other type of website, the amount of pages, faceted navigation, and pages that are only useful for the buyer (e.g. checkout) can be a huge strain on the size of the website.
Knowing how to noindex Shopify pages can decrease your website’s crawling budget and prevent low-quality pages from being crawled, which becomes more important as your store grows.
Suggested reading
How to edit robots.txt in Shopify?
It’s possible to edit your Shopify store’s robots.txt file through the so-called robots.txt.liquid theme template. However, we suggest hiring a Shopify expert or someone with expertise in code editing because if not done right, you could see a huge dip in traffic.
Another important point is that the robots.txt.liquid file is an unsupported customization, meaning that Shopify customer support can’t help with the edits.
To edit the robots.txt.liquid file, follow these steps:
- Go to your Shopify Admin
- Click Online Store
- Go to Themes
- Click the … button next to the theme you’re currently using, then Edit code
- Under the Templates section, locate robots.txt.liquid and open it. If it’s not there, click Add new template, select robots.txt
- Click Done
- Make the changes
- Click Save
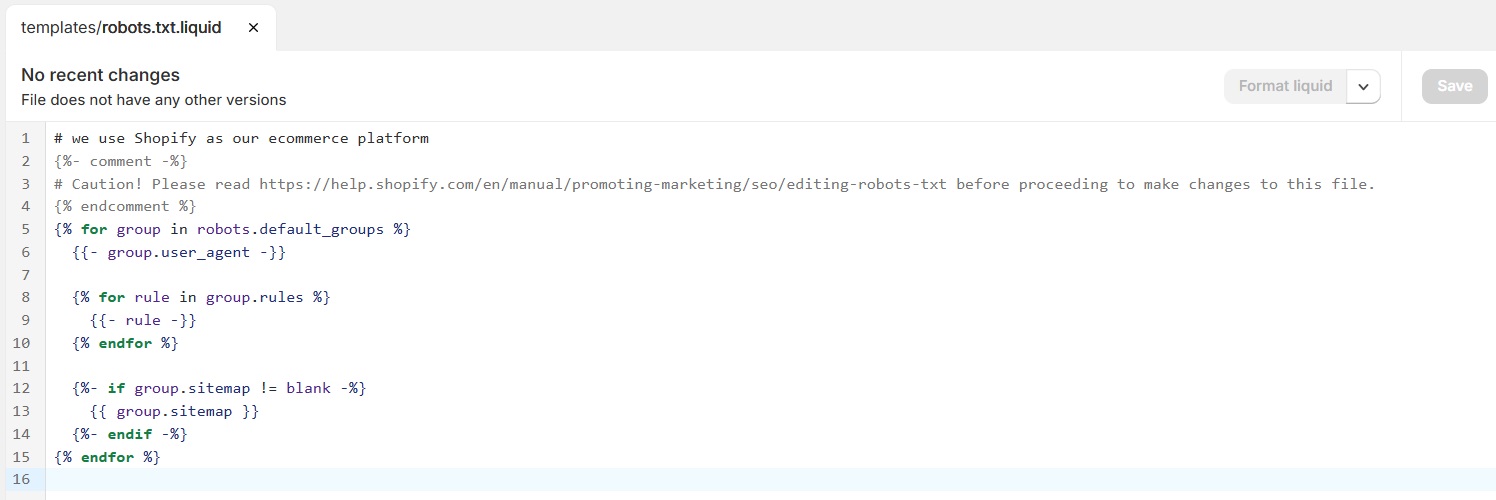
When you create this template, it should look like this:
 We suggest keeping the rules already created by Shopify as they're well-optimized, and interference could result in the loss of traffic.
What can you change in the Shopify robots.txt file?
You can customize the robots.txt file to manage the access of web robots to specific parts of your website. Below are some actions you can take with the robots.txt file in Shopify:
- Add a new rule to an existing group (e.g. disallowing bot access to some private pages on your website)
- Add custom rules (e.g. adding different rules for Bingbot or DuckDuckBot)
- Remove a default rule (e.g. removing the Ahrefsbot with the “Disallow:” rule)
Add a new rule to an existing group
Existing rules include * (all bots), adsbot-google, Nutch, AhrefsBot, AhrefsSiteAudit, MJ12bot, and Pinterest. To add a new rule to one of these groups, you have to add a new block of code to the robots.txt.liquid file.
It could look like this:
{%- if group.user_agent.value == “*” -%}
{{ ‘Disallow: [URLPath]‘ }}
{%- endif -%}
By adding a new rule to an existing one, you can tell all bots or specific bots (e.g. Google bot) not to crawl a certain page that’s not already in the pre-generated Shopify robots.txt file, like checkout, cart, etc.
Add custom rules
We mentioned what groups already exist in the previous section. If you want to add a custom rule that doesn’t apply to any of the aforementioned groups, you’ll need to write a couple lines of codes at the bottom of the template.
Let’s say you don’t want Google Images to crawl images on specific pages. The line of code you need to add will look like this:
User-agent: Googlebot-Image
Disallow: /[URL]
Remove a default rule
Removing default robots.txt rules is not recommended but you can do it by modifying the robots.txt.liquid code.
Below is an example of what it would look like if you removed a default rule that blocks /policies/ pages in the Shopify robots.txt file:
{% for group in robots.default_groups %}
{{- group.user_agent }}
{%- for rule in group.rules -%}
{%- unless rule.directive == 'Disallow' and rule.value == '/policies/' -%}
{{ rule }}
{%- endunless -%}
{%- endfor -%}
{%- if group.sitemap != blank -%}
{{ group.sitemap }}
{%- endif -%}
{% endfor %}
While not recommended, removing a default rule can be beneficial if you want bots to crawl a page that’s already blocked by Shopify.
Shopify robots.txt change examples
A default Shopify robots.txt file includes a bunch of rules. Here’s part of the robots.txt file in a Shopify store:
You can change any of these rules and allow bots to crawl these pages, although it’s not recommended since it can damage your rankings and decrease traffic.
Generally, all of your website is being crawled by bots unless stated otherwise in the robots.txt file.
Besides the default Shopify robots.txt rules, here are some examples of the changes you can make in robots.txt:
- Image crawling. You can block bots from crawling images in specific pages, for example, your personal directory.
- Adding another sitemap. You can add an additional Shopify sitemap to your robots.txt file if you have a lot of pages in your website, and want to categorize them better.
- Blocking bots. You can block specific bots from crawling your website or specific pages, e.g., WayBackMachine, DuckDuckBot, and others.
Should you customize Shopify robots.txt?
There are pros and cons of customizing your Shopify store’s robots.txt file. Let’s explore.
Pros
- Allowing or disallowing search engines from crawling specific pages. For example, you can write a rule that will allow search engines to crawl pages already in the robots.txt file.
- Controlling your website’s crawling budget. Your Shopify store pages will be crawled faster since the crawling time won’t be wasted on pages that don’t need to appear in search engines.
- Disallowing search engines from crawling pages with thin content. Certain pages don’t have enough content to rank in SERPs. To save your crawling budget and not hurt rankings, you can simply instruct bots to not crawl thin content pages.
Cons
- Complex for those not experienced in code editing. It’s better to hire someone knowledgeable to customize robots.txt on your website, as incorrect usage of the feature may result in loss of traffic.
How to check if new robots.txt rules are working?
To test if the changes you made to the robots.txt file are actually working, you can use Google’s robots.txt tester. Just submit your page URL and wait til you get an answer. This tester tool acts just as Google bots would when crawling your website.
How to reset Shopify robots.txt to default?
In order to reset your Shopify robots.txt file to default, you need to save a copy of the robots.txt.liquid template customizations. This step is crucial because you cannot recover deleted templates.
This is how you reset Shopify robots.txt to default:
- Go to your Shopify Admin
- Navigate to Settings > Apps and sales channel
- Click Online store > Open sales channel
- Click Themes
- Click the … button, then Edit code
- Click robots.liquid, then Delete file
Once you delete the file, Shopify will revert back to the default robots.txt configuration automatically.
Conclusion
A robots.txt file can help control search engine crawling and optimize crawl budget, contributing to your Shopify SEO efforts. You can edit the robots.txt file on Shopify, giving you more control over what search engines can and cannot access.
However, if you’re not skilled in SEO, proceed with caution and create a file backup in advance. Misusing robots.txt can be detrimental to your website’s rankings and traffic.

Frequently asked questions
Some search engine crawlers choose to ignore the robots.txt file and index pages that are blocked. The reason could be external links pointing to the blocked page or the fact that the page used to be indexed, and crawlers want to recheck the content.
Yes, robots.txt rules impact your Shopify store’s SEO because it can block duplicate pages, thin content, and other unnecessary pages from being crawled. When you save your site’s crawling budget, new and updated pages can be indexed quicker. This way, you’ll see changes in rankings faster.
