Shopify redirects can be an important part of your online store management strategy, especially if you’re changing out your stock frequently. You want to maintain your website authority and backlink profile, so you want to create Shopify redirects correctly.
This article will explain 301 redirects in Shopify. We will cover three methods to create Shopify redirects, analyze how they function as well as learn how to edit and delete them.
Get notified about broken links and manage redirects with the TinyIMG app
Install TinyIMG nowWhat is a URL redirect?
A URL redirect is a way of moving your visitors from one page (URL) to another. There are a few types of redirects, with 301 or permanent redirects being the most typical.
In Shopify, the only type of redirects it currently allows are 301 redirects. And having them properly set up is important not only for your customers but also for your Shopify store SEO.
Redirects also help your website keep the authority (and links) associated with the page you’re redirecting, which helps Google as well. A 301 redirect tells Google and other bots you’ve moved house, so eventually, the old URL falls out of Google’s index.
Creating Shopify redirects
There are a few different ways to create redirects in Shopify. Generally, though, Shopify makes creating a few redirects fairly easy. If you want to manage redirects in bulk, you may want a bit of help, whether through the import/export tool native to Shopify or through an app. It depends on the level of support you’re looking for.
We’ll go through adding redirects manually, uploading them in bulk, and using an app through Shopify.
Creating Shopify redirects manually
Use this guide to redirect one Shopify URL to another:
1. Go to Content > Menus.
2. Click on View URL Redirects. In mobile or smaller windows this may be a (...) menu.
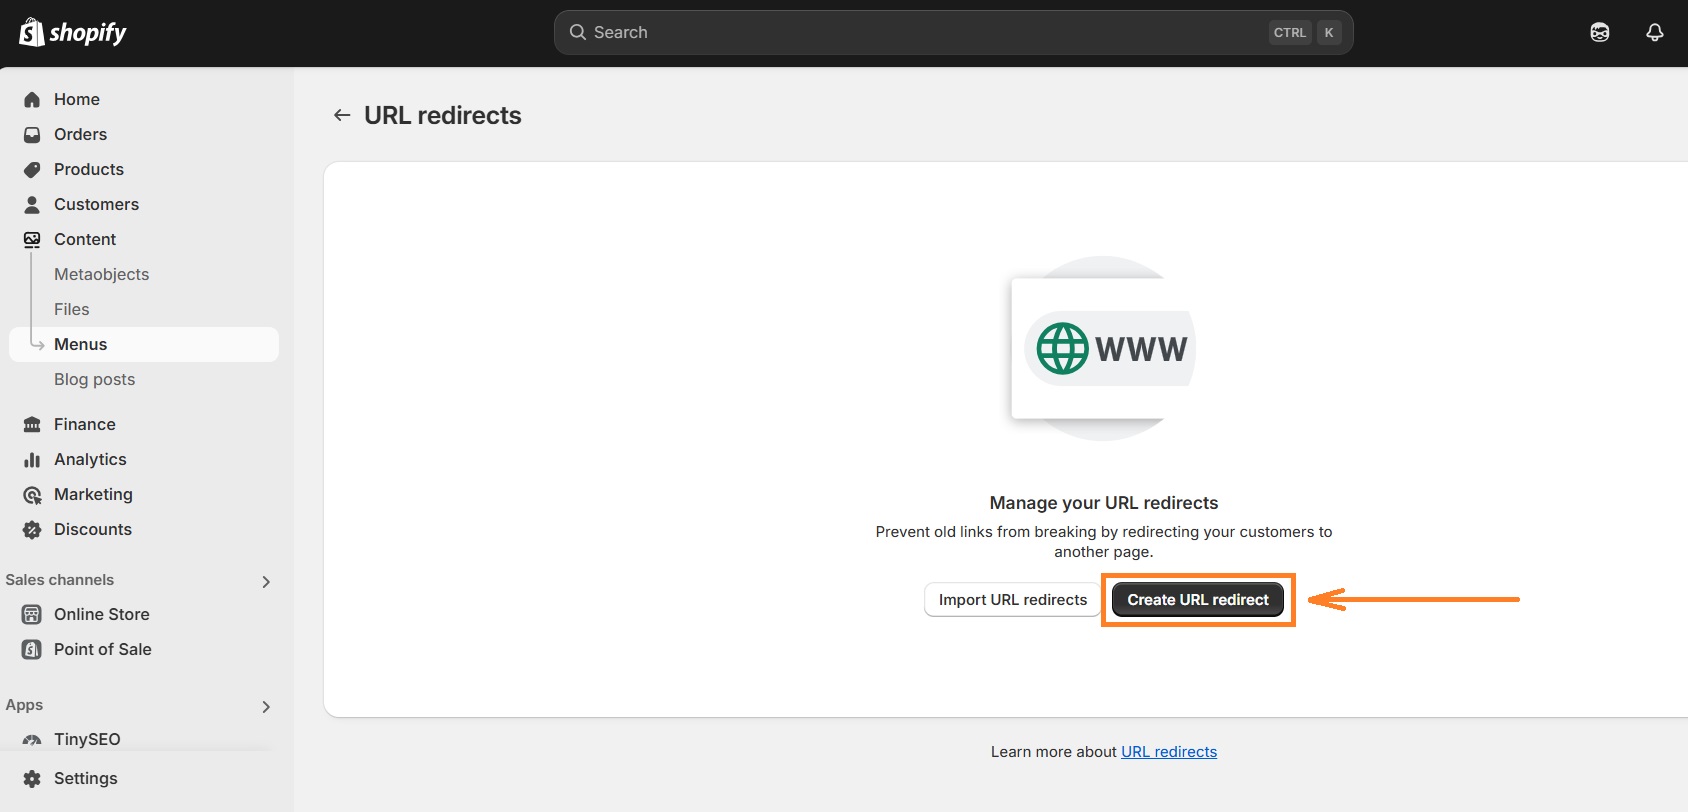
3. Click Create URL redirect
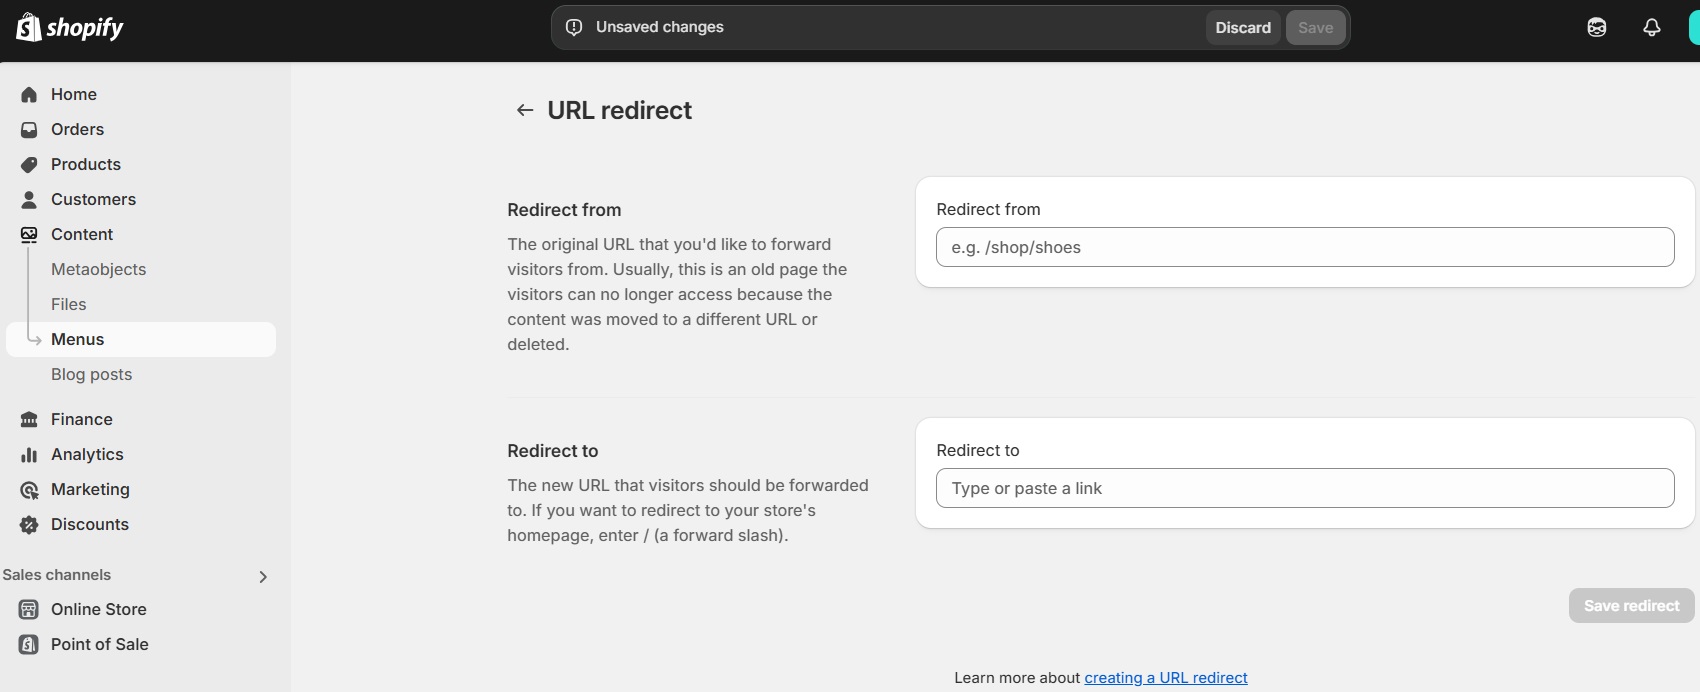
4. Update the screen according to the instructions. Include only the page path (/products) and not the full URL (https://www.examplesite.com/products) when the “redirect to” is on your own site. If the “redirect to” is outside of your Shopify site, you’ll want to use the full URL.
Within Shopify there are restrictions on what you can redirect. You can't redirect URLs that begin with the following prefixes: /apps, /application, /cart, /carts, /orders, /shop, or /services.
5. Once you’ve updated the two fields, Redirect from and Redirect to, click Save redirect.
6. Repeat this as many times as you need to manage your redirects.
Importing redirects list to Shopify
This is a great option to use for bulk redirects in Shopify
1. Download the Shopify redirects sample file. Follow the format in the file to list all of the redirects you want updated.
2. Get back to the URL redirects menu (Online Store > Navigation > View URL redirects).
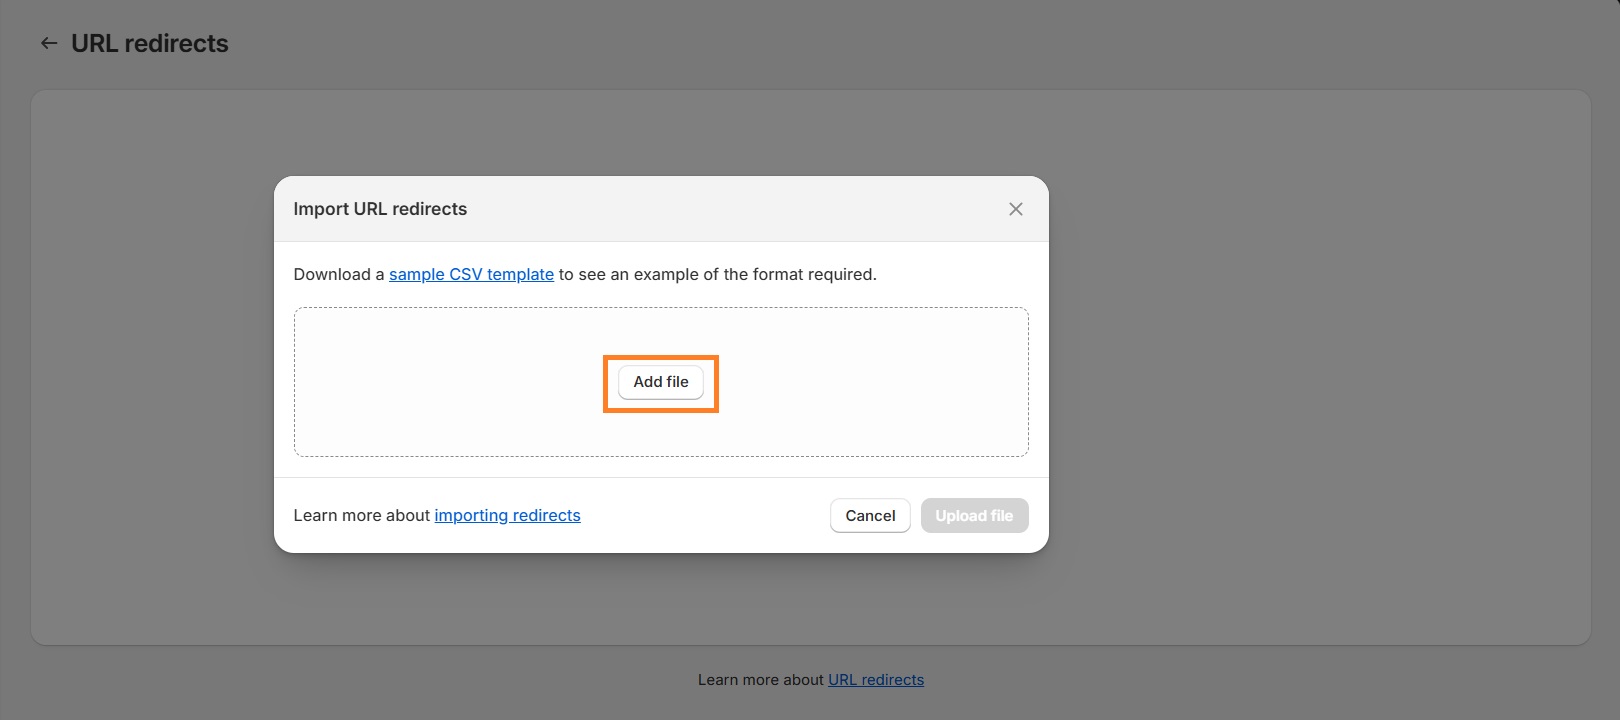
3. At the URL Redirects menu screen, click "Import URL redirects."
4. On the import redirects screen, click "Add file" and choose your import file.
5. Click Upload File.
6. When prompted, review the URL redirects on the Import Details screen:
7. Click Import redirects.
8. Press close.
Using a Shopify app to create redirects
If for whatever reason neither manually creating nor bulk importing 301 redirects works for your website, you can also download an app (like ours at TinyIMG) from the Shopify app store. Usually, apps make it easier to manage by having auto-detection systems or allowing you to do redirects on the fly from your browser bar rather than having to go within the Shopify system.
TinyIMG, for example, detects your broken links and displays them on a dashboard. Our tool also gives you an option to edit those links so you could redirect them to your preferred pages or delete them. There are also tips and tutorials available, as well as access to the TinyIMG support team.
Use one single app to find broken links, manage redirects, and optimize your Shopify store SEO
Try TinyIMG for freeDoes Shopify automatically create redirects?
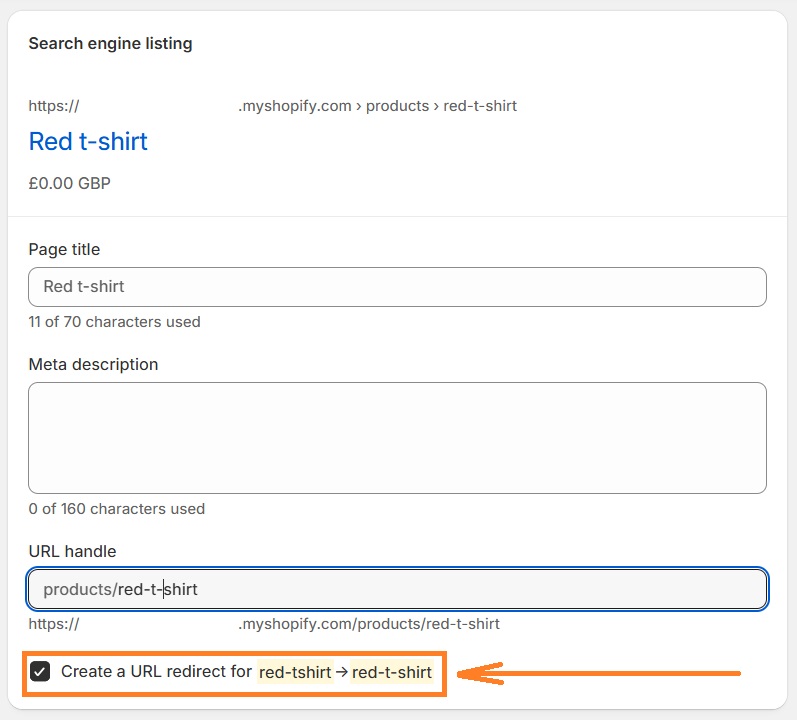
Yes, Shopify automatically creates URL redirects if you’re changing your product page or collection page URL handle and check the box next to “Create a URL redirect for”. After you click Save, your old URL will be redirected to the new one.
Other than that, Shopify will never create redirects from one page of the same domain to another without your command, even if a page is broken.
If you wish to create automatic redirects from broken URLs to avoid dead ends on your Shopify store, you can do that using an app like TinyIMG. It will scan your store for broken links and redirect them to your chosen URL, usually your homepage. You can also access and manually manage your redirects at any time.
How to manage redirects in Shopify
Once your redirects are in, that doesn’t mean they’re untouchable. You can do any number of things with your redirects, including filtering, deleting, exporting, and editing.
Remember any changes you make to existing redirect rules could take some time for Google to notice and catalog.
Edit Shopify redirects
To edit a redirect, go to the URL redirects menu, where you’ll see a list of all the URLs that are currently redirected.
If you want to change one, click on the line for the existing link redirect and update either or both the “to” and “from” URL fields and save.
Currently, the only way you’re able to bulk edit your redirects is if you export your existing redirect list, make changes and then re-upload. There was historically a way to bulk edit URLs within Shopify, but that option is no longer available.
Filter redirects on Shopify
You can easily filter redirects by what is in the URL, by using the search bar:
To save a filter, click Save filters.
Give the filter a name and click Save filters.
Once that is done, your saved filter will show up as a tab next to “All” in the URL redirects list on the home screen.
Delete Shopify store redirects
To delete redirects, select all redirects you wish to remove and click the popup box that appears at the bottom “Delete selected redirects”.
When do you need redirects in your Shopify store?
Redirects, particularly for eCommerce, can be critical to the business and maintaining your eCommerce shop’s visibility. More common scenarios include:
- When you remove a page — typically a product or category — from your site: if you’ve pulled a product or product line, it often makes sense to redirect it to the most related live product category.
- When a page is no longer up-to-date: this could be for a time-based offer you aren’t going to run again. If you’re going to run it again, it would make sense to use a 302 redirect or create placeholder content for the page, which would need to be done outside of Shopify.
- When you change the URL of a page: In Shopify, a 301 redirect happens by default in most cases, you’ll just want to check the box is ticked.
- When you change the domain of your store.
Basically, you want to implement 301 redirects on your website when you want to fix something that would otherwise interrupt the customer’s experience (a page with no content, an outdated offer, etc.).
What if the Shopify redirect is not working?
A number of things can break your Shopify redirects. This is how you troubleshoot Shopify redirects that aren’t working:
- Is everything spelled correctly?
- Are the to and from fields correct — not swapped?
- Is the page you’re redirecting from deleted (serving a 404 error)? You might also be able to revert your page to a draft if you want to keep the content of the page for your own reference.
You also want to make sure you aren’t cached — sometimes it can take time for 301 redirects to populate in Shopify. Try clearing your cache by going to your browser tools (in Chrome it’s under More tools) and clicking the option to clear browsing data.

Frequently asked questions
Redirects can affect SEO, yes. Usually positively. If you have a lot of broken links and 404 errors it can erode Google’s trust in your website, as well as your customers. So you want to make sure old pages, incorrect pages, products that are out of stock, and similar pages should all be redirected.
No, you can’t currently create temporary (also known as 302) redirects in Shopify. This means you want to think carefully before implementing any redirects in Shopify, as they’ll be permanent and not ones that you want to revert or change much, if you can help it, even though Shopify does give you that option.
You can set up geo-located domain redirection by following these redirection steps, though Google best practice generally doesn’t recommend auto-redirection. This is in part because Google will always be based in the US, so if you do auto-redirection, Google will only ever see one version of your website.
You can also change your primary domain through Shopify. So for example, if you want a custom domain rather than the shopify.com domain for your shop you’d need to go through that primary domain switch process. That being said, for domain-wide redirects, it’s still probably best to execute server-side redirects with the help of a backend developer.
Even though Shopify doesn’t specify this in their URL redirects page, it’s safe to assume that all redirects you create are 301. This type of redirect indicates that the old URL was moved permanently and passes its value to the new one.
You can delete Shopify redirects by going to the Content > Menus > URL redirects. Select URLs you wish to redirect and press Delete selected redirects. To see a visual walkthrough, scroll up to the section called “Delete Shopify store redirects”.


