Wix is a powerful website builder for eCommerce and blogging, but it comes with storage caps, limited inventory capacity, and only a few hundred apps. That’s why merchants with growing businesses are looking to switch to Shopify – an eCommerce platform that lets you focus on sales.
Shopify allows you to add unlimited products, gives you unlimited storage, and comes loaded with marketing, SEO, and AI-driven features. Plus, it has a more extensive third-party app library than Wix, with over 8,000 apps to extend your store’s functionality.
Read further to find out everything you need to know about Wix to Shopify migration and how to do it using both automatic or manual methods.

How to prepare for Wix to Shopify migration
When migrating from Wix to Shopify, you have to prepare with a few tasks, including setting up a Shopify website and backing up your Wix data. So, here’s a step-by-step guide on how to do both:
Step 1: Create a Shopify website
Before you start exporting your Wix store’s data, it’s best to set up a Shopify store first. This will ensure a faster migration process, especially if done manually. So, here are the main tasks you should take into account:
- Choose a Shopify plan that fits your store’s needs. You can claim the Shopify free 3-day trial and get 3 months for just $1/month.
- Head to the Shopify theme store and choose a free or premium theme that matches your brand vision.
- Set up shipping and tax rates for different regions. You can do that in your Shopify Account Settings under the “Shipping and delivery” or “Taxes and duties” sections.
- Set up Shopify Payments to ensure lower transaction rates or choose third-party payment gateways.
- Test the ordering process using the “(for testing) Bogus Gateway” on Shopify Payments to ensure everything works seamlessly.
- Transfer your domain to Shopify or get a new one. It’s important to remember that if you’re transferring your domain, manual migration requires setting up redirects on Shopify so your customers don’t get lost between broken pages.
Step 2: Back up your Wix store
When migrating your store to another platform, you must create a backup in case something happens. This helps prevent accidental data loss or human error. I highly recommend exporting different types of your store’s data and storing the files in a separate location.
Here’s how you can export each data category on Wix:
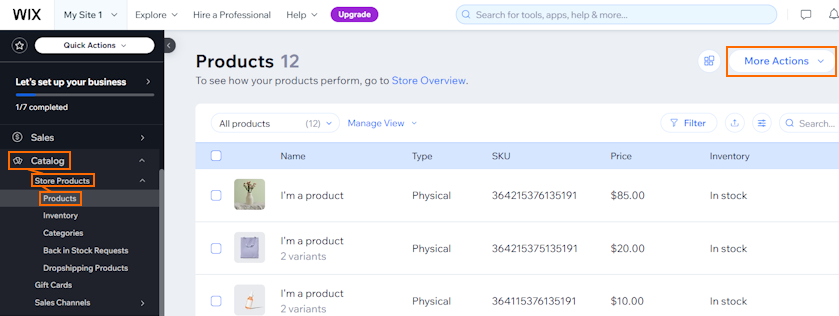
- Products: Go to Catalog > Store products > Products.
- Customer data: Head to Customers & Leads > Contacts > Import / Export > Export.
- Product reviews: no automatic method, only manual copy-pasting into a CSV document.
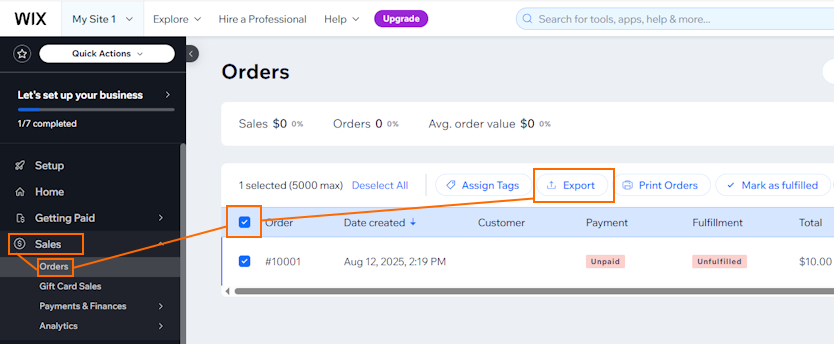
- Order history: Go to Sales > Orders > Export.
Wix to Shopify: migration methods
You can migrate from Wix to Shopify manually or automatically using multiple methods. Automatic migration costs more but takes less time and is less likely to leave errors behind, while manual migration is a budget-friendly solution. Let’s review the main migration methods:
| Method | How does it work? | Best for |
|---|---|---|
| Copy-paste method | Copying data from Wix and pasting it into your new Shopify store | Small stores with few products or customers |
| CSV file export and import | Exporting data to a CSV file from Wix, matching the data format, and importing it to Shopify | Medium-to-large businesses on a budget |
| Migration services | A tool, like LitExtension, automatically migrates your store based on your provided migration settings | eCommerce businesses who need fast and automatic migration |
| Migration expert | You can hire an expert, like a Shopify Partner, to migrate your site for you | Businesses that need a completely error-free migration |
My recommendation is to choose automatic migration services if your budget allows it. It’s less likely to leave errors and takes less time than manual CSV data file migration. But if you don’t want to spend money, then CSV data file migration is the way to go.
How to migrate Wix to Shopify (manually)
Migrating from Wix to Shopify manually is easy to do even for those without technical knowledge, but only if you know the steps. You can’t just export data from one platform and import it to another – you’ll also need to match the data format to Shopify’s.
Let’s review the full process on how to migrate Wix to Shopify manually:
Step 1: Export product data from Wix
Products are the core of an eCommerce website, so it’s the first thing you should migrate to Shopify. This can be done by first exporting the data from Wix. Here’s how:
- Open your Wix account. Go to Catalog > Store products > Products.
- Go to More actions and click Export.
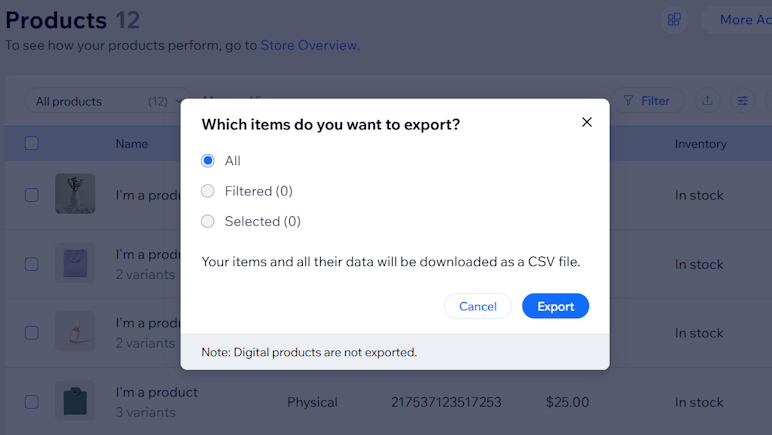
- A dialog box will open – pick whether you want all or selected products to be exported. Press Export.
- Create a name for your CSV file, like “wix-products.csv,” and save the file to your computer.
Step 2: Edit product data format to match Shopify
When migrating from one eCommerce platform to another, the data type names often don’t match. The same goes for Wix and Shopify. So, if you try to upload your exported CSV file straight to Shopify, the migration won’t be successful, as Shopify won’t be able to map out the data.
To ensure proper migration, you’ll need to match the Wix and Shopify data formats in your exported product CSV file.
Here’s a table that shows how to change Wix data types to Shopify data types:
| Wix data type | Shopify data type |
|---|---|
| handleID | Handle |
| name | Title |
| description | Body (HTML) |
| brand | Vendor |
| visible | Published |
| productOptionName1 | Option1 Name |
| productOptionDescription1 | Option1 Value |
| productOptionName2 | Option2 Name |
| productOptionDescription2 | Option2 Value |
| productOptionName3 | Option3 Name |
| productOptionDescription3 | Option3 Value |
| sku | Variant SKU |
| weight | Variant Grams |
| inventory | Variant Inventory Qty |
| price | Variant Price |
| cost | Cost per item |
If it makes it easier, you can download the Shopify CSV product template to understand what each data type represents.
Step 3: Import products into Shopify
After you edit your Wix store’s CSV product file, you can proceed with migrating it to Shopify. You can do it by following these steps:
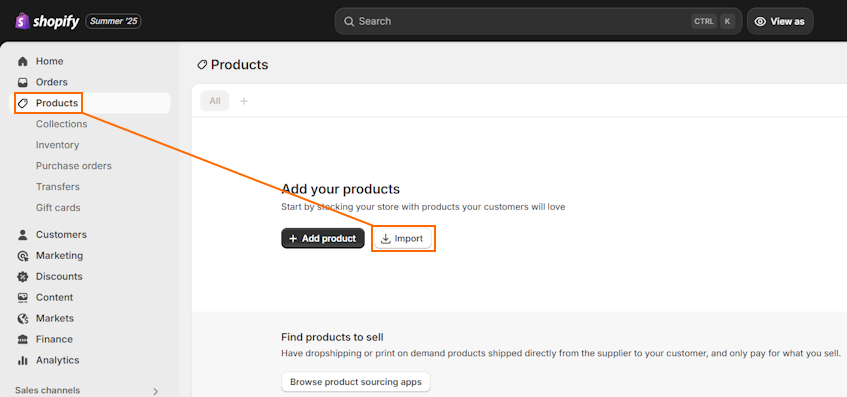
- Go to your Shopify Account, head to Products, and click Import.
- Press “Add file” and select the CSV product file that you’ve edited.
- If the “Publish new products to all sales channels” field is marked, deselect it. Then, click “Upload and preview.”
- Check if all information looks fine, then click “Import products.”
That’s it. You’ll receive a confirmation email from Shopify.
Step 4: Double-check migration results
After you import products to Shopify, go through the product pages to see if all the information was migrated correctly. Some of the common issues include:
- Missing details. If there are just a few product details that were left out, you can fill them in manually. But if all products are missing something, then you should review whether you edited the data format of the CSV file correctly.
- Product variants not imported. Double-check if your product variants were migrated. If not, you’ll have to insert them manually in the Products section of your Shopify Account.
- Not published products. If your products weren’t published, head to your Shopify Account > Products, open the unpublished product, edit the Publishing section, and save.
You should also consider creating product collections and organizing your products into them.
Step 5: Export customer data from Wix
If your store has customer accounts and information, you may want to migrate them to Shopify too. This way, your old customers don’t lose access to their accounts, ensuring a seamless experience.
Here’s how to export customer data from Wix:
- Open your Wix Account > Customers & Leads > Contacts.
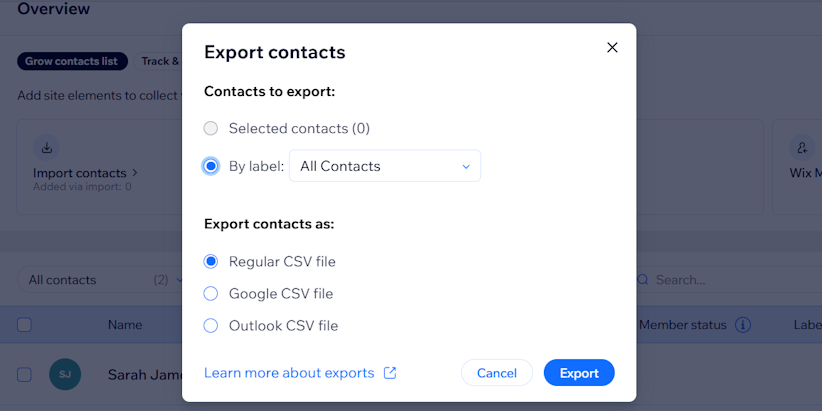
- By the customer data table, you’ll find the “Import / Export” button. Click it and press Export.
- Choose how you want to export your customers. You can select “All customers” by the “By label:” option and export as a Regular CSV file. Press Export.
- Choose the file name, like “wix-customer-data.csv,” and save it to your device.
Step 6: Change the customer data format
Like with product data, if you don’t first edit the customer data format in your Wix file, Shopify won’t recognize it, resulting in an unsuccessful migration. So, here are the data formats you should exchange Wix data types to:
| Wix data type | Shopify data type |
|---|---|
| First Name | First Name |
| Last Name | Last Name |
| Address | Default Address Address1 |
| City | Default Address City |
After you edit the data format, double-check that everything is correct and don’t forget to save the file.
Step 7: Import customers to Shopify
Now, it’s time to upload your edited CSV file to Shopify. Let’s review the steps on how to import customer data:
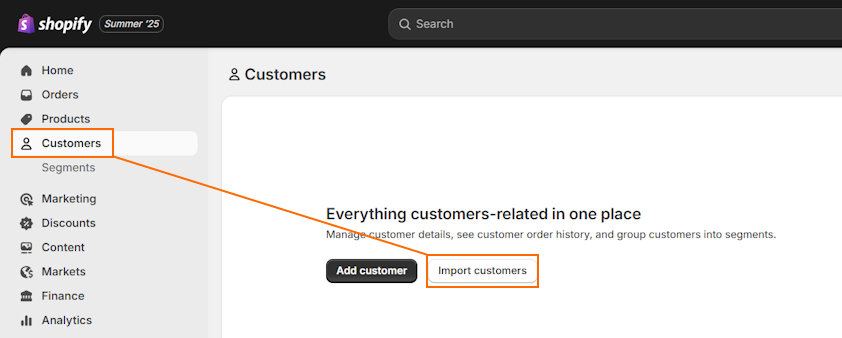
- Head to your Shopify Account > Customers and click Import.
- Click “Add file” and choose your customer CSV file.
- Once you add the file, click “Import customers,” review the data again, and press Import.
Step 8: Import your product reviews to Shopify
There’s no automatic way to import your product reviews to Shopify, so you’ll need to use a third-party reviews app. For example, I’d recommend Loox, considering it’s easy to use and gives you up to a 14-day free trial.
Here’s a simple process on how to import reviews using a Shopify reviews app:
- Choose a product review app – Loox was the most user-friendly for me.
- Click Install and follow the setup instructions.
- Open the app and click Reviews on the left sidebar. Then, press Import reviews.
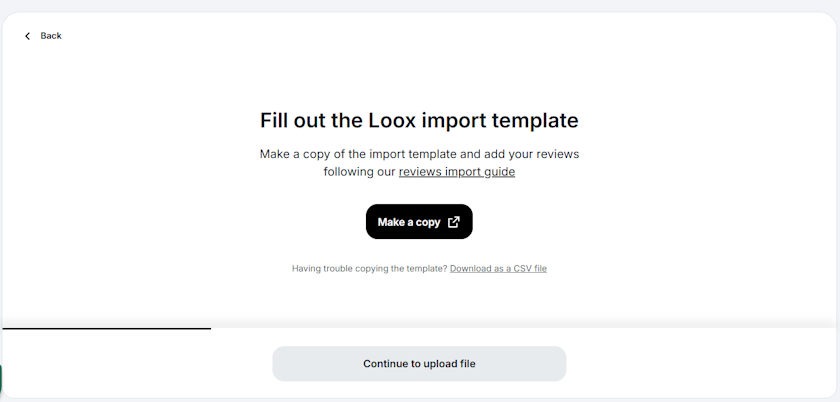
- Choose “Custom file” and download the CSV template.
- Now, get your product review data from Wix and upload it to the CSV template.
- Head back to the Loox app and press “Continue to upload file.”
- Drag-and-drop the filled CSV template.
Step 9: Move your order history to Shopify
To migrate your order history to Shopify, you’ll need to first export it from Wix. Although Shopify doesn’t have an option to import orders, you can use a third-party app to help you out.
Let’s review the full process on how to migrate orders:
- Export your Wix order history by going to Sales > Orders.
- Select the orders you want to export or all of them, and click Export.
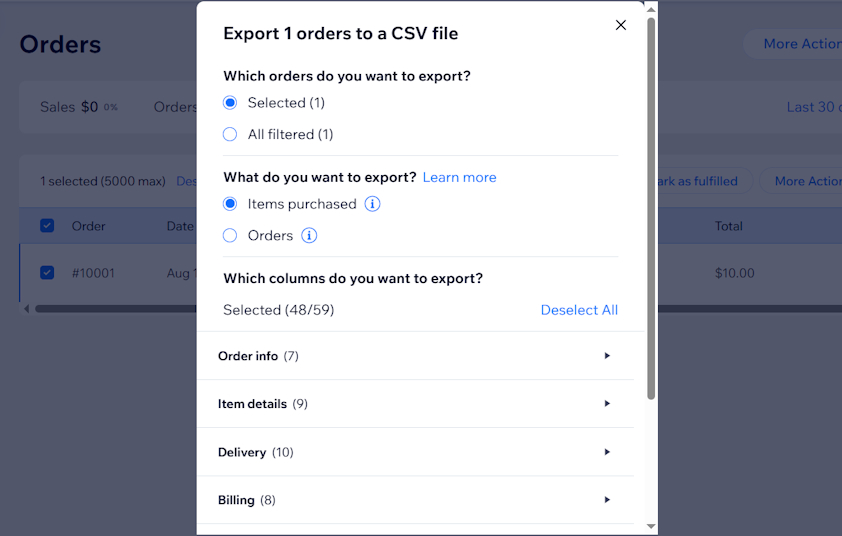
- Wix will allow you to choose what orders you want to export and the exact order data you want the file to contain. Once you pick the settings, click Export.
- Your CSV order history file will automatically be exported.
For importing orders into Shopify, you can use Shopify migration apps like LitExtension Store Migration. It lets you migrate up to 20 orders completely free, so it’s a good solution if you have a small store.
How to migrate from Wix to Shopify (automatically)
You can migrate your Wix to Shopify automatically using a migration service. It’s the best method to migrate your store if you have the budget because it’s less prone to error. Plus, you can save loads of time considering you don’t have to export or import files, change data formats, and so on.
My suggestion is to use the LitExtension migration package. It’s easy to use, doesn’t require much of your involvement, and gives you the freedom to customize what you want to migrate.
You can find the full process of how to automatically migrate from Wix to Shopify below:
- Sign up for LitExtension and log in to your account.
- Click “Create Migration” in the top menu bar.
- As “Source Cart Type,” select Wix. It will offer you a premium migration package. Press “Get the package now.”
- You’ll be taken to another page where you have to choose what to migrate and specify the product, customer, and order count. Then, click “Check Out.”
- After you buy the package, you’ll receive a technical consultation to understand your migration needs.
- Then, provide your source and target cart type information. Your source cart should be Wix, while your target cart should be Shopify. You’ll need to insert your Shopify store’s URL and API details, which LitExtension will guide you on how to find.
- You can run a demo migration for previewing or you can instantly go with the full migration.
Please note that you should disable Shopify plugins that automate tasks, like Shopify Flow, so your customers wouldn’t get unnecessary emails or notifications. Since LitExtension migrations are run on a server, you don’t need to leave the window open.
Final thoughts
Migrating from Wix to Shopify is the right choice for merchants who are expanding their business and want to have unlimited storage that can handle thousands of products. It comes with useful marketing features, thousands of highly-rated Shopify apps, and multichannel selling integration.
If you have the budget, the fastest way to migrate from Wix to Shopify is to use a migration service like LitExtension. It automatically migrates your store based on your settings and is less likely to leave mistakes behind. Meanwhile, if you want to save money, you can manually export Wix data, change the data format, and import it to Shopify.
Just remember to review the migration results a few times to ensure that you don’t leave anything behind and your customers don’t encounter broken pages.

Frequently asked questions
Yes, it’s worth switching from Wix to Shopify if you have a fast-growing business that requires a lot of storage. Shopify provides unlimited storage space on all plans, letting you add as many products as you want. Plus, you get useful marketing features and can start selling on multiple sales channels.
Yes, you can integrate Wix with Shopify using the Shopify Buy Button, which allows selling products from Wix by generating a checkout button. It lets you track sales through the Shopify Admin. To set it up, you have to log in to Shopify, generate an embed code, and paste it into Wix.
If you’re just starting out, Wix offers cheaper plans, starting from $17/month, while Shopify plan prices start from $29/month. However, if you’re a medium-to-large business, Shopify can be cheaper since it offers lower transaction rates and has unlimited storage and unlimited products on all plans.

