Running a BigCommerce website can limit merchant stores due to the lack of multiple sales channel support and limited theme selection. Naturally, some website owners are looking to switch to Shopify, which is known for its user-friendly page builder and extensive marketing features.
Shopify makes everything from design to order management and social media marketing simple. You can set up a store in just a few minutes and extend its functionality with thousands of third-party apps for SEO, advertising, and more.
In this guide, I’ll show you how to prepare and migrate your store from BigCommerce to Shopify using multiple methods.

How to prepare for BigCommerce to Shopify migration
Preparing for the BigCommerce to Shopify migration involves backing up your data and setting up a Shopify store. This ensures you can migrate faster and are less likely to experience data loss.
You can find the detailed steps on how to prepare your store below.
Step 1: Back up your BigCommerce store data
When you’re migrating your store to another platform, you first have to create backups just in case something gets messed up. To do this, you can export all of your BigCommerce store data in CSV format and store the files in a separate location.
For example, when you’re exporting your product data as a CSV file to import it to Shopify, make sure you create a copy of this file and store it separately. This way, if errors occur while changing the data format, you still have the original data files.
Step 2: Set up a Shopify store
Whether you’ll migrate your store manually or automatically, you’ll first need to create a Shopify store.
You can leverage Shopify’s 3-day free trial. After the three days, you can pick any of the standard monthly plans to get 3 months for just $1/month. Here’s everything you need to do to prepare for migration:
- Pick a Shopify plan depending on your business and resource needs.
- Choose a free or premium layout from the Shopify theme store. Remember to take into consideration not only the designs but also the features.
- Set up shipping rates and tax information in Shopify Settings.
- Configure Shopify Payments or other payment gateways (I suggest enabling Shopify Payments for lower transaction fees).
- Place a test order to ensure everything works seamlessly (you can use the “(for testing) Bogus Gateway” on Shopify Payments).
- Transfer your domain to Shopify or get a new one.
Ways to migrate your BigCommerce store to Shopify
There are multiple methods you can follow to migrate from BigCommerce to Shopify. However, the best way depends on your budget and how many products, customers, orders, and other data you have. Let’s review the different methods and when to use which:
- Manual CSV file migration. You can export your BigCommerce store data and import it to Shopify. However, it requires matching the data format so the import would be successful. You’ll need to spare some time for this method and a good eye for detail to ensure you don’t leave errors.
- The copy-paste method. If you don’t have a lot of data on your BigCommerce store, you can manually copy and paste all the data into Shopify.
- Automatic migration app. Migration apps like LitExtension or Matrixify cost money, but they make migration much faster. Plus, you’re less likely to make errors.
- Hiring a migration expert. If you’re not confident with migration and want it to be done by a professional, you can hire a migration specialist or explore Shopify Partners.
How to migrate BigCommerce to Shopify manually
Migrating your store from BigCommerce to Shopify manually takes both time and attention to detail. You can migrate products and customers by exporting the data from one platform and importing it to another. However, migrating orders or product reviews to Shopify will require third-party apps.
Let’s review the detailed instructions on how to move each data category to Shopify.
Step 1: Export BigCommerce product data
The first step is to move your product data, which requires exporting it from BigCommerce. You can do it following the tutorial below:
- Open your BigCommerce account.
- Go to Product > Export.
- Under the “Export Template and File Format” section, click Default > Continue.
- Click “Export my Products to a CSV file” and Close.
Step 2: Update product data format to match Shopify
The product data format in Shopify is different from BigCommerce. For Shopify to be able to read the BigCommerce CSV file and import your products correctly, you’ll need to make sure it matches.
You can simply open your product CSV file and the Shopify product CSV template and exchange the values accordingly.
Step 3: Import the product CSV file to Shopify
When our product data format is per Shopify’s instructions, you can start importing it. You can see how to import product data below:
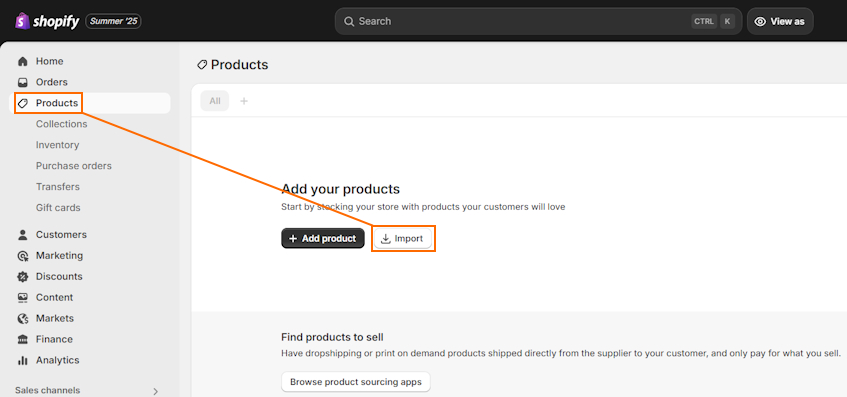
- Open your Shopify account.
- Go to Products > Import.
- Upload the CSV file and deselect “Publish new products to all sales channels.”
- Click Import products after you review the information.
You don’t need to wait for the migration process to complete – Shopify will send you an email.
Step 4: Export your BigCommerce customer data
When you’re migrating your store to another platform, it’s important that you take your customer information and accounts with you. It’s important for both your business operations and legal compliance. Here’s how to do it:
- Open BigCommerce and head to Customers > Export.
- Choose Default under the “Export Template and File Format” section. Press Continue.
- After a dialog box opens, press “Export my customers to a CSV file.”
Step 5: Edit customer data format for Shopify
Just like with product data, you need to edit your customer data format so that it imports correctly into Shopify.
To match the formats, you need to use the Shopify customer CSV file template and add it to the BigCommerce CSV file accordingly.
Here are the Shopify customer data types:
| Shopify data type |
| First Name |
| Last Name |
| Default Address Company |
| Default Address Address1 |
| Default Address Address2 |
| Default Address City |
| Default Address Province Code |
| Default Address Country Code |
| Default Address Zip |
| Phone |
Step 6: Import customers into Shopify
When your customer CSV file is ready for import, here’s what to do:
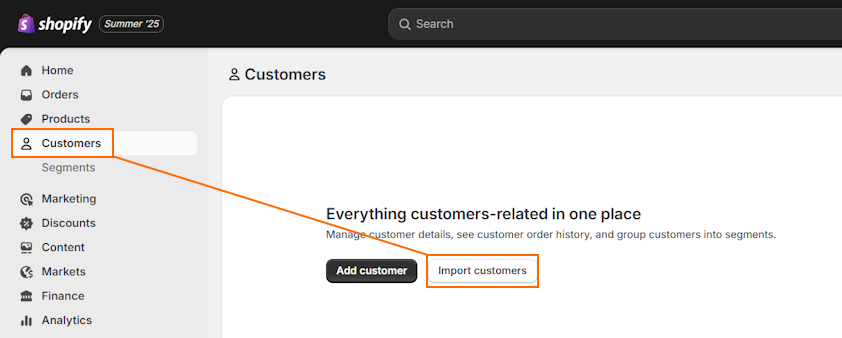
- Go to your Shopify account.
- Head to Customers > Import customers.
- Press Add file and insert the customer data CSV file.
- Now, click Import customers, double-check the data, and press Import customers again.
Step 7: Move your orders and history data
To move your orders to Shopify, you’ll need to export them from BigCommerce. Here’s how:
- Open BigCommerce and head to Orders > Export.
- Select Default under the “Export Template and File Format” section and press Continue.
- Click Export my orders to a CSV file.
The tricky part is that Shopify doesn’t provide a built-in option to import order history, so you’ll need to use a third-party app. For example, the LitExtension app offers 20 orders for free, while Matrixify offers 10 free order migrations. Check whichever app offers better pricing based on how many orders you have.
Step 8: Migrate customer reviews to Shopify
If you want to migrate your customer reviews from BigCommerce to Shopify, you’ll need a third-party app on both platforms. Although the process isn’t complicated, you need to understand what to do step by step:
- On BigCommerce: install the Product Review Importer & Exporter app.
- Export the reviews per instructions.
- On Shopify: install and set up the review app of your choice, such as Loox.
- Open the review app and go to Reviews > Import reviews.
- Select Custom file and download the CSV template.
- Make sure the data format of the product review CSV file you exported from BigCommerce matches the Shopify review app’s template.
- Drag-and-drop the updated CSV file with your product reviews.
Step 9: Set up redirects to preserve SEO rankings
If your BigCommerce and Shopify URL structures are different, you’ll need to set up redirects for such pages. This helps ensure that your customers can locate the new pages and you preserve search engine rankings.
Here’s a quick guide on how to do it:
- Open Shopify, go to Content > Menus > URL redirects.
- Click “Create URL redirect” and add both the original and new URL. Click Save.
How to migrate BigCommerce to Shopify automatically
Migrating your store from BigCommerce to Shopify is much faster when using a migration app like LitExtension. The cost depends on how much data you have to migrate, but it also limits the chances of errors. If you have fewer than 100 products, LitExtension will migrate your store for free.
I’d recommend signing up for the LitExtension service, setting up your source cart and target cart, and selecting what you want to migrate. This process will show you the final migration price, and you can decide if it’s in your budget. Let’s review the step-by-step process on how to do it below.
Step 1: Set up source and target carts
After you’ve signed up to LitExtension, you can start creating a new migration process. Let’s review how to set up the source cart and target cart:
- Log in to LitExtension and click “Create Migration” in the top menu.
- Choose “BigCommerce” in the Source Cart type section. Insert your website’s URL.
- If you’re not sure where to find your API details, you can click the video guide under the source cart setup section. Insert them in the dedicated fields.
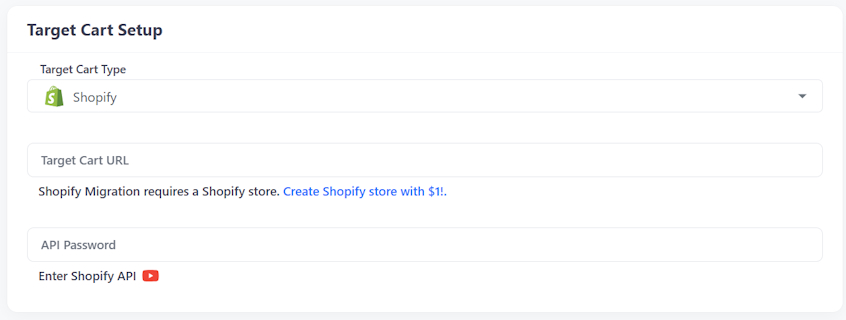
- Next, select Shopify as your Target Cart Type and insert the website URL.
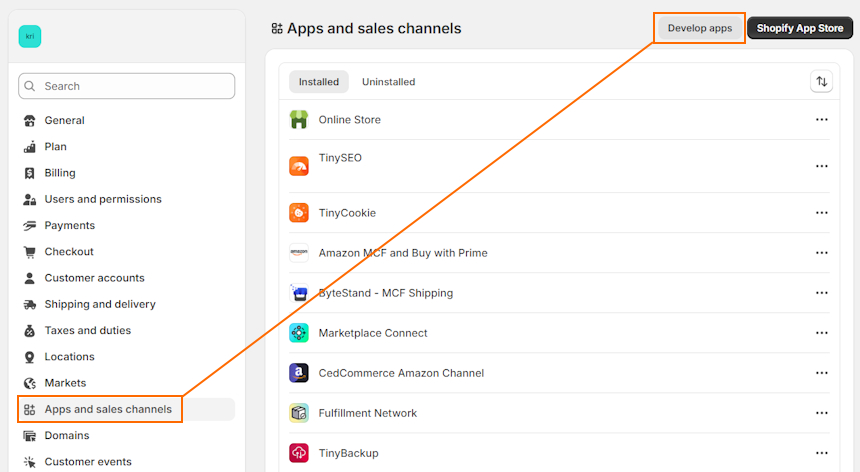
- Add the API Password. You can find it by going to your Shopify Settings > Apps and sales channels > Develop apps. After you allow custom app development and “Configure Admin API scopes,” you’ll need to save it and install the app. There, you’ll find the API credentials tab.
- After you insert all the necessary information in LitExtension, press “Next: Configure your Migration.”
Step 2: Choose what data you want to migrate
LitExtension lets you select the entities you want to migrate to your Shopify store. All you have to do is tick the boxes you want or press “Select All.”
Here’s what you can choose to migrate with the app: products, reviews, categories, taxes, manufacturers, customers, orders, and coupons.
Step 3: Initiate BigCommerce to Shopify migration
After you pick the data you want to move to another platform, you can either click “Next: Start Free Demo Migration” or select “Skip Demo Migration” and press “Next: Start Full Migration.”
LitExtension will show you an overview of all the entities it will migrate and the total price. Press “Next: Full Migration” to begin the migration process.
That’s all. You don’t have to keep the migration window open. LitExtension will send you an email when it’s completed.
Final thoughts
Switching from BigCommerce to Shopify is a great way to simplify website management, track site analytics, and build a professional site that converts.
The easiest way to migrate your store to Shopify is by using a migration app like LitExtension. It helps save you loads of time and reduces errors. However, if you’re on a budget, you can simply export your data from BigCommerce, match the data format to Shopify, and import it to your new store.
The most important thing to remember is that you always have to review your data post-migration. Don’t forget to properly set up URL redirects so that you don’t lose search engine rankings and can ensure a seamless user experience.

Frequently asked questions
You can move from BigCommerce to Shopify using multiple methods. For example, you can use a migration service like LitExtension, which will automatically migrate your store based on your settings. Alternatively, you can migrate the site yourself by exporting data as CSV files and importing them to Shopify using the correct data format.
Both Shopify and BigCommerce are popular eCommerce website builders that are good for different merchant needs. Shopify is the better option for beginners who prioritize ease of use and multiple sales channels. Meanwhile, BigCommerce is a good option for website owners with more complex needs.
Both Shopify and BigCommerce have their strengths and weaknesses, but Shopify is generally the more suggested option. This is especially true for beginner merchants and small teams that want to focus on conversions. BigCommerce is tailored towards larger businesses with custom needs.

