Building a Shopify website is a convenient way to grow your business, especially if you want to sell products online. A professional website gives your company an online presence that helps generate new customers and drive more sales.
The Shopify website builder makes site creation fast, simple, and accessible for all, even complete beginners with no experience. It comes with business tools for product management, inventory, and marketing features, and manages hosting for you.
Follow my article to get a detailed explanation on how to build a Shopify website. You’ll learn the main requirements to create a functional store that’s ready to accelerate your business.
How to create a Shopify website in 9 steps
Anyone can create a Shopify website, no matter if you’re a beginner or an experienced user. It’s simple if you know where to start. So, here are the main steps to take:
- Define your website’s purpose
- Pick a Shopify plan
- Purchase a custom domain
- Choose a layout
- Add the most important pages
- Set up payment methods
- Leverage business tools
- Test your website and publish
Now, let’s get into each step in detail so you understand how to build a functional website that helps meet your business goals.
Step 1: Define your website’s purpose
The very first step when building a Shopify website is understanding your business goals. Think of the purposes your website is going to serve. Here are a few questions you should answer:
- What am I selling – physical items, digital products, or services?
- Who is my target audience?
- What do I want to achieve (higher traffic, more sales…)?
- Will I sell locally or internationally?
Once you have a clear vision of your goals, you can start planning how you’ll achieve them using Shopify.
Step 2: Pick a Shopify plan
Once you have a clear vision of what kind of Shopify website you want to create, you can start looking through Shopify pricing and picking a plan. When you’re just starting out, standard plans can be a budget-friendly solution. Here’s a comparison of the main tiers:
The most suitable plan for your website depends on your business size and needs. Here’s what each of them is best for:
- Basic ($29/month) – small businesses just starting out
- Grow ($79/month) – organizations with multiple team members
- Advanced ($299/month) – medium-to-large businesses that want to sell internationally
- Plus ($2,300/month) – enterprises with custom needs
While prices are annual, you don’t have to commit instantly. You can leverage Shopify’s free trial followed by a promotional offer – a 3-month subscription for just $1/month.

Step 3: Purchase a custom domain
A domain is a label that represents a website’s address, like facebook.com, to make it easy to find compared to a numerical IP address.
When you purchase a Shopify plan, you automatically get assigned a myshopify.com URL with your store’s name. However, companies purchase a custom domain to make their brand appear more professional.
You can purchase a domain from the Shopify domain registrar or look for a third-party domain provider. Here are the main things to note when choosing a domain:
- Keep it simple – avoid numbers, complex words, or special characters.
- Make it relevant – companies usually choose their store name or its variation as a domain name to keep it memorable.
- Choose a TLD (top-level domain), like .com, .edu, .net, and similar.
- Consider country code top-level domains (ccTLDs) – if you’re selling internationally, consider TLDs of countries you’re selling in, such as .co.uk, .in, or .nl.
- Check for trademark – review official trademark databases to ensure the name isn’t similar to other existing brands.
Step 4: Choose a layout
When you purchase a Shopify plan, the free Dawn theme is installed by default. However, you can browse the Shopify theme store to find a better theme for your needs.
Currently, the Shopify website builder has 240+ premium and 20+ free themes for different industries. They’re all optimized for security, top-tier performance, and mobile devices.
Picking a theme goes beyond finding a pretty design. Colors, fonts, and their sizes can all be changed, but there are specific functionalities that may be lacking even in the visually appealing options. So, here’s what you should know when choosing a theme:
- Features. Look through the theme descriptions to see what features each theme comes with. Depending on whether you’re looking to write a blog, optimize conversions, or prioritize visual storytelling, you’ll need different functionalities.
- Layout options. The best Shopify themes come with multiple layout choices. Prioritize such themes to ensure higher design flexibility.
- Test before buying. The best way to find out if the theme is for you is to test it out. You can download even the paid themes for free – you’ll only have to pay if you decide to publish.
Step 5: Add the most important pages
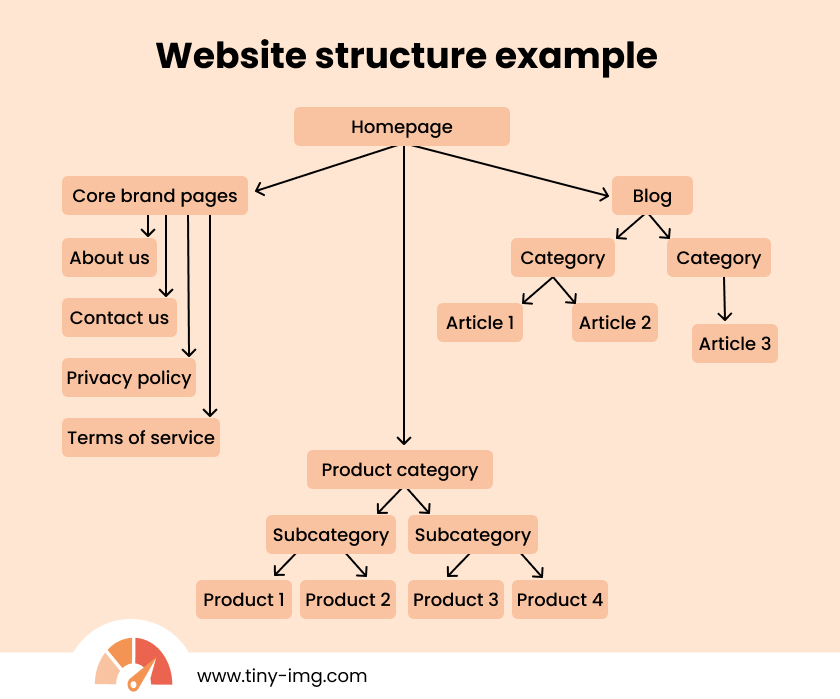
Depending on your website type, you’ll need to add the most important pages. For example, if you’re running a dropshipping store, you’ll need to create product categories and product pages. You can see an example of an eCommerce store website structure below.
However, your website structure will also depend on the items or services you sell and whether you want to run a blog or not. So, here are the main pages that most or all websites should have:
- Homepage. This is the first page of your website that gives visitors the main idea of what your website is about.
- Category pages. If you’re running a store, you’ll need to create category pages which will lead customers to subcategory or product pages. For example, a “leggings” category could contain subcategory pages like “high-waisted leggings” or “leggings with pockets.”
- Product pages. Create separate product pages for all of the items or services you’re selling. Product pages usually contain descriptions of the item, variants, images, and customer reviews.
- About us page. This page is used to describe your brand and why it exists. You can include contact information or links to your social media accounts.
- FAQ page. To save time for both your customers and customer service team, create a page for frequently asked questions.
- Legal document pages. Create pages for different policies, such as a privacy policy, shipping and returns, and terms of service.
Step 6: Set up payment methods
Setting up convenient payment methods on your Shopify website is crucial to make more sales. The payment process should be fast and seamless. You can set up gateways on Shopify by going to Settings > Payments.
There are a few methods you can use to set up payment methods:
- Shopify Payments. You can activate Shopify Payments, which is a built-in payment gateway that allows accepting credit cards and other payment methods through your store. It offers unified reporting, but please note that it’s only available in select Shopify Payments countries.
- Third-party gateways. If Shopify Payments isn’t available, you can also set up third-party gateways, like PayPal or Stripe. This way, you can get more features based on your specific needs.
- Manual payment methods. The Shopify website builder allows setting up bank deposits, money orders, Cash on Delivery (COD), or even custom payment methods.
 Tip:I recommend setting up Shopify Payments if possible because it comes with 0% transaction fees, helping you save money.
Step 7: Leverage Shopify apps
While the Shopify website builder has many features built in, you can extend the list of functionalities using the best Shopify apps. There are over 8,000 apps on the Shopify App Store created for different purposes, including:
- Email marketing
- Social media ads
- Dropshipping
- Live chat
- Order management
- SEO and speed optimization (such as TinyIMG)
- Cookie law compliance
What you need ultimately depends on your website’s needs. You can find both free and premium add-ons for improving your customer experience or achieving business goals.
Step 8: Test your website and publish
Before publishing a website, it’s best to meticulously review it again. This way, you can ensure that you leave no crucial errors. The best way to test it is to try mimicking what a user would browse.
For example, try finding a product from your homepage, choosing a specific product variant, and adding it to the shopping cart.
It’s also useful to check if ordering products on your website works as intended by placing an order test. For this, you can go to Shopify Settings > Payments and set up the “(for testing) Bogus Gateway.”
To learn more, read the full process on how to place a Shopify test order.
Next steps after launching your Shopify website
Once you publish your website, it’s time to start implementing techniques to gain traffic, sales, or meet other business goals. Here are the next steps to take:
- Set up and track analytics. Shopify provides you with some reports that you can view from your Admin panel, like orders and returns, gross profit, and more. However, for more extensive analytics of conversion rates and user behavior, it’s useful to integrate tools like Google Analytics.
- Run marketing campaigns. Think of what kind of marketing strategies you want to integrate. You can plan email campaigns, paid ads, social media promotions, and more.
- Enable other sales channels. If you’re also selling on Amazon, TikTok, or other platforms, Shopify offers tools that let you sell directly on other marketplaces through Shopify.
- Prepare an SEO strategy. To attract organic traffic, you’ll have to prepare your website for SEO. Read my in-depth Shopify SEO optimization checklist to reach higher rankings.
- Keep content up to date. With time, your Shopify product or blog post information could become outdated. Regularly perform content review to ensure users get fresh information at all times.
- Gather customer reviews. Reviews are important so that potential customers can get rid of pain points. They help others understand what to expect from the product, helping drive more sales.
Why create a website with Shopify?
Building a website with Shopify is easy because it offers extensive features and is catered to both beginners and experienced users. Here are the main reasons you should create a website with Shopify:
- Coding-free. Shopify website builder has a drag-and-drop editor that doesn’t require technical skills. You get to choose from 260+ customizable, ready-to-use themes.
- eCommerce-focused. If you’re looking to create a website that sells, Shopify is the right option. All plans allow placing unlimited products, and you can also leverage multiple sales channels or use features for inventory tracking, abandoned cart recovery, and more.
- Scalable. You can find Shopify plans for both beginner users, startups, and large businesses. Even if you outgrow the standard plans, you can contact Shopify to get a custom one.
- Beginner-friendly. With Shopify, all you need to do is create and design a website. The platform takes care of hosting, SSL certificates, and security for you.
- Extensive app store. The Shopify App Store has over 8,000 third-party apps that can help you extend the platform’s functionality. That’s way more compared to many other website builders, like Wix (500+) or Weebly (300+).

Frequently asked questions
The cost of building a Shopify website ranges from free to $20,000+ depending on your needs. With a free Shopify trial and a free theme like Dawn, you can build a simple site, but you won’t be able to publish it until you purchase a Shopify plan. If you’re aiming to build a custom site, the price can range from $5,000 to $20,000 and more.
Shopify website builder is beginner-oriented and comes with a drag-and-drop editor that’s easy to use. While it’s not difficult, you may have to view some tutorials to get a hang of how it works.
Based on my research, I’d recommend Shopify for both beginners and experienced users. It has excellent features on top of an extensive app store. Meanwhile, Wix may be even easier to get a hang of for beginners, but it doesn’t offer as many advanced features for eCommerce as Shopify.
Yes, Shopify is easy to use for beginners. The admin panel offers simple navigation, and you also get an extensive help center and live chat for support. Additionally, the editor is drag and drop, meaning you can easily organize your site’s elements to your liking.
Yes, you can create a free website using the free Shopify trial. Just sign up for the 3-day trial and get the next 3 months for just $1/month.
Shopify gives your website a default myshopify.com URL. However, to appear more professional to your customers, you need to get a custom domain, like storename.com. You can get a custom domain through the Shopify domain registrar or look at other registrars.


